Cool Tools in the Kitchen
Kevin Kelly and Steven Leckart
Editor
Brian Jepson
Copyright © 2011 Kevin Kelly and Steven Leckart
2011-10-05 First release
O’Reilly books may be purchased for educational, business, or sales promotional use. Online editions are also available for most titles (http://my.safaribooksonline.com). For more information, contact our corporate/institutional sales department: (800) 998-9938 or [email protected].
While every precaution has been taken in the preparation of this book, the publisher and author assume no responsibility for errors or omissions, or for damages resulting from the use of the information contained herein.
Published by O’Reilly Media
Authors
This ebook was created by:
STEVEN LECKART, Editor
Steven edited Cool Tools from 2007-2009, and conceived, aggregated, and polished this kitchen-specific collection. A correspondent at Wired Magazine, Steven has also written for the New York Times, Men’s Health, and Men’s Journal, among other publications.
CAMILLE CLOUTIER, Managing Editor
Camille runs the Cool Tools website, posting items daily, maintaining software, measuring analytics, managing ads, and in general keeping the site alive. As Kevin Kelly’s personal librarian, she also oversees research, web production and ebook conversions for many of his publishing projects.
KEVIN KELLY, Publisher
Kevin founded Cool Tools and edited all reviews through 2006. He writes the occasional review, oversees the design and editorial direction of the website, and is working on a print book version of Cool Tools. A Senior Maverick at Wired Magazine, Kevin co-founded Wired in 1993, and served as its Executive Editor from its inception until 1999. From 1984-1990, he was the publisher/editor of the Whole Earth Review. He co-founded the ongoing Hackers Conference, and was involved with the launch of the WELL, a pioneering online service started in 1985. He is the author of New Rules for the New Economy, Out of Control and, most recently, What Technology Wants.
Contents


Preface
This is a curated collection of the best cool tools for the Kitchen. It is not intended as a shopping list or checklist. Consider this a jumping-off point for thinking and re-thinking about what’s possible in your kitchen. Some kitchens can certainly operate with fewer and/or different tools; some might require more. But everything we’ve included here is well worth knowing about.
Since 2003, our Cool Tools website has posted more than 2,000 reviews of stuff that is tried and true. Broadly defined, a Cool Tool can be any book, gadget, software, video, map, hardware, material, or website that has proven utility. The reviews here are not the kind of comparative reviews you’ll find in magazines and other websites, which give pros and cons for each item. Rather, our reviews are outright rave recommendations submitted by readers who swear by the items, telling you why you should use them as well. Think of this book as a very knowledgeable best friend recommending the coolest stuff in no uncertain terms.
For this ebook, we will introduce you to 81 of the best uncommon kitchen items you may not know about, but can depend on. Tell us if we have missed anything.
—Steven Leckart
December 2011
How to Use This

1. Hot Stuff


Pizza Conveyor Belt
Super Peel
So you’ve decided to make pizza at home. But you quickly discover there’s no substitute for a crust baked on brick or stone. No problem: You get a pizza stone! But then you find out that sliding a 12″ pizza from a peel onto a 14″ stone or wooden board is possible, but just not so easy. After multiple messes, overshoots and fold-overs, you retire the stone. 🙁

Now, suppose you had a peel with a built-in conveyor belt? The Super Peel is, as difficult as it is to picture, exactly that: A baking peel with a conveyor belt that lifts the delicate, sticky dough from a surface and transfers it onto a board for easy transport. This tool definitely prevents needless baking and pizza disasters.

Place the corner of the pizza onto the peel. Then, slowly retract the peel while pushing the board forward and—voilà!—the sticky dough simply slides on. To put it back on any surface or stone, simply lower the board until it touches and reverse the process.
Don’t get it? I didn’t either at first, but this short clip is worth thousands of words.
—J. P. Roosma
- Super Peel
- $37
- Available from Amazon
- Manufactured by EXO Products
Versatile Kitchen Timer/Thermometer
Polder Thermometer/Timer
The Polder timer/thermometer features a 43-inch cord running from the thermometer to the probe, which allows you to take active readings without opening the oven. I really like being able to adjust the cook time or reset the finish temperature on the fly. Plus, there’s a magnet on the back, so you can attach the thermometer to the side of the oven.

The Polder also allows you to preset a desired high/low temperature simultaneously. When either temperature is reached, the unit’s beeping alarm sounds. It’s helpful for remembering to check on liquids and meats. My 8-year-old son has even used ours to check the temperature outside: You can insert the metal probe underneath your window, and it’s quite accurate.
The timer, which counts up or down, is very handy for a range of other household uses, such as, “You have three minutes to pick up your room before I come in with a trash bag that’s headed for Goodwill!” Best of all, the thermometer is amazingly durable. We’ve had ours for at least four years and have dropped it many times.
Lastly, it can be set to display in Celsius or Fahrenheit, which proved to be a huge help when we spent some time living in Ireland. I had my American recipe books and was able to use the Polder thermometer to convert temperatures for a Celsius-based oven.
—Ginger Cooper
Apron with Pot-Holders
Royal VKB Oven Mitt Apron

We avoid clutter in our kitchen, so all towels, pot holders and oven mitts live in a drawer next to the stove. Accessible, but nowhere near as handy as this apron that literally puts two padded mitts at your side, right where you need ‘em, whenever you need ‘em. So simple, so elegant. The slits lessen your below-the-belt coverage, of course, but the convenience is a worthy trade.
Durable Steel Hands
Stainless-Steel Locking Tongs

As a former cook in four restaurants, I’ve found these simple tongs to be an indispensable utensil day in and day out. Stirring, cooking and tossing pasta, flipping steaks, and grabbing anything hot including pans. They become an extension of your hands. I continue to use them in my own kitchen. I often see a lot of inferior, cheap and just plain useless tongs included with BBQ sets. They are usually too long or poorly designed to be effective. Get these: Williams-Sonoma Stainless-Steel Locking Tongs, or a pair of OXO Stainless-Steel Locking Tongs.
—Alan Hachey
I learned how indispensable a decent pair of tongs can be around the campfire while working as a river and ocean kayak guide. We cooked as much of the meals as possible on a grill over the fire to conserve fuel on multi-day trips. I still cook this way whenever possible and use these OXO Stainless Steel Locking Tongs to not only move food around on the grill, but also to move hot coals or briquettes! These tongs lock closed for easy storage and have a “hook hole” for hanging up. The non-slip rubber grip has held up for years in the dishwasher. Available in 9-inch, 12-inch, and 16-inch models. For obvious reasons, I would suggest the 16-inch ones for outdoor cooking. Buy one of these for that unfortunate soul still using—gasp!—a fork at the barbecue.
—Lewis Duffy
Or:
- $11 for Williams-Sonoma’s Stainless-Steel Locking Tongs (12-inch)
- Available from Williams-Sonoma
DIY Dried Goods
Excalibur Food Dehydrator

I’ve been using this 9-tray dehydrator once or twice a week for the last three years to make dried fruit, veggies, jerky, dog treats, and dried bread crumbs. Other uses include re-crisping crackers, cookies, and chips, and thoroughly drying wet photographs and flowers.
Overall, this is truly the most flexible dehydrator I’ve found. The thermostat is adjustable (85–145°F), so you can customize your dehydrating. The removable trays allow you to experiment with sizes, quantities and varieties of foods sorted by temperature range. If you group shorter-term items by tray, you just remove those trays first, then keep the remaining items/trays inside a bit longer.
Other units heat unevenly from the bottom, require you to manually rotate trays, and—in the case of cheaper units—don’t let you control the temperature. Along with a thermostat, the Excalibur has a fan that distributes heat more evenly; it also features a timer, so it will automatically turn off at a desired time whether you’re around or not.
All of the dehydrators I’ve used generate noise (I now use my Ronco and Home Essentials models exclusively for making dog treats). Since the Excalibur isn’t quiet, I keep it in our craft room. It’s very easy to clean. I enjoy not throwing out spoiled food. We always have healthy snack alternatives for us and our grandkids—and they enjoy contributing to the process as much as they eating the rewards. Ever since we moved to a property with grapevines, they’ve helped us make copious amounts of raisins.
Tips:
To make fruit yogurt leathers or work with items high in moisture content, you’ll need ParaFlexx non-stick drying sheets. Excalibur provides a pretty good guide on how to work with different foods.
If you buy direct from the manufacturer, it may be slightly more expensive, but I understand they’ll guarantee the unit for 10 years; otherwise, you can purchase a 10-year extended warranty.
—Chris Lewis
- Excalibur Food Dehydrator
- $180 (9-tray model)
- Available from Amazon
- ParaFlexx Sheets (14″×14″)
- $16
- Available from Amazon
- Manufactured by Excalibur
Affordable Dehydrator
Nesco Food Dehydrator
The Nesco Food Dehydrator is a simple, affordable, and well-built tool for drying foods quickly and thoroughly. Though not an every-day-use item for most people, it becomes absolutely essential when it is needed.

I recently went on a weekend trip hunting for morels and returned with far more than I could eat. Luckily, this dehydrator made short work of the excess. The stackable trays easily fit 60 whole small morels and many of the larger ones which I’d cut in half. Altogether, I fit about three pounds of mushrooms in five trays.

Like the previously reviewed Excalibur Food Dehydrator, the Nesco model has a temperature control, fan, and heating unit. The Nesco’s heating unit is built into the top (cheaper models heat bottom-up) that sits atop the stack of trays and blows air through a central column allowing for better distribution and airflow throughout.
I used a temperature of 110°F when drying morels, and left them to dry over night for about 8 hours. Since any moisture can lead to a ruined batch, I made sure to let them dry out for a little longer than necessary. They were perfectly dried the next morning, and ready for storage in an airtight container.

While I have mainly used this model for mushrooms, the large trays and variable temperature dial (95–160°F) allows for a wide range of dried foods to be made. This particular model is also expandable to 12 trays if you need to dry a truly astonishing amount of food.
The Nesco, when compared with the Excalibur, has the benefit of being nearly $125 dollars cheaper combined with a smaller (though expandable) footprint, a relatively-quiet fan, and similarly adjustable temperature.
—Oliver Hulland
The Excalibur vs. the Nesco
I have experience with both the Excalibur and the more recently-reviewed Nesco, a smaller and less expensive dehydrator. The Excalibur is a superior product if you are a heavy user and tend to be drying large batches of produce at once. It has quite a bit more capacity due to the design (no center hole and square racks make a big difference). The horizontal airflow system does dry large batches more uniformly. Although you can add racks to the Nesco, it dries less efficiently, and once you add in the cost of extra racks you are approaching the same price as the Excalibur.
Having said that, the price on the Nesco has really dropped and the top-down heater/blower is a nice upgrade over the older bottom-fan models. Heck, you could almost get three of them for the same price as an Excalibur, although that would take up a lot of storage space and use more energy to power 3 units.
—JC
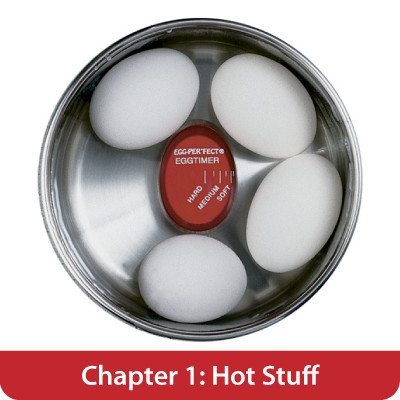
Perfect Egg Timer
Egg Timer

I love love boiled eggs. After several batches of edible, but less-than-perfect eggs, I was reminded of a nifty gadget my mom used to keep around. This little chunk of lucite reacts to heat the way eggs do, allowing you to cook a perfect hard-, medium- or soft-boiled egg.

It works great, whether you subscribe to the “boil then add the eggs” method or if you prefer adding the eggs, then bringing the water to a boil.
—Rene
- Egg Timer
- $5
- Available from Amazon
Even-Cooking Pans
All-Clad Roaster
In 2008, Williams-Sonoma released a line of exclusive All-Clad flared roasters. They are expensive, but well worth it if you use your oven a lot. The unique design makes for very even cooking, especially if you don’t have a convection oven. The lower sides give good heat exposure, so you get excellent browning on the underside of roasts. The aluminum core provides outstanding heat distribution.

Last year, I cooked a 27-pound Thanksgiving turkey in the extra large roaster, and I’ve since used this pan for all kinds of dishes. Since it’s basically a very large saute pan, it works great on the stove as well. I’ve used it to cook a huge portion of mac & cheese (mixing the roux/bechamel right into the pan on the stove). I also use it regularly for large batches of braised lamb shanks and short ribs. The roaster’s low and wide design encourages a lot of reduction of the braising liquid, which yields a more flavorful sauce.
Warning: The extra large size is unwieldy. Before buying, make sure it can fit in your oven and sink. Although the curved design makes it very easy to clean with a brush, this size barely squeezes into my sink. Though it’s a bit of a beast to handle, it’s nevertheless indispensable if you need the capacity.
If the large version also seems a bit much, there’s now an even smaller and cheaper version for roasting chickens. This has quickly become my standard everyday pan for most things. It also comes with a suspension arm for cooking a chicken elevated.
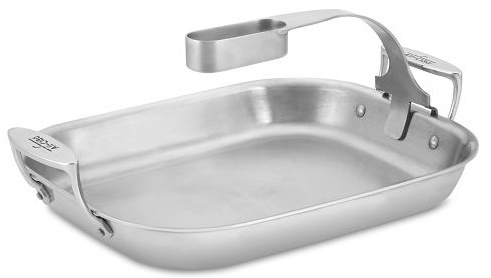
I’ve experimented a bit with the suspension arm. In my oven, which is not a convection oven, breast-side-up is a disaster. Not enough heat reaches the bottom, and the white meat gets overcooked while the thighs stay very undercooked. However, breast-side-down gives outstanding results. Time after time, I’ve gotten evenly-cooked, very tender and juicy meat with crispy skin. And here’s the best part...without adding oil or basting; just salt and pepper or a dry rub. Out of the box, the suspension arm was a little testy: If it’s jostled too much, the whole chicken will fall into the pan and it’s a bit of work to get it put back up. I was able to fix this by bending the prongs with a pair of pliers. Once adjusted, it yields good results.
Regardless of which size is right for you, these are great roasting pans. The images are pretty deceptive with respect to the size differences and just how big they actually are. It’s worth a trip to the store to see which size is best for you.
- All-Clad Stainless Steel Flared Roaster
- $280 (extra large: 18 3/4″ × 14 3/4″ × 3″ high)
- Available from Williams Sonoma
- All-Clad Ultimate Chicken Roaster
- $180 (14 1/2″ × 11 3/4″ × 2 1/2″ high)
- Available from Williams Sonoma
Reusable Non-Grease Baking Sheet
Silicone Baking Mat

For years professional have baked their goods on inert silicone-impregnated mats. These simple, inexpensive, oven-proof, non-stick sheets slide into baking trays and are now quite common in households like ours. Instead of consuming rolls of aluminum foil or parchment paper, you just lay everything out on these reusable durable mats, and bake. The nicely-browned goods slide off with no effort and no added grease. There’s less burn on the bottom, too. Multiple mats can feed one expensive baking tray for serious cookie production. Clean-up is a simple rinse. As an added bonus, they make great kneading boards. The mats also roll up for easy storage. We’ve used several of the five brands available. So far, they all seem similar. Silpat was the original, but SiliconeZone is the least expensive I’ve seen.
—KK
- SiliconeZone Standard Baking Mat
- $20 (11 × 16″)
- Available from Amazon
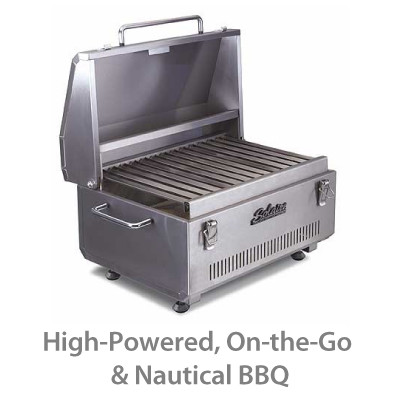
High-Powered, On-the-Go and Nautical BBQ
Solaire Anywhere Portable Infrared Grill
The Solaire Anywhere Portable Infrared Grill is a full-sized, no-compromises top-quality grill wrapped up in a super-portable package. It even comes with its own carrying bag, and—a very nice touch—has flip locks that hold the lid closed when stowed. This grill is small in size, but not cooking power; it puts out 14,000 BTUs, nearly twice what is typical for portable grills. The secret is that instead of conventional burners, it uses a ceramic infrared grid that heats in seconds (full-blast in less than three minutes), cooks in a flash, and cools down in about 15 minutes with no coals to dispose of. It uses 1-lb. propane bottles or a 20-lb. tank with optional adaptor. It can also be converted for use with natural gas.
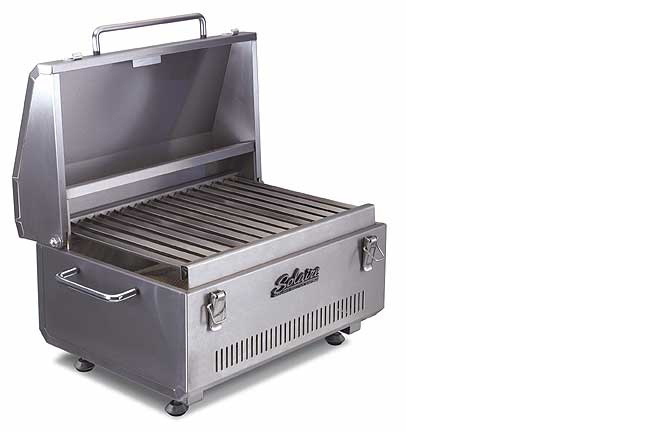
The grill’s surface area may seem small (155-sq. inches), but food cooks so fast, it will handle a meal for four without any trouble. The unit is super easy to clean: The burner self-cleans if you let it run on high for a few minutes after everything is off the grill—anything on the burner simply vaporizes. Both the grilling grate and burner easily lift out, allowing for easy wipe-down of the steel housing. Best of all, the Solaire is elegantly designed and ruggedly built for a lifetime of use. The basic unit is made from commercial-grade 304 stainless steel; there’s also a marine-grade version in 316 stainless.
Although I never take my grill anywhere beyond our patio, I wanted a high-performance grill that I could set up in an instant and hide away in a closet, as I hate the look of those big grills that take up deck space. Mine is 21″×12″× 3″, including the carrying handles, and weighs 20 lbs. with the carry bag. The Solaire fits the bill perfectly for me, but it is really designed for RV-ers, car-campers, tailgaters and boaters. It also has some nice accessories: Car-campers will like the collapsible tripod base, while boaters should check out the gimbaled deck rail clamp.
The only hitch is cost: At $285–$400 the Solaire is more expensive than other previously-reviewed portable grills. But as our parents told us, sometimes spending a bit extra on quality saves money (and grief) in the long term. Cost kept me from buying the Solaire three years ago. Instead, I purchased another brand name portable for $150. It was great at first, but hard to clean and started failing in the second season. I repaired it and donated it to a charity; and then bought the Solaire.
- Solaire Anywhere Portable Infrared Grill
- $350
- Manufactured by Rasmussen Iron Works, Inc.
- Available from Amazon
5-Minute Breakfast Sandwiches
Back to Basics Toaster & Egg Poacher

This toaster is the same price and size of a basic toaster (about 8″×7″×15″), but it does much more. It can poach one egg or boil up to four. It also boasts a tray for simultaneously warming meat or veggie sausage. The real selling point is just how convenient it is. I place a few tablespoons of water in the heating tray, spritz the poaching tray with non-stick spray, add water (a measuring cup is included), crack an egg, pop in the toast, and return in about 5 minutes when everything’s ready for quick assembly and consumption.

Clean-up is a breeze: Wiping out the trays only takes a minute, and there’s even a tray for crumbs. I never want to own another toaster.
—Tim Plumley
Classic Ceramic Smoker/BBQ
Big Green Egg
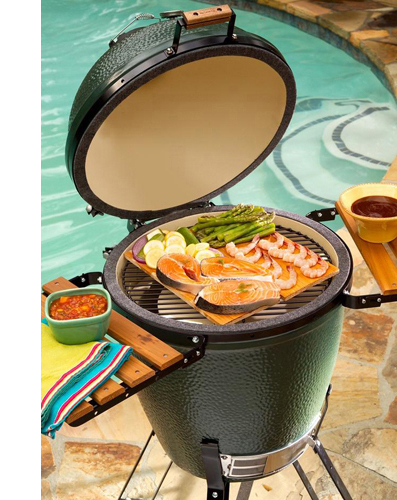
The Big Green Egg is an awesome-looking ceramic smoker with amazing heat retention. Modeled after the ceramic kamado pots used in Japan, the “BGE” has been around since the 70s, but has developed a rabid fan base in recent years (They call themselves “eggheads”). It’s easy to see why people love them. The BGE gets to temperature in 10 minutes, allows a bag of charcoal to last for 6 months, and can cook from 150-700°F. Thus, it enables proper smoking and grilling, where the flavor gets right into the meat.
The top and bottom halves feature a felt seal that’s virtually airtight; the only holes are a variable intake vent at the bottom front and a variable exhaust. With the combination of these vents you can vary and maintain the temperature to around 25 degrees of accuracy within that 150-700°F range. This keeps all the smoke and heat inside, while also limiting the amount of fuel burned. Like an oven, the ceramic doesn’t develop hot spots, so the cooking is completely even and food stays moist and juicy (We’ve had awesome pulled pork, ribs and steaks).

With the right accessory, you can also use the BGE as a clay oven for cooking pizza, tandoori and even pies. We have the XL BGE, which is massive enough for smoking 15 chickens at once! The smaller BGEs are cheaper, of course, though not cheap. Still, you can basically do everything on a BGE that you can on a regular grill. Our old bbq and BGE sit side-by-side on our back patio; these days, we only use the BGE.
—Matt Field
Note: A reader pointed out that the Big Green Egg Company has an odd policy regarding “internet retailers.” The manufacturer does NOT honor the warranty if you purchase online instead of ordering from an offline retailer. —SL
- Big Green Egg
- $630 (medium)
- Available from Home Village
- Some sizes and various accessories also available via Amazon
- Manufactured by Big Green Egg Company
2. Cutting
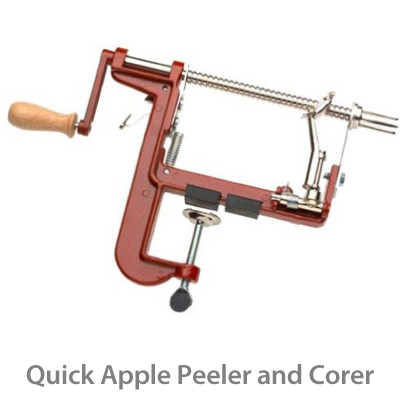


Quick Apple Peeler and Corer
Progressive Apple Peeler
My wife’s grandmother seems to effortlessly make dozens of wonderful apple pies. And yet, she has poor hand strength due to advanced rheumatoid arthritis. Finally, we convinced her to pass along the secret behind her pie-making success: She uses one machine to peel/slice/core her apples.

Simply poke the three prongs into the base of an apple and turn the crank. Before you know it, a lovely spiral of apple skin will unfurl before you, leaving a perfectly cored and peeled apple that can be quickly cut into quarters and thrown into a pie.
As soon as you see the device in action, it’s obvious just how elegant the mechanism is. It’s safe for children to use, once the apple is situated on the prongs. Best of all, it makes prepping apples so simple you’ll wish you had one years ago. There’s a version that clamps to a kitchen bench, but I find the models with a vacuum base are the same price and are far easier to set up and use.
—Steve Allen
- International Apple Peeler and Corer
- $20
- Available from Amazon
Precise Sharp Slicer for Kitchen
Microplane Grater
Microplane began making micro-blades for woodworking use, but they’ve diverged into making fantastic kitchen tools. Their kitchen graters will turn a little block of Parmigiano-Reggiano into a huge cloud of billowy cheese wisps. Vegetables grate into little strips that almost melt in your mouth. My favorite use is with citrus zest. My lemon bars, lemon tarts and key lime pie have a much greater depth of flavor than ever before.

With most zesters, you end up with too much of the pithy white rind of the citrus fruit, but the Microplane takes off only the very thinnest layer of the outside of the fruit, the part which contains the intense and volatile citrus oils.
Hands down, these are the best tools I’ve tried for fine-grating and zesting.
—Jeff Zimmerman
Warning: Get a model with a handle; they are SHARP.
- Microplane Grater/Zester
- $11
- Manufactured by Microplane
- Available from Amazon
Quick Fish Cleaner
Magic Fish Scaler

Sure, you can scale a fish with the back of your knife blade. I did for years—until I drove my thumb into the dorsal spike of a striped bass. After having surgery, I picked up this little device at the tackle shop. It offers more than self-defense. It’s just absolutely good at what it does, and costs less than ten bucks. Show it to your friends and make them guess what it’s for; they’ll be stumped. What would make you design a fish scaler with what looks like plastic hex-head bits loosely attached to the underside of a circular disc? It doesn’t make sense. But it works! It defends your thumb (thank you) and prevents scales from scattering all over and flying up into your face. Only a little pressure is needed, and the fish is completely clean in seconds.
—Jay Allison
- Magic Fish Scaler
- $11
- Available from Cabela’s
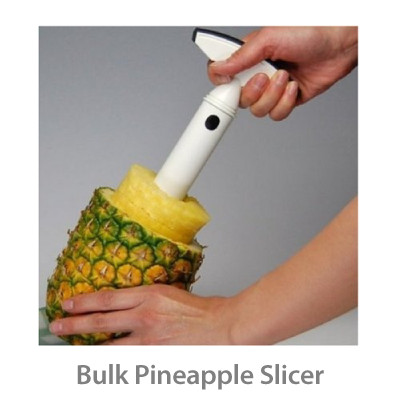
Bulk Pineapple Slicer
Pineapple Slicer/Corer

I’m not usually a big fan of single-use tools, but this is by far the only tool for this job. We had a party where I needed to core and slice three cases of pineapples, and what could have taken all day took but a few hours. No skill is needed. You just cut off the top of the pineapple and screw down the corer. Once you are at the bottom, pull out the meat and you’re done. The pineapple is evenly-sliced and you are left with a usable hull (for serving fruity drinks in, of course). I have seen these on sale for as little as $7.
—Walter Susong III
Healthy Snacking in 30 Seconds
OXO Apple Divider
I like apples but I’ve never been a fan of the form factor, which tends to be tough on the teeth and jaws. The OXO Apple Divider cores and chops in one fell swoop. Total prep time, including rinsing the apple beforehand: 30 seconds max, 20 if I’m in a hurry. Like other OXO products I’ve tried, the OXO Apple Divider is a well-designed, well-built version of a classic tool. The company’s included its trademark “good grips” and sharp blades.

I appreciate it every time I use, it because I’m a chocoholic with easy access during the day to cookies and hot chocolate. Bringing a plastic container filled with wholesome, fresh, organic apple chunks makes it easier for me to resist the lure of chocolate. Even if you don’t consume apples as frequently as I do, the OXO Apple Divider is one single-use tool that’s worth keeping around.
—Jonathan Steigman
We bought this and use it regularly on potatoes to make oven fries. Slice the potato, toss the pieces in olive oil and spices of your choice, and bake on a non-stick sheet for 20–30 minutes at 450°F, turning once. I didn’t even know this device was actually for apples until I saw it on Cool Tools!
—Julee Bode
- OXO Apple Divider
- $10
- Manufactured by and available from OXO International, LTD
- Available from Amazon
Reliable Fish Cutters
Dexter-Russell Fillet Knives
This filleting knife does not rust, does not dull easily, is easy to sharpen, and the handle is sanitary, comfortable, and good in cold conditions. Most importantly, the blade is flexible, thin and the shape is just right for filleting.
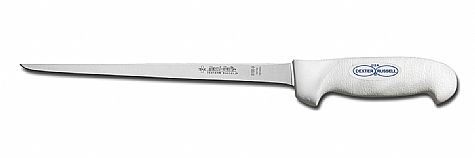
I’ve used mine for about eight years. It came razor-sharp from the factory and stays sharp for a good deal of time. These days, I usually sharpen it a little bit before every use. A couple laps on a 220-grit Japanese waterstone does the trick.
There are plenty of fancy fillet knives you can get. This one is not particularly expensive, and it’s the brand I see most commercial fishermen using. There’s also a plastic scabbard you can buy.

Dexter’s filleting knives come in a few varieties of size/length, etc. There’s the 9-inch narrow one, for instance. Personally, I find that one a bit bulky, so I use an 8-inch narrow.
—Michael Krakovskiy
- Dexter-Russell Fillet Knife
- (SofGrip 9″ narrow)
- $29
- Available from Amazon
Or:
- 8″ w/a sheath from Sportco
- Sometimes available in 8″ from Amazon
- Manufactured by Dexter-Russell
Affordable, Cut-Resistant Hand Protection
Whizard Handguard
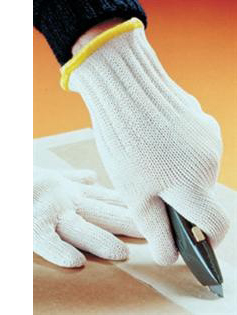
These Spectra/Kevlar gloves are used in the restaurant industry to defend against knife and mandolin cuts, as well as handling trash that may have protruding bits of glass and fish bones. I read about them in a cooking magazine, and bought one glove after cutting myself on a mandolin.
I find the glove allows for ample movement and dexterity. It’s definitely flexible enough to carve with and feels a lot like wearing a winter Thinsulate glove. These days, when I use the mandolin, I find I can get in closer for a few extra slices. Although the glove hits the blade, my hand’s always safe. My gloved hand has even survived an errant cleaver (Fortunately I didn’t hit myself not too hard).
I’ve used mine about five times a month for the past three years. I’ve washed it and haven’t noticed any deterioration, though it does feel a little stiffer at first. Bonus: The weave is much tighter than with a pricier chain mail glove, so it also seems better for guarding against knife pokes.
—Steve Golden
- $16 (per glove)
- Available from Magid Glove & Safety
- Manufactured by Wells Lamont Industry Group
Squash Disemboweling Drill Bit
Pumpkin Gutter
The Pumpkin Gutter is a drill bit that’s much much better at cleaning out a pumpkin than a spoon. We’ve used the device to clean out five large pumpkins in one night. It works very well. You can feel the device breaking up the stringy wall parts and other gut items (not sure about the proper anatomical terms for a pumpkin).
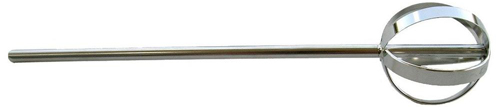
I’ve tried using a spoon and a spatula-like thing that came in another pumpkin carving kit. Not only was it very difficult, but it took the same time to finish one pumpkin as it takes the Pumpkin Gutter to complete five. Plus, that one pumpkin wasn’t as clean.
The Pumpkin Gutter removes chunks so quickly, you actually need to be careful while working the pumpkin.
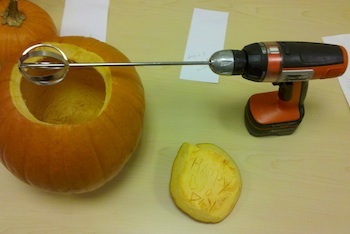
It’s longer than I expected, but not so long that it won’t fit it in my kitchen drawer. I don’t know exactly what I might use it for outside of pumpkins, but it seems perfect for any larger mixing project.
—Paul Knuth
- Pumpkin Gutter
- $10
- Available from Amazon
- Manufactured by Dakota Products
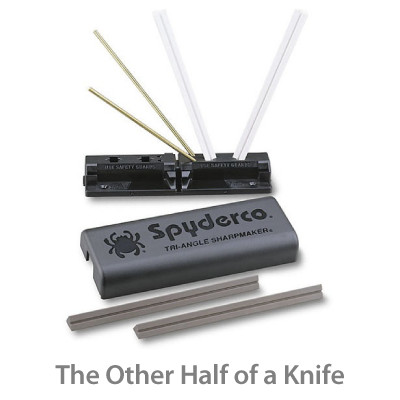
The Other Half of a Knife
Spyderco Sharpmaker

A knife without an edge is worthless, and most knives you find in pockets, sheaths, and kitchens are dull. Every edge you have, including an ax, should be able dry shave hair off your forearm and slice loose-held newsprint without catching.
The most effective sharpener I know is also the easiest to use—just carve straight down on the V of slender stones, a stroke on one side, a stroke on the other. The stones are triangular, so you can use either the flat side or the angle (which permits sharpening serrated blades such as bread knives). Spyderco has had the leading product for 20 years and now has a new improved “Sharpmaker” that looks pretty good.
- Spyderco Sharpmaker
- $54
- Available from Amazon
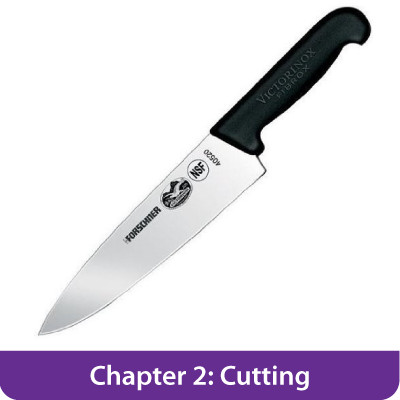
Inexpensive Great Chef Knife
Forschner Victorinox Chef’s Knife

A really great chef’s knife is insanely sharp, yet retains its edge easily and feels well-balanced and welcoming in your hand. These days, a decent high-grade chef’s knife can cost $100-$200. Several cooking publications, including Cook’s Illustrated, recently tested a bargain $30 chef’s knife that rated just about as good as the $100-plus knives. It’s the Victorinox Chef’s Knife; the one we use.
The Victorinox is a hybrid of a thin Japanese blade with a 15-degree edge (western knives have a 20-degree edge), but with the longer, broader blade of European knives. It is lightweight, nicely-balanced, and lethally-sharp. It has a comfortable, grippy handle that won’t slip even when wet. There are five cooks in our household. This is the knife they all grab first. It may not be quite as super great as some of the other previously-reviewed chef’s knives, but considering the price, it can’t be beat.
—KK
- Forschner Victorinox Chef’s Knife, 8 inch
- $29
- Available from Amazon
Superior Vegetable Peeler
OXO Peeler

It is hard to image how the traditional kitchen peeler could be substantially improved. Remarkably, the OXO Peeler accomplishes this. Easier to use, vastly more comfortable for long stretches, sharper, and more productive. The OXO Peeler continues to win awards in test kitchens. A superior tool; worth the few extra dollars.
—KK
Heavy Duty Kitchen Scissors
Fiskars Kitchen Shears
I don’t consider myself a great cook, but I’ve found that for a multitude of kitchen activities, scissors are important. Whether for cutting cooking twine, small bones or a chicken breastbone, they can be very useful. Normal office scissors don’t have the right length of blade and the joint can harbor germs and food residue.
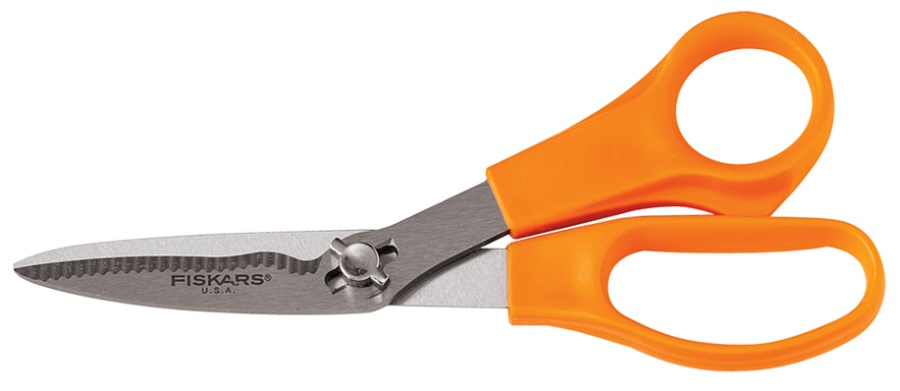
The Fiskars shears are one of a number of scissors specially made for the kitchen. They feature shorter, stainless steel blades and a take-apart joint for cleaning. However, these shears are one of the least expensive, yet still reliable pairs.
—AK
World's Best Garlic Press

Rösle Garlic Press
Out of the dozen or more different garlic presses I’ve used, the Rösle is the absolute best. The Germanic precision of manufacture is very high. It has a built-in mechanical lever that presses the garlic significantly harder than you press the handle. Hence, it takes less physical strength and strain, which is especially helpful when you’re pressing a lot of garlic. The press is also much easier to clean because the screen where the clove is pressed can be removed. No more digging down into the “pit” to scrape out the fiber remains with your finger or a separate cleaning bristle. When I mentioned “the world’s best garlic press” in the office, two folks immediately knew I was talking about the Rösle.
- Rösle Garlic Press
- $39
- Available from Amazon
Cheapest High-Quality Cutlery
Kiwi Knives
As I got more serious about cooking, I splurged and bought myself a very nice Kai Shun santoku like the previously reviewed Tosagata Hocho. I used its preternaturally sharp edge with joyous dispatch for about 6 months, until I woefully cut some citrus with it and left it dirty overnight, eroding that wonderful edge. I’ve never been able to get that magic edge back, even with pro sharpening.

On a visit to a local Asian market, I found a series of Thai-made Kiwi brand knives. In the store, they were nearly free: The large tapered chef’s knife (model #21) that soon stole my heart cost around $4; the paring knife was $1.50.
These knives are very sharp and schuss through veggies and meats like it’s nothing. Don’t go hacking at bones with the thinner models, but Kiwi also makes quite usable cleavers for around $8. The miraculous part is, the knives hold an incredible edge for months with proper use of your steel, and they take a new edge with aplomb after a few strokes on a stone.
I have owned knives by Wusthof, Kyocera, Calphalon, and Ikea (::shudder::) and the Kiwis are the most consistently sharp, most durable, and have the most effective shapes. I’ve bought or suggested them for all of my foodie friends, and people can’t get over how wonderful they are. They don’t look like much, but they’re well-balanced, very sharp. It doesn’t hurt that I could have picked up a full set for less than my crappy block-o-food-manglers cost 10 years ago.
As far as longevity goes, I’ve had my main chef’s knife for about four years, have steeled it every time I used it and given it a few good hones on mySpyderco Sharpmaker. It’s still wicked sharp, and while I haven’t babied it, it looks none the worse for wear. I used my paring knife to whack the lid off a persnickety glued-shut can of Lyle’s Golden Syrup, and in my zeal, the tip bent over almost double. I thought, Oh no! But then I bent it back in place with a pair of pliers, and it’s basically good as new.
They’re definitely the Jeep Wranglers of the kitchen. I suggest buying them locally if you live in an area with Asian markets; if not, they can be picked up online at generally higher prices.
—George Cochrane
- Kiwi Knives
- $3–$15
- Available from The Wok Shop
3. Liquids
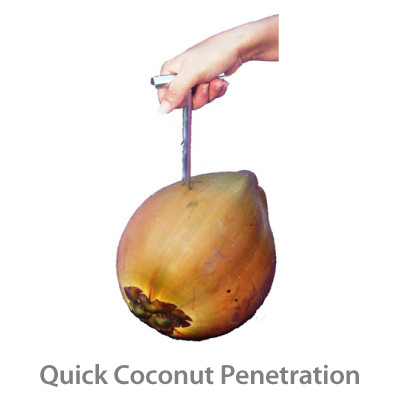


Quick Coconut Penetration
CocoTap

Considering the implications of carrying around a machete and the likelihood of hacking off a finger, a CocoTap is an invaluable tool for accessing a coconut. A solid 316 stainless tube crafted with a pointed end and a fold-out T-style handle, the device will easily pierce everything from a green coconut and jelly nut to a mature drinking coconut.
I picked up my “Barman” model at a market in Cairns, Australia. At the time, I was actually after a machete, which I’d used while living in Ecuador for many years. When the guy at the market showed me the CocoTap, I was skeptical. But after more than a year of use, I’m now on my second trip to the tropics with it. It folds up conveniently and is a hell of a lot easier to pack than a machete. I also use it for all kinds of small jobs requiring something strong, sharp, and pointy. As the website says, it’s like an extra finger.
—Patrick Handley

- CocoTap
- $35
- Available from CocoTap
Easy Homemade Soy Milk
Joyoung Soy Milk Maker
I used to buy soy milk from the store in cartons. Aside from the fact it’s heavy (I transport groceries without a car), it comes in a tetra-pack, which is difficult to recycle. More importantly, commercial soy milk tends to include a number of ingredients I can do without, like chalk (calcium carbonate) and guar gum.
Unless you really like mucking with cheesecloth and lots of pots covered in soy scum, you owe it to yourself to buy a soy milk maker. After some research, I settled on the Joyoung CTS1048. This “filterless” model is a major improvement compared to earlier soy milk makers. Other devices require filter cups, which tend to get clogged with gummy okara (soy pulp) and are a terrible headache to clean. Instead, the CTS1048’s immersion blender head is contained inside a small steel cage. From there, the milk strains through a second, basket-style strainer. Clean-up is no harder than what’s required by a food processor.

Since the Joyoung makes 1.6 Liters per run, there’s plenty to serve up hot and/or store in the fridge. It doesn’t take long either, so you can always run it twice. Plus, it only costs around 15 cents a batch. I drink four times as much soy milk now, so the machine paid for itself in two months.
If you’ve never had fresh, hot soy milk, the way the Chinese like it, you’re missing out; it’s rich, foamy and all-around delicious. I always enjoy a warm glass as soon as a batch is done. Bonus: Aside from soy beans, you can add other ingredients. The Joyoung makes excellent coconut milk, for example, which eliminates an often preservative-laden canned good from the kitchen.
During my research, I discovered that most of the more-expensive soy milk makers are just rebranded Joyoung appliances, making the Joyoung the smart and economical pick. This is that rare product I can recommend with no reservations.
—Sam Putman
Note: Before starting, soak the beans until they’re plump. Although the Joyoung features a dry-bean mode, the end product is inferior and your patience will be well-rewarded.
Best Cooking Spoon
Spout Ladle
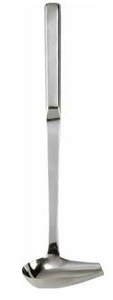
A spout ladle is the optimal tool for basting. I’ve tried spoons, suction basters, basting mops, and even those new silicone basting brushes. All but the first are less efficient at getting enough liquid out of the bottom of a pan.
Regular spoons, even so-called “basting spoons,” aren’t the right shape for getting down deep into the pan while simultaneously letting you scoop up enough liquid without having to tilt the pan too much. Enter the spout ladle, which is the perfect shape for this. The angles line up; The tilt is right; And it’s long enough you don’t run the risk of burning yourself on the pan or the rack while doing it.
I got mine in Chinatown, which is the only place I’ve ever seen this exact shape. You want a slight angle, not a 90-degree between spoon and handle as in most serving ladles. You can get one close to, but not exactly, that design online.
- Spout Ladle
- $5 (1 oz.)
- Available from Amazon
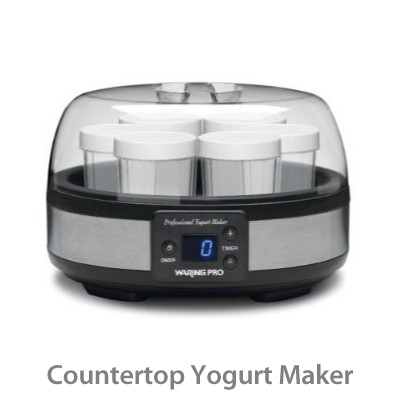
Countertop Yogurt Maker
Waring Pro YM350 Yogurt Maker
I’ve been making my own yogurt for the past couple of years. Not only is it much tastier than store-bought yogurt, but it’s also much cheaper. At my local supermarket, an 8-ounce container of yogurt costs $1. That adds up to $16 per gallon. At the same supermarket, one gallon of low-fat organic milk costs $4.
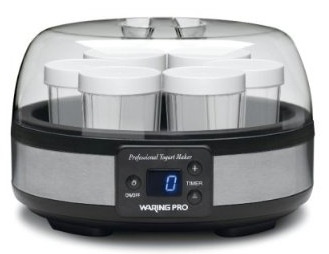
Since I’m a believer in the power of probiotics (i.e. bacteria is good for your immune system), I usually eat three cups of home-made yogurt a day. That translates to a savings of $2.25 per day, or $67.50 per month—which means my $89 Waring Pro YM350 yogurt maker paid for itself in just a few months. Even if you don’t eat as much yogurt as I do, I recommend you try making it yourself. It’s so easy, and even fun.
Here’s how:
Pour 4–6 cups of low fat milk into a microwave-proof glass bowl, and heat it until the milk begins to boil. (Boiling changes the milk’s composition so it will solidify when mixed with the starter culture.) If a skin forms on top of the milk, that’s a good sign you boiled it long enough.
Let the milk cool to the point where you can tolerate holding your hand against the bowl. Remove and discard the milk skin. Add one tablespoon of your previous batch of yogurt (or plain store-bought yogurt if you’re just starting out), and mix together with a whisk. Do NOT add more starter yogurt to the mix in an attempt to speed up the process. Paradoxically, it will only slow down the fermentation (I’ve read that too much starter crowds out the bacteria from doing its job).
Pour the yogurt into 8- or 16-ounce containers. Do NOT put on the lids yet. If you have an older-style oven with a pilot light, you can stick the glass jars in there and allow the warm oven to act as an incubator. Otherwise, use the yogurt maker or a seed-starter warming pad to ferment the milk into yogurt.
Wait 8–10 hours, then screw the lids onto the jars and place them in the refrigerator.
Note: I like to mix my yogurt with nuts, blueberries, and honey from my beehive. My kids love yogurt, banana, and berry smoothies.
Note: Watercolorist Jana Bouc has put together a great set of illustrated instructions on how to make yogurt using this device. —OH
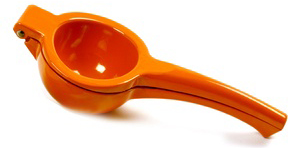
Mega-Powerful, Hand Juicer
Hamilton Beach Commercial Juicer

While some gadgets gather dust in our kitchen cupboards, this industrial-strength juicer remains on the counter. A glorified lever, it is the most efficient, easiest to clean, and most satisfying kitchen tool we own. The juicer boasts a simple design, few moving parts, and a removable cup to catch the drips. Unlike other juicers, it doesn’t spew flecks of fruit all over the wall; there’s no messy pulp to mop up; and the six-inch lever delivers steady power.
We bought ours two years ago and use it at least twice a week, depending on what citrus is in season. It works just as well and—with no motor to burn out—should continue working like a champ for some time. We also own a Black & Decker electric model (which now has a blown-out motor), a Juiceman Jr., a wooden hand reamer, and a little metal one you insert into a lemon just for a squeeze. The Hamilton remains our absolute favorite. In the dark winter months, when the backyard tree gives us lemons...well, you know.
- Hamilton Beach Commercial Juicer
- $165
- Manufactured by Hamilton Beach
- Available from Amazon
Reliable Washer for Greens
OXO Salad Spinner
For any salad lover, the spinner is perhaps the most elegant and useful invention of all time. Known for years as that cool, design-minded brand that manufactures everything from garlic presses to tea kettles, OXO has taken the reins of the salad spinner market.

Instead of a crank arm and string pulley, the OXO model sports a pump-action plunger-like mechanism. Click a button, and the pump springs up from being flush with the lid. Depress the pump a few times to get the sucker spinning real fast. Then, a push of the brake button stops the spinning in seconds.
The plastic is non-porous, so it’s much more resistant to odors. To top it off, there’s a rubber rim around the bottom, which keeps the bowl from slipping as you enthusiastically spin your Cocard or Rouge d’hiver.
For several years, the Zyliss was the gold standard in salad spinners. They first replaced the traditional crank arm design with a pull-string that reduced time and elbow strain dramatically. But eventually they changed their design just enough to make a once-elegant device clunky and annoying. Since the Zyliss doesn’t spin freely (it stops when the string gets reeled back in), the parts are yanked to a stop, which puts a lot of stress on them.
The OXO beats the Zyliss hands-down. I’ve been using mine almost daily for a year. I haven’t found another spinner quite like it. I grew up in a family that graduated from keeping a small garden to an actual farm, so I have always eaten copious amounts of salad, even when it wasn’t bursting out of the ground chez nous. Needless to say, I really appreciate a good salad spinner!
—David Jacoby
- OXO Salad Spinner
- $30
- Manufactured by OXO International, LTD
- Available from Amazon
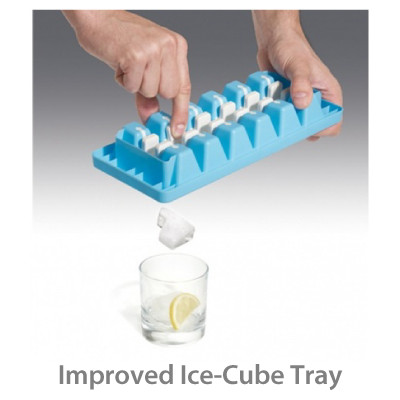
Improved Ice-Cube Tray
Quick Snap Ice Tray

These ice trays aren’t glamorous or costly, but they do the job. Below each cube’s compartment is a button that releases the cube. The trays are very easy to use. My husband has very little hand strength. As such, we’ve tried aluminum, plastic and several other different ice trays. These are the only ones he has been able to use in several years.
—Laurie Gelb
- Joseph Joseph Quick Snap Ice Tray
- $8
- Available from Amazon
- Manufactured by Joseph Joseph
Stirs PB With Less Mess
Peanut Butter Mixer

Natural peanut butter is delicious, but the initial stirring causes a mess. The minute you put in a spatula, the oil on top overflows everywhere. Instead, try this stirrer integrated into a screw-on lid. With a few quick turns, the peanut butter is completely mixed with zero spillage. Plus, when you remove the stirrer from the gasket once you’re done, it automatically cleans the stirrer! These days, my husband actually sneaks in a new jar of peanut butter just so he can mix it up before I get to.
—Sessalee Hensley
- Peanut Butter Mixer
- $12
- Manufactured by Witmer Products, Inc.
- Available from Amazon
- Or $10 from Lehman’s
Easy Carbonated Water Maker
Sodastream Home Soda Maker
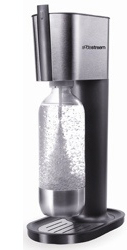
Concerned with our household’s waste-stream of plastic bottles and cans, we started using this counter-top soda maker to concoct our own soft drinks with tap water processed through a Britta. It’s easy to use. The durable bottles are said to be good for three years. Best of all, Sodastream’s proprietary CO2 cartridges can be conveniently exchanged either via mail or at accessible chain stores like Williams-Sonoma.
If you’re looking to save a little money, you can build your own set up, like the previously-reviewed carbonation system. However, the Sodatream has the benefit of being plug-and-play; it’s smaller and less clunky; and it’s only about $30 more than the DIY set-up. Plus, the DIY set-up requires you to lug around a big scuba tank every time you refill the CO2. But hey, to each his own, no?
After the initial investment, the only things I ever need purchase are carbonator refills and new bottles of flavoring. So far, we’ve enjoyed Sodastream’s cola, faux Dr. Pepper, tonic, and pink grapefruit—all diet with Splenda instead of aspartame (They also sell sweetened syrups without hi-fructose corn syrup). I find the taste is excellent. The pink grapefruit is one of the best soft drinks I’ve had anywhere.
Aside from reducing our waste, we no longer have to lug bottles back from the store. I also like to think about all the energy we will save annually by not buying water that’s been shipped from one part of the country to another.
—Brad Zebal
- Sodastream Pure
- $130
- Manufactured by Soda Stream Direct
- Available from Amazon
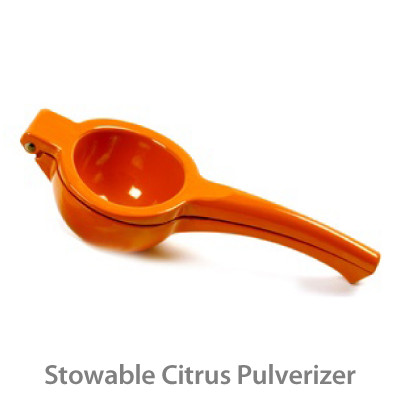
Stowable Citrus Pulverizer
Citrus Squeezers
We make tapenades for the local farmers’ markets and each contain the juice of half a lemon. Before getting this sturdy juicer, not only were my hands and wrists aching after a morning squeezing (literally by hand), but the lemon juice would get onto my fingers and, after a while, burn.
With this juicer, I insert half a lemon and push down using my whole arm rather than squeezing the lemon with my fingers. It works great and takes half the effort. No juice is wasted by dripping onto the hands. And the device is small enough to tote around. One caveat: Smaller seeds can sometimes pass through the juice holes, so I prefer to squeeze the juice through a sieve.
—Bruno Teersteeg
I’m sure some folks are partial to using the specific color-coated sizes, but we rely on the orange juicer for all of our citrus needs. If you’re tackling a bucket of lemons at home you’ll probably want a counter-top unit like the previously-reviewed Hamilton Beach juicer. However, if you’re juicing a few on the fly, I highly recommend these enameled aluminum juicers. There are similar stainless steel hand presses with soft grips, but they can be twice as expensive. Ours is tough enough. Besides, there’s nothing like a bright orange tool to break up the monotony of the silverware drawer.
- Citrus Squeezers
- $15 (oranges)
- Available from Amazon
- $12 (lemons)
- Available from Amazon
- $11 (limes)
- Available from Amazon
No More Splatter
OXO Splatter Screen
Unlike other splatter screens made of mesh or metal, the OXO is made of perforated stainless steel. This renders it nearly indestructible, even when teenagers are involved.

Two concentric rings center and secure the screen so it stays put on all our pans. Steam easily escapes through the perforations, avoiding sogginess. The sturdy handle folds for dishwashing and easy storage.
Before we found the OXO, a typical mesh splatter screen would last about nine months before inevitably getting damaged. What tends to happen is the mesh comes loose from the frame, either in use or during cleaning. I’ve used the OXO screen on a near-daily basis for the past year. The OXO splatter screen is so superior, it reinvents the tool.
—Chris Hecht
Better than a Blender
Cuisinart Smart Stick Hand Blender
I hate most kitchen gadgets with a passion. Seeing things like an avocado slicer, mango corer, or left-handed inverted egg whatsizinger give me the hives. For the longest time, I prided myself on being able to do the most with the least in the kitchen.
I’m saying all this because I wanted to convey just how hard it was to buy the Smart Stick a year ago on the recommendation of my wife. Normally blenders are hard to clean, bulky, loud, and can only be used for low-viscosity liquids; if the mixture is too thick, the blade just whirs uselessly.
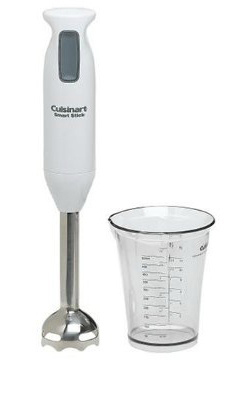
The Smart Stick solves all that. It takes up virtually no space. It is easy to clean. Instead of scrubbing out a blender, you just pop off the Smart Stick’s head, so it can be cleaned in eight seconds under running water. It’s impressively powerful and can be jammed full force down into a glass of ice to chop it up quickly. Yet, it’s still much quieter than a blender. The measuring cup it comes with is also well designed to break up the vortex the blender creates.
The Smart Stick is the cheapest and most basic hand blender I could find. Others come with whisks and choppers and brushed metal finishes, but I think the regular head works just fine. I found that the Smart Stick did 150% of what I’ve used a blender for and 75% of what I used a food processor for.
It’s very versatile. No more “pour boiling hot broccoli soup into blender to cream it, then pour back into pot.” You can use the Smart Stick right inside a stockpot on the stove. You can use it on thicker foods because you can stir and mash while blending, continuously bringing new material into the blade as opposed to a stand blender’s reliance on gravity to find unblended parts.
Making hummus, salsa, applesauce, and pesto went from “giant mess” to “easy.” Making smoothies went from “big production” to “two minutes.” Guacamole and whipped cream turn out wonderfully smooth. Margaritas can be made right in the pitcher. Almond butter can be made without too much trouble. I imagine this would also be a lifesaver for making baby food.
There are some downsides: It only has one speed (high!), so you have to be careful and use it in bursts if chopping ice, as it will happily sling iced coffee circumferentially around your kitchen in a ten-foot radius if you get too enthusiastic. You also have to be careful using it with plastic bowls as the metal head can punch through the bowl bottom if you push it too hard. The blade is SHARP. It’s not really suitable for use by children (or klutzy adults). If you need to clean around the blade’s backside with a finger, REMOVE the head from the motor first.
Again, I really really wanted to hate this thing and didn’t buy one for the longest time because I considered it useless. Now it’s the only electric kitchen tool that remains permanently plugged in on my counter other than a Kitchen-Aid six-quart mixer.
—Jon Braun
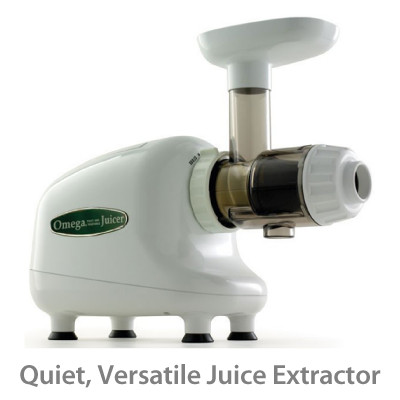
Quiet, Versatile Juice Extractor
Omega Juicer
I eat fruits and veggies, but based on everything I’ve read, the potential health benefits of juicing are too great to pass up. Unless you’re an impatient person, the Omega 8003 is great for a beginning juicer. It not only handles apples, oranges and carrots, but won’t get bogged down with wheatgrass, spinach and other leafy greens. Unlike a centrifugal juicer, which violently shreds what you put in it, the Omega 8003 uses what is known as a dual-screen, single auger. That means it doesn’t cut or chew as much as it mashes pulp forward into the end of a cone using the pressure of a spinning auger. The juice yield definitely trumps my old Braun centrifugal juicer, which can’t handle wheatgrass. The pulp I get from the Omega is drier and if need be, I can easily put it back through for a tiny bit more juice. I put the pulp from the Braun into the Omega and actually got several extra tablespoons of juice!

Of all the machines I’ve researched, tested and used, the Omega 8003 just crushes every piece of machinery, especially at this price. After eight months, I still use the juicer almost every other day and nothing has broken or malfunctioned. Juice extractors tend to be jet-engine loud. While the Omega’s motor is strong and hums with authority, it’s killer quiet. I can easily juice in the early morning or night without waking my wife or the neighbors. It’s also not too large in size and the folding handle on top makes moving the machine around much easier than other machines. The construction is solid. Omega backs it up with 10-year warranty.
Juicing itself is relatively subjective. Some people want to process lots of fruit, and fast. While the Omega isn’t as quick as some centrifugal juicers and while it can’t handle soft fruit like bananas or strawberries quite as well as other juicers, it gets the job done. Plus, I feel the juice quality is better. The only other juicer in the same realm is the Green Star, which is harder to clean, bigger and almost twice the price! Since the 8003 has only a few parts, it is by far the easiest and fastest juicer I’ve seen and tried to clean. You can also use it as a food processor and grinder for coffee beans, flour, garlic, etc. There are also several optional attachments if you wish to make nut butters, baby food, frozen desserts, pasta and other things.
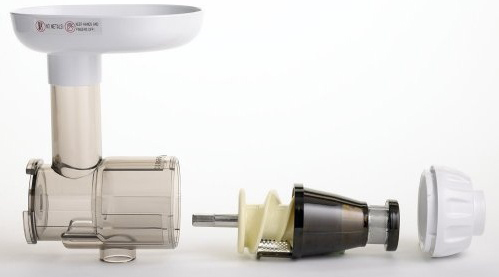
For those who are concerned about heat destruction of enzymes, the Omega’s auger turns slowly and doesn’t appear to generate much heat. Granted the process of crushing and squeezing the vegetable matter through a small screen will cause friction, but I don’t feel it’s a deal for the average user. Same goes for oxidation. All juicers introduce some oxygen into the juice because of the mechanical process of extraction. With some fruits and vegetables, however, this machine does a noticeable job of reducing the amount of foam. Using two carrots from the same bag, I juiced one in a centrifugal juicer and one in the Omega. There was a lot less foam with the Omega, and the color of the juice was also darker and richer.
Overall, I’m thrilled with my Omega 8003 juicer. I paid about $229 for mine, plus shipping. I feel that’s a very reasonable price to start changing my life and health.
—Jim Rubel
Note: The feeder chute is relatively small in diameter, so it’s best to cut up anything large to make it fit or be more manageable.
Instant Hot Water Source
Zojirushi Electric Dispensing Pot
Like the rice cooker, the electric dispensing pot is an appliance that EVERY Japanese household has. Its function is simple: It heats and dispenses hot water at just-below-boiling, as much or as little as you want. Perfect for a cup of tea or a cup of noodles. There’s even a “Keep Warm” feature for maintaining the water temp at 208°F, 195°F, or 175°F for a set amount of time.

We picked up Zojirushi’s 3.0-liter US version when we moved back from Japan. It’s performed flawlessly for well over a decade. Lots of nice little touches: The “MagSafe” magnetic power cord featured in Apple’s laptop computers? Zojirushi did it first; makes it easy to move the pot to the tap to fill it up.
—Robert Woodhead
- Zojirushi 3.0-Liter Electric Dispensing Pot
- $120
- Available from Amazon
- Also available in 4.0- and 5.0-liter capacities (pictured).
The Ultimate Blender
VitaMix 5200 Countertop Blender
At Costco, my wife and I happened upon one of those salesman wearing a headset a-la-Madonna. He was demoing a blender. As we stood and watched, I commented to my wife that all these people were just waiting to try a smoothie; and there was no way this guy would get one of these suckers to pay $350 for a blender. A BLENDER!

But guess who walked out with one? Because of Costco’s liberal return policy, we figured it was worth a shot. So for the next month, we used it...and used it...and used it. Every time, I thought to myself, $350 for a blender!? But man, this thing is an incredible MACHINE.
I once believed that a blender only needed two speeds: Off and High. I was wrong. With ten variable speeds, it makes short work of anything and everything we’ve ever put in it. We use it every single day, often multiple times. The 1380-watt motor surprisingly quiet on low, and a barracuda at high speeds. Clean-up is incredibly quick: Add water, a bit of soap, turn on high for ten seconds, and then rinse and dry.
The 64-ounce Lexan pitcher is amazingly tough. I always figured plastic was plastic, but this stuff is really tough. If you do happen to somehow break it, the company will replace it free of charge through its seven-year warranty. After that, you can simply purchase parts/replacements.
So we extended our 30-day trial to 90-days, since I still thought it was a lot of money for a blender. Ultimately—after using it EVERY day, usually multiple times a day—I realized it’s worth $350. I hesitated to send this review, because of the considerable expense. Anyone who uses a blender regularly will find this to be the best blender they ever own. My previous $45 blender, which I once thought was pretty good, now sits gathering dust. I’ve been spoiled.
—Jeff Jewell
Note: Check Costco, if there’s one near you. They tend to sell the blender at a discount.
4. Utensils
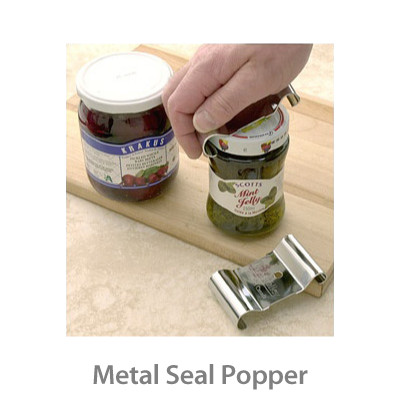


Metal Seal Popper
Lee Valley Jar Opener
I always used a spoon, until I was given one of these lid poppers. I was skeptical, but I now find myself reaching for it without even thinking. An 8.5 × 5-cm piece of metal, it’s bent in the middle and curved at each end to accommodate just about any size jar lid.

It’s very simple and straightforward: Simply place it on the jar top with either of the rolled sides caught under the lid’s lip (which side of the opener depends on the lid size); Then, hold the opener in place and use it as a lever. The bend in the metal serves as the fulcrum. The downward pressure of your hand provides enough force to release the vacuum seal without distorting the lid. I can happily report no more bent spoon handles, no more splatters, and no more spills. Just a nice “pop” when the vacuum breaks, and I’m home free.
I have not tried the previously-reviewed plastic JarPop, but I’ve had this steel one for at least 3 years. It has never bent, nor has it rusted.
—Ellen Rocco
- Lee Valley Jar Opener
- $11
- Available from Lee Valley
Last Bit o' Jam Scoop
Bottle Scraper
I first used this bottle scraper twenty years ago while boarding with a family in the Netherlands. At the time, Dutch pudding came in glass jars similar to traditional milk bottles. This spatula was the only way to get out the last drop. Since then, I’ve thought wistfully about the bottle scraper every time I’ve tried to get gooey foods, sauces or peanut butter out of a bottle or jar.
Unlike most spatulas, the long handle reaches the bottom of tall bottles. The small silicone head bends to enter small openings, then re-opens inside. The curved head fits snug against interior bottle walls, making it easy to scrape the contents out.
On a recent trip to The Netherlands, I made sure to purchase one for my home kitchen. Of course, travel isn’t required. They’re sold online at Fante’s Kitchen Wares Shop.
—Debora Dekok
- Silicone Bottle Scraper
- $5
- Available from Fantes
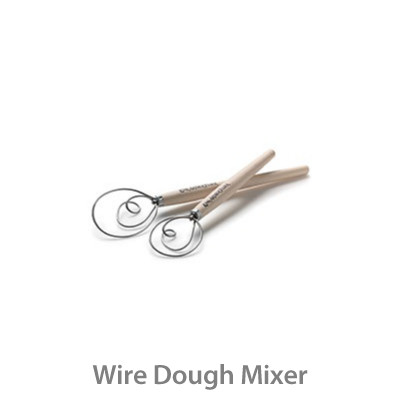
Wire Dough Mixer
King Arthur Dough Whisk
I try to bake by hand as much by hand as possible, because it’s a nice contrast to working in front of a computer everyday. But one part of baking I never used to enjoy was the mixing of the dough. At first, it gets all gummed up on the spoon or spatula. Then, once the dough comes together, it doesn’t seem as if you’re mixing the ingredients so much as pushing a big ball around the inside of the bowl.
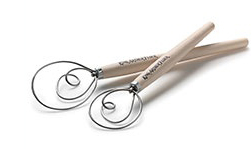
For year, I’d seen the dough whisk in the King Arthur catalog. I never ordered it because I thought the wire part looked a bit fragile. I finally decided to give one a try, figuring I’d send it back if I didn’t like it. Well, I’m never sending it back.
The whisk’s wire is extremely stiff. I’ve yet to encounter a dough it doesn’t slice through with ease. I don’t know how much thought went into designing the twists of the wire, but it’s amazingly efficient at bringing a dough together. When I made a double batch recently, I was worried I might have given the whisk more than it could handle. Nope. Mixing took no more effort than a smaller batch.
Clean-up is a breeze: Only a little bit of dough adheres to the wire, which is easy to dislodge with a wipe of the fingers. After that, it goes into the dishwasher.
So far, I have the large model, but I’m planning to buy the smaller one to use in smaller mixing bowls. I suspect that once I also have the smaller one, I’ll never have to order another, unless it’s for a gift. I’ve seen similar-looking whisks on Amazon for a few dollars less, but I don’t know how well they’re constructed. King Arthur’s whisks have their logo on the wooden handles and feel very, very sturdy.
—Tom Streeter
- King Arthur Dough Whisk
- $17
- Available from King Arthur
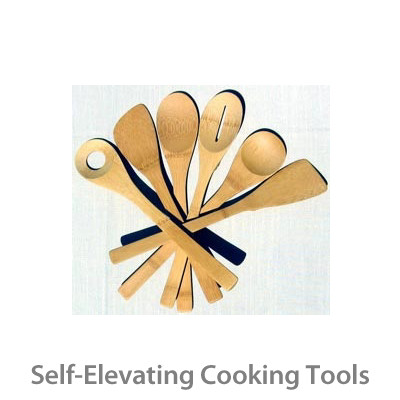
Self-Elevating Cooking Tools
Give It A Rest Bamboo Utensils

Bamboo utensils are great for cooking with nonstick pots and skillets. Recently, I found an even better version: Bamboo utensils with rests carved right into the handles. Lay down the utensil, and the business end won’t touch the surface. You don’t need a spoon rest, and you don’t need to clean a spoon rest either. Thus far, I have purchased a spatula and two spoons; I intend to buy more. I converted overnight. The other wooden utensils I’d been using for years? They’re all gone.
—Bob Callaway

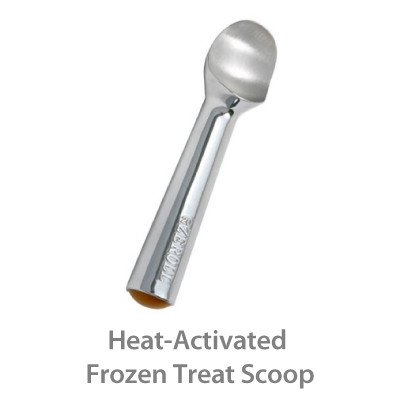
Heat-Activated Frozen Treat Scoop
Zeroll Ice Cream Scoops

Unfortunately for my waist, I love ice cream. For a long time, I accepted the fact I either had to strengthen my wrist muscles, leave out the ice cream to soften up, or run the frozen tub or spoon under hot water before digging in (which dilutes the ice cream if you forget to dry it off beforehand). Not anymore.
The trick to this scoop is a heat-conductive fluid sealed inside the handle and business end. The heat from your hand warms the fluid, which lets you scoop easier and quicker. I find it can scoop ice cream from ice cream tubs that are hard as a rock, like a spoon through a tub of margarine.
This Zeroll scoop is not dishwasher safe, and must be hand-washed in warm or luke warm water (the fluid in the handle can’t take any hotter). It comes in different sizes from two to four ounces, in either a silver aluminum or Anodized Teflon finish. I opted for the two-ounce aluminum scooper because I’ve heard the Teflon finish wears off over time.
It’s worth mentioning that I learned of the Zeroll from a cooking magazine. They tested various scoopers to settle on one that makes the “perfect, round scoop.” The Zeroll won.
—Ethan Stettner
- Zeroll Ice Cream Scoops
- $16
- Manufactured by The Zeroll Company
- Available from Amazon
Safe Can Opener
Kuhn Rikon Safety Lid Lifter
It may be a terribly long and unwieldy name, but it is far and away the coolest can opener I have ever used.

Why? The blade cuts into the can below the rim so the lid never falls into the food, and the blade doesn’t touch the food either. You can use it to open “pop top” lids as well. A can opened with this tool will have no sharp edges. Apparently it works for both righties and lefties (not tried). Best of all you can challenge your friends by handing them the opener and a can and watch them figure out how to use it.
—Marsh Gardiner
- Kuhn Rikon Safety Lid Lifter
- $20
- Available from Amazon
- Manufactured by Kuhn Rikon
Evenly Floured Surfaces
Best Flour Duster

This flour duster allows for remarkably light and even dusting of dough or a work surface. You simply squeeze the wire handle, which expands the spring bulb so that the wires have space between them. Stick it in a bag of flour, stop squeezing and the spring bulb closes around a golf-ball-sized wad of flour. Then, shake it over a work surface squeezing gently—I tap it over my free hand ala David Byrne’s “Once in a Lifetime”—and voilà: A very even dusting is achieved. I’ve used this flour duster for five years, and have found nothing else that can compete.
—Robert Narracci
- Best Flour Duster
- $9
- Available from Amazon
- Manufactured by Best Manufacturers
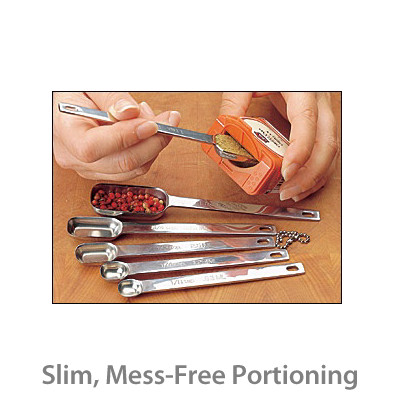
Slim, Mess-Free Portioning
Spice Jar Measuring Spoons
Unlike traditional measuring spoons resembling those intended for stirring and eating, these stainless steel Spice Jar Measuring Spoons are rectangular in shape with a narrower profile. Translation: They fit easily through the small opening of a spice container. Bonus: If the container’s opening has a straight edge, you can level the scoop as you withdraw the spoon.

In addition, the set contains two sizes that aren’t normally included with the average measuring spoon set: 1/8 and 3/4 teaspoons. I find the 3/4 spoon particularly handy in that two 3/4 teaspoons equals 1/2 tablespoon, a measurement I frequently encounter after scaling down a recipe.
After three years of daily use, I’ve found no down-side to using these sturdy spoons for all my measuring needs—liquid or dry. Given their advantage with small containers, I see little reason to use traditional measuring spoons other than a slightly lower cost.
—David King
- Spice Jar Measuring Spoons
- $11
- Available from Lee Valley
- Or $13 from Amazon
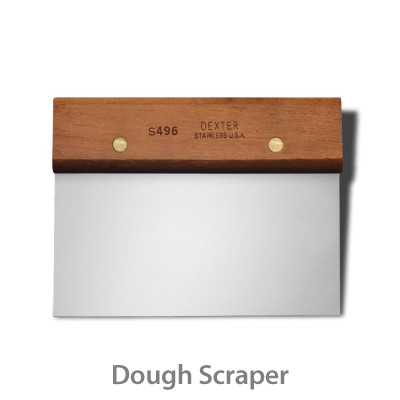
Dough Scraper
Dexter-Russell Dough Scraper
Although it was designed specifically for bakers, this low-tech tool is absolutely indispensable in the kitchen. Beyond scraping bread dough off the counter, we use ours to transport all types of chopped foods from counter to bowl, counter to skillet, etc.

There are other dough scrapers out there, but Dexter-Russell’s S496 features a wide wooden handle that helps make it the best. Don’t want take my word for it? I was in a local Sur la Table recently. They had various bins filled with dough scrapers; the Dexter bin was empty!
—Mark Esswein
- Dexter-Russell Dough Scraper
- $14 (S496)
- Manufactured by Dexter-Russell
- Available from Amazon
5. Storage & Space


Space Saving Funnel
Collapsible Silicone Funnel
My kitchen is on the small side, which means every inch of space must be efficient and tidy. While most funnels are bulky and take up valuable room, this one is compact enough to fit in a studio-size kitchen or be a welcomed addition to any camping pack.

The accordion-style pleats not only allow you to collapse the silicone funnel so it fits neatly even in a shallow drawer. The pleats also allow you to adjust the height and width of the funnel for pouring into various-sized containers.
Since the funnel is made of high-quality silicone, it is dishwasher safe and heat and cold resistant, making it more durable and longer-lasting than plastic funnels. Other potential uses: changing your car’s oil or adding washer fluid. If you plan to use it in the garage, of course, I’d recommend getting a second one.
—Kelly Spitzer
- Collapsible Silicone Funnel
- $10
- Available from Amazon
- Manufactured by RSVP International
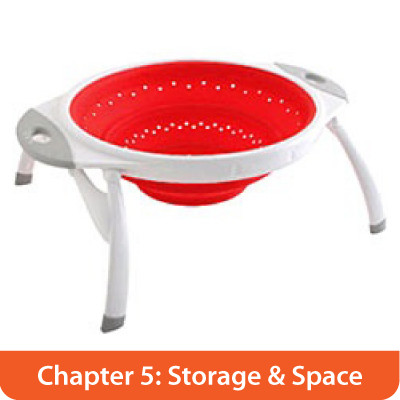
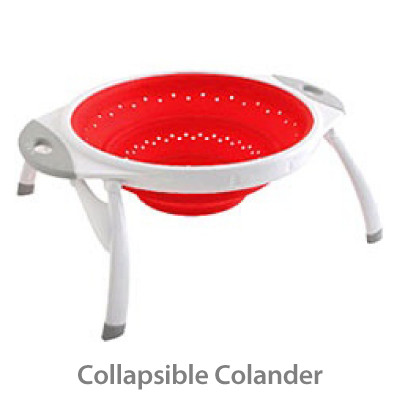
Dexas Pop Silicone Colander
After a year of regular use, I’m still struck by how much of an improvement this collapsible colander is over traditional ones. For small apartment or galley kitchens this colander brings serious space savings.

The bowl section folds flat and the legs swing under, clicking into place. When collapsed, the colander is 1.5 inches thick. It can be easily stored upright like a book between cupboard items or behind a counter-top appliance. It even has a hole, if you prefer to hang it on a rack.
Though the colander is compact, it’s well-designed. The legs are set broadly apart, making it extremely stable. The tall legs give ample clearance underneath the colander, which can be handy if there are dirty dishes in the sink and the pasta needs to be drained right away. The wide handles offer a solid grip. Also, it’s dishwasher safe.
The only benefit to another colander would be volume. I rarely cook for more than a few people, so the 2.5-quart Dexas suits my needs fine. If you’re cooking larger portions, I’d recommend one from OXO.
—Aaron Scrignar
Expandable Premium Dish Air-Dryer
Simplehuman Flip-Top Dishrack
I’ll admit it takes a fanatic to appreciate an $80 dishrack when you can get a plastic one for just a few bucks. But if anyone can design a superior, beautiful and functional kitchen product that many folks usually don’t think twice about, it’s Simplehuman.

Made of stainless steel with ABS plastic parts, this dishrack can handle pretty much anything you toss at it. The “flip-top” allows you to make room for larger pots and pans. The “dual direction” draining mat actually works. A bamboo knife block inserts into part of the utensil holder, but still leaves space for other utensils and tools. The cup holders along the edges will dry four at a time. And there are even two additional clip-on holders specially designed to accomodate wine glasses.
I first used the dishrack while visiting my sister. Both my wife and I were amazed at how good design can improve an everyday tool. I hunted down and ordered one as soon as we got home!
—Aaron Ebata
- Simplehuman Flip Top Dishrack
- $80
- Manufactured by Simplehuman
- Available from Amazon
Mess-Free Storage
King Arthur Sugar/Flour Dispenser

King Arthur’s dispenser is a sturdy, reliable container that accommodates a five-pound bag of sugar or flour. You just slide in the bag, open it up, trim the bag top to the top of the container, and put the lid back on. A little flap inside the lid holds the bag open and keeps the sugar/flour from sifting down the sides. When sealed shut, the whole thing is ant- and water-proof. Another practical benefit is that the lid has two openings: One is a pour spout; The other is large enough to allow for scooping with a measuring cup. Since the spout is slightly flexible, I find I can squeeze the sides to crush any lumps or clumps.
Obviously, this is not a sexy matte-black high tech kind of tool. But using it makes me very happy. It’s a solid, well thought-out product that makes working with and storing sugar/flour much simpler, easier and cleaner.
—Amy Thomson
Note: King Arthur Flour’s online store and print catalog are packed with tons of other nifty cooking tools. The King Arthur Flour’s Cookie Companion and Baker’s Companion books are fabulous cookbooks.
Spice Filing Cabinet
Spice Stack Rack

We’ve been searching for an efficient way to store spices for ages. Those rotating towers are too large, and we didn’t want to devote kitchen counter space to a separate rack. I finally came across this horizontal filing system on Amazon. It’s the perfect solution. The whole thing is sized to fit inside standard kitchen cabinets; the dimensions are 7.75″H x10.85″W × 10.75″D. It takes both large and small grocery-size spice bottles. Also, it comes with labels for the front of the drawers. After several months, my only reservation is that the plastic feels as if it could eventually be prone to breakage at the hinges. Nevertheless, for now, it’s holding up just fine.
- Jon Margolis
- Spice Stack Rack
- $35
- Available from Amazon
- Manufactured by Stacks and Stacks
Compact Culinary Travel Kit
Mr. Bento Lunch Jar
Zojirushi’s Mr. Bento Lunch Jar is a modern spin on the Japanese bento box. However, it will keep cold things cold and hot things hot. Mr. Bento features four microwaveable containers: a watertight soup container, a large main-meal container with an insulated lid, a smaller container I use for salads, and an even smaller container for snacks like cheese/grapes. All these containers stack neatly inside a stainless jar in a specified order that creates a seal, keeping the soup/main container hot or cold while the other containers remain at room temperature.
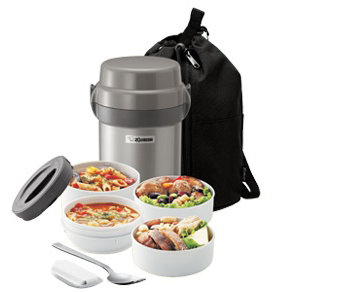
Mr. Bento also comes with a spork, so you don’t have to carry extra utensils; the spork even has a cover. Mr. Bento himself fits inside a nice bag (included) that has pockets for napkins and the like, and enough extra room for another small food container should you desire a bigger meal. In my case, I typically take a small container of oatmeal to work, so I just place Mr. Bento on top and put the entire stack in the bag. A fully-packed Mr. Bento with bag and utensil weighs around 3 lbs.
As for how long things stay hot: Typically, I pack my lunch around 6:45 a.m., then don’t eat until 12 noon. I never feel the need to microwave. For example, recently at 7 a.m., I microwaved a frozen burrito and cut it in half to fit in the meal container. At 11 a.m., the burrito was still hot and steam came from the container when I opened it. Zojirushi advises preheating the jar with hot or cold water for maximum temperature retention, though I’ve never tried that.
When you first look at Mr. Bento, you might worry you’re going to walk away hungry. Your mileage may vary, but I am a whopping 240 pounds of man and sometimes I wonder if I should have purchased a smaller Bento like the Ms. and mini (I also have Zojirushi’s rice cooker).
My impetus for buying a lunch box was that I discovered I was spending over $100/month going out to lunch. I wanted to save money and did not want to get bored eating-in. So far so good! I also found Mr. Bento has a cult following, including the “Mr. Bento Porn” group at Flickr (Despite the name, it’s safe to look at during work). This is what really sold me on it.
—Ted Boydston
Fridge-Free Butter
Butter Bell
Some folks are comfortable leaving out the butter, as-is on the counter for days on end. For those who aren’t, but still want the convenience and pleasure of a steady, safe supply of spreadable-yet-fresh butter: You’ll love the Butter Bell.
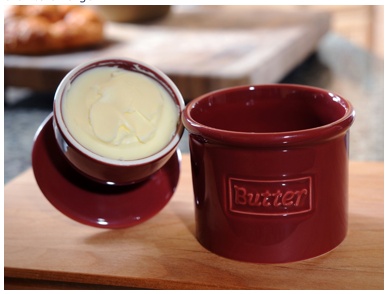
Begin by leaving a stick of butter on the counter for an hour, or just long enough to soften it up. Place the butter in the Bell, then add a little water to the base. This creates an airtight seal around the butter, discouraging bacteria. Voilà! You’ll never again be stuck trying to spread rock-hard butter on a piece of toast.

It’s a design that’s been around in various forms for centuries.
—Bryn-Ane MacKinnon
- Butter Bell Crock
- $20
- Manufactured by Tremain, Inc.
- Available from Amazon
Best Indoor Compost Bucket
Norpro Stainless Steel Pail
What’s truly superb about this countertop pail—aside from its fun design, reminiscent of a classic galvanized trash can—is that it’s made of stainless steel and is dishwasher safe. We fill ours daily with kitchen waste—messy coffee grounds, used tea leaves, aging cornmeal mush, soggy cucumbers—but a quick cycle in the dishwasher and it looks almost as good as new. Years ago I used a plastic bucket designed to perform the same task, but it was difficult to keep clean and less rugged for trips to our backyard compost bin (the lid kept breaking). Since it gets banged around inside the house and out, I prefer this stainless steel, one gallon-capacity model to its ceramic lookalike.

Yes, there are many clever ways to repurpose some other household container into a waystation for outbound kitchen waste, but I haven’t seen one work as well as this sturdy, ventilated design. The charcoal filters keep rotting smells in check, while allowing for airflow. Frequent trips to empty a simple Tupperware container would be fine, but our bin’s about 30 feet from the back door. With this one-gallon pail, we only end up heading out there every other day.
—Elon Schoenholz
- Norpro 94 Stainless-Steel Composter Keeper (1 Gallon/4QT/3.8L)
- $40
- Available from Amazon
- Replacement Filters (2 piece)
- $4
- Manufactured by Norpro
One-Handed Towel Dispenser
Kamenstein Paper Towel Holder
Most free-rolling paper towel dispensers just don’t work for me. Since I do a lot of food prep from my wheelchair, I can only grip with one hand. The genius of this “Perfect Tear” dispenser is how it allows enough freedom for the roll to unwind with a steady pull; yet, there’s still enough friction to prevent further unwinding when you pull to detach the sheet.
The secret? 1) The center post is a series of bowed wires that contract and hold the paper roll snugly in place; and 2) The base weighs about four pounds, which adds stability.
No more chasing unwinding rolls of paper across the kitchen floor. Or getting five sheets when I only need one. Better still, it works just as well at the end of the roll as it does at the start. When a roll is out of sheets, just unscrew the top cap, slide off the cardboard tube, push on another roll and replace the cap. All of this can be easily performed one-handed.
After a couple of years, it’s still well worth the precious space it’s claimed on my very limited counter.
—Eric Eales
- Kamenstein Paper Towel Holder
- $29
- Manufactured by Kamenstein
- Available from Amazon
6. Books


Food Answers
On Food and Cooking
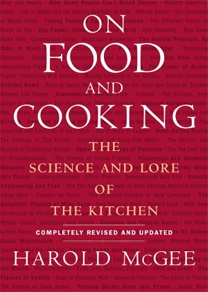
This is the smartest book in my kitchen. It’s where I go whenever I have a question about what I am eating, or the science behind its preparation. Simply the best source for understanding food and how it works. Now in its updated second edition. Covers ingredients from all over the world and time. Awesome, encyclopedic.
—KK
- McGee, Harold. 2004. On Food and Cooking: The Science and Lore of the Kitchen. New York: Scribner.
- 884 pages
- $26
- Available from Amazon
Sample Excerpts
Aromas from Altered Carotenoid Pigments
Both drying and cooking break some of the pigment molecules in carotenoid-rich fruits and vegetables into small, volatile fragments that contribute to their characteristic aromas. These fragments provide notes reminiscent of black tea, hay, honey, and violets.
Green Chlorophyll
One change in the color of green vegetables as they are cooked has nothing to do with the pigment itself. That wonderfully intense, bright green that develops within a few seconds of throwing vegetables into boiling water is a result of the sudden expansion and escape of gases trapped in the spaces between cells. Ordinarily, these microscopic air pockets cloud the color of the chloroplasts. When they collapse, we can see the pigments much more directly.
Soba: Japanese Buckwheat Noodles
Buckwheat noodles were made in northern China in the 14th century, and had become a popular food in Japan by around 1600. It’s difficult to make noodles exclusively with buckwheat flour because the buckwheat proteins do not form a cohesive gluten. Japanese soba noodles may be from 10%-90% buckwheat, the remainder wheat. They’re traditionally made from freshly milled flour, which is mixed very quickly with the water and worked until the water is evenly absorbed and the dough firm and smooth. Salt is omitted because it interferes with the proteins and mucilage that help bind the dough (p. 483). The dough is rested, then rolled out to about 3 mm thick and rested again, then cut into fine noodles. The noodles are cooked fresh, and when done, are washed and firmed in a container of ice water, drained, and served either in a hot broth or cold, accompanied by a dipping sauce.
Maple Sugaring Without Metal or Fire
In 1755, a young colonist was captured and “adopted” by a small group of natives in the region that is now Ohio. In 1799 he published his story in An Account of the Remarkable Occurrences in the Life and Travels of Col. James Smith, which includes several descriptions of how the Indians made maple sugar. Here’s the most ingenious method.
“We had no large kettles with us this year, and the squaws made the frost, in some measure, supply the place of fire, in making sugar. Their large bark vessels, for holding the stock-water, they made broad and shallow; and as the weather is very cold here, it frequently freezes at night in sugar time; and the ice they break and cast out of the vessels. I asked them if they were not throwing away the sugar? they said no; it was water they were casting away, sugar did not freeze and there was scarcely any in that ice...I observed that after several times freezing, the water that remained in the vessel, changed its color and became brown and very sweet.”
Best Basic Cookbook
How to Cook Everything

In our household, this is the book that has replaced Joy of Cooking as the first cookbook we reach for. It educates the ignorant, rewards the expert, and gratifies the harried with steady and sure knowledge about how to cook everything. By everything it means: wholesome everyday food. Its 2,000 recipes are unpretentious, yet diverse.
—KK
- Bittman, Mark. 2008. How to Cook Everything: 2,000 Simple Recipes for Great Food. (10th Anniversary Ed.) Hoboken, NJ: John Wiley & Sons, Inc.
- 1056 pages
- $18
- Available from Amazon
Sample Excerpts
Each year, I experiment less and less with complex dishes, and try to master the simple staples both of our widely divergent culture, and of other cultures from around the world. I look for good ingredients, and handle them minimally. I am usually satisfied with the food I prepare, but I am the first to admit that it is very rarely on the same level as that served in the world’s best restaurants. (It’s better, however, than that served in the vast majority of restaurants.)
Striving for brilliance in everyday cooking is a recipe for frustration. Rather, everyday cooking is about preparing good, wholesome, tasty, varied meals for the ones you love. This is a simple, satisfying pleasure. Your results need not be perfect to give you this gift, to which all humans are entitled.
Spiced Melon Balls
Makes 10–15 servings
Time: 20 minutes
Melon balls are melon balls, until you do something to them. This converts them to an exotic Asian-style dish, easily eaten with toothpicks.
1 ripe cantaloupe or other orange-fleshed melon
1 ripe honeydew or other green-fleshed melon
½ teaspoon salt
1 teaspoon ground coriander
¼ teaspoon cayenne, or to taste
1 tablespoon very finely minced cilantro leaves
2 tablespoons freshly squeezed lime juice
Sugar to taste (optional)
Use a melon baller to remove all the flesh from the melons. Combine the balls in a bowl with the salt, coriander, cayenne, cilantro, and lime juice.
Taste and adjust seasoning; you may add more of anything. If the melon is not sufficiently sweet, add a bit of sugar. Cover and refrigerate until ready to serve, up to 2 hours.
How To Cook Everything (iPhone app)
This $5 iPhone app contains all the content of Mark Bittman’s original book. Since the information is stored offline, unlike many other recipe apps, you can access it whenever. In addition, there are useful features including a recipe timer, fast searchable index (by main ingredient, cook time, vegetarian, etc.), an emailable grocery list from recipes, and reader-recommended recipes. I have used it almost every day since it was released. It’s what a cook book for the iPhone should be.
- How To Cook Everything: On The Go
- $5
- Available from iTunes Store
- Manufactured by Culinate, Inc.
Natural History of Food
The Cambridge World History of Food

What’s so virgin about virgin olive oil? Is tapioca born as little round balls, or can you get it in another form? At the dinner table, our questions are endless. Yet, the ingredient lists on the side of packages are wholly inadequate. Most cookbooks don’t know much about origins either. This humongous, library-belonging, scholar-written, two-volume encyclopedia fills our hunger for more information. No recipes, only superbly reliable research on food, food crops, and food preparation. Eat smarter.
—KK
- Kiple, Kenneth F. and Kriemhild Coneè Ornelas, eds. 2000. The Cambridge World History of Food. Cambridge, UK: Cambridge University Press.
- 2 vols., 2153 pages
- $200
- Available from Amazon
Sample Excerpts
Indeed kola is to the African what tobacco or coffee is to the European or betel is to the southeastern Asian a stimulant and a psychoactive substance. The importance of kola as a drug was first recognized outside Africa in the twelfth century by an Arabian physician, who wrote that it was used in the form of a powder for colic and stomachache and had warming properties. A later Portuguese observer testified to the importance of Kola nuts thus: “The Black population would scarcely undertake any enterprise without the aid of Kola” which, among other things, was supposed to protect against the pangs of thirst.
Since the 1850s, however, research has been carried out by botanists, chemists, and pharmacists on some of the properties ascribed to the kola nut. For example, A.M.F.J. Pasisot-Beauvois asserted the nuts’ remarkable ability to impart a pleasant taste to all food or water consumed. Subsequent experiments have confirmed this observation at least for drinking water, which, even when comparatively stale or impure, becomes quite palatable to the consumer after chewing kola. It is possible that the action of the chemicals in kola on the palatal mucosa creates the “illusion” of sweetness, or perhaps this is the result of kola’s high caffeine content.
The Magazine for Cooking Nerds
Cook’s Illustrated
The technical aspects of cooking are usually overlooked. Kitchen gear is addressed by most publications, if at all, when it is fancy and untried. This paper magazine, however, tests equipment, gadgets, and recipes—new and old— in a relentless quest for the best kitchen stuff. Cook’s Illustrated is at liberty to be honest in their recommendations because they have no ads—no one to please but avid readers. The tests are amazingly thorough, and astoundingly informative. They examine everything from basic ingredients (sea salt, bread flour, olive oil) to high-end equipment (what is the best mixer?), as well as state-of-the-art in standard instruments like garlic presses, frying pans, oven thermometers, etc. I find their comparison methods to be more realistic and far more useful than Consumer Reports; and, of course, they evaluate far more items than CR ever would. They also obsessively taste-test popular recipes in hundreds of variations, and research the mysteries behind each ingredient. I learn tons each issue—about foodstuffs, about cooking, and about eating. Best of all, these folks make it very clear when a new tool or technique is not worth the trouble, and how you could manage with an old version. Unlike most magazines, back issues don’t age. This is the 2600 for cooking nerds.
—KK
- Cook’s Illustrated
- One-year subscription (6 issues)
- $25
Best Guide to Artisan Bread Making
The Bread Baker’s Apprentice

New to bread-making, I’ve been looking for a great guide. I found and fell in love with Peter Reinhart’s book. It has beautiful photographs, and has motivated me to experiment. I’m now one-third of the way through baking every formula in the book. His explanations are very clear. He includes enough theory, which allows me to make my own informed decisions about baking different styles of bread. It is not rocket science, but there are a lot of non-intuitive details he covers well. Needless to say, all this teaching has elevated the quality of my own breads. He also provides detailed recipes for each type of bread he describes, so those who are uninterested in the fundamentals can still bake quite easily. When I got the book, about the only thing my breads had going for them was that they were “homemade.” Now I like my breads just as much or more than the expensive artisan-style breads I buy at my local bakeries.
—Christopher R. Carlson
Some masters are great at craft, and some at teaching, and every once in a while a person like Peter Reinhart comes along who is grand master of both. This book is considered the best all around guide to making fancy and rustic artisan breads; some would say for making any bread, period. Grounded in theory and practice, it is superb teaching.
—KK
- Reinhart, Peter. 2001. The Bread Baker’s Apprentice. Berkeley, CA: Ten Speed Press.
- 304 pages
- $20
- Available from Amazon
Sample Excerpts
It is easy to see the subtle difference in color and texture of various flours when they are placed side by side. These are, from left to right, cornmeal, semolina flour (coarse durum), fancy durum, dark rye, white rye, bleached cake flour, unbleached pastry flour, unbleached bread flour, clear flour, and whole-wheat flour.
For perspective, here are the twelve stages in order:
1. Mise En Place (“everything in its place” is the organizing principle)
2. Mixing (in which three important requirements must be met)
3. Primary Fermentation (also called bulk fermentation, in which most of the flavor is determined)
4. Punching Down (also called de-gassing, in which the dough begins to enter its secondary fermentation and individuation)
5. Dividing (in which pieces are weighed or scaled, while continuing to ferment)
6. Rounding (in which the pieces are given an interim shaping prior to their final shape)
7. Benching (also called resting, or intermediate proofing, during which time the gluten relaxes)
8. Shaping and Panning (in which the dough is given its final shape prior to baking)
9. Proofing (also called secondary or final fermentation, in which the dough is leavened to its appropriate baking size)
10. Baking (which may also include scoring the dough and steaming, but in which three vital oven actions must occur)
11. Cooling (which is really an extension of baking but must occur before cutting into the bread)
12. Storing and Eating (in production baking it’s primarily storing, but home baking usually emphasizes, ahem, eating)
From BBQ to Chef
How to Grill

It’s a goofy cliche to say outdoor cooking stirs in men some sort of cellular caveman memory about fire and roasting Mastodon shanks or whatever. But given how firmly the obsession has taken hold of me, there may be something there. I grill at least three times a week, from as early in the spring as possible until I have to start scraping ice just to get cooking. People kept telling me I had to get Steven Raichlen’s How To Grill, so to kick off this year’s grilling season, I bought it. Now I know why people rave. It’s not only the best grilling book I’ve seen, but it’s probably one of the best cookbooks in print. Beautifully designed with great recipes, step-by-step photos and useful marginalia. Warning: Raichlen puts butter or oil on everything, even steak. Beyond meat, there are lots of recipes for grilled veggies and even grilled deserts.
—Gareth Branwyn
From reading the Amazon reviews it appears this book has turned many men into chefs. They started out grilling and ended up cooking.
—KK
- Raichlen, Steven. 2001. How to Grill. New York: Workman Publishing Company, Inc.
- 498 pages
- $12
- Available from Amazon
Sample Excerpts
The pros use the poke test to gauge the desired degree of doness: A quick poke of the meat with your finger will tell you whether it’s rare, medium, or (heaven forbid) well-done. Use the following guide to help you, but remember: A steak will continue cooking even after it comes of the grill.
*
“Bizarre” and “outrageous” aren’t necessarily words you expect to find in a cookbook. But how else would you describe roasting a chicken in a vertical position over an open beer can? I first encountered the method at the Memphis in May Barbecue Festival and described it in The Barbecue! Bible. Since then, I’ve prepared beer-can chicken hundreds of times, and each time this astounding technique produces an exquisite bird. The fact is, the upright position helps drain off the fat, and crisp the skin, while the beer in the can steams and flavors the bird from the inside. Needless to say, the sight of a roasted chicken standing erect on an upright can of beer will astound your guests.
Best Vegan Cookbooks
Veganomicon

Veganomicon is the best vegan (no meat or dairy) cookbook out there. Its reputation is based on the quantity and variety of its recipes, and the complexity and deliciousness of the resulting dishes. There are more than 250 recipes, presented with wit and lighthearted punk-rock irreverence, as well unpretentious and helpful instructions. These vegan dishes don’t only try to mimic meat-based meals; they are just good food. Our household doesn’t adhere to a vegan diet, yet we’ve found some of these recipes great eye-openers as to how tasty and accessible homemade vegan food can be.
—Elon Schoenholz
- Moskowitz, Isa Chandra and Terry Hope Romero. 2007. Veganomicon. Cambridge, MA: De Capo Press.
- 336 pages
- $18
- Available from Amazon
Sample Excerpts
Chickpea Cutlets
We try not to play favorites, but this is one of our babies and a recipe that we are sure will take over food blogs worldwide. A combination of chickpeas and vital wheat gluten formed into savory cutlets, it’s perfect for when you want something “meaty” buy don’t want to go to the trouble of making seitan. We serve these cutlets in myriad ways, packed into sandwiches or smothered in mustard sauce, with a side of mashed potatoes and roasted asparagus. It’s vegan food that you can eat with a steak knife and, best of all, it is fast and easy. You’ll probably want to double the recipe if you’re serving it to guests.
1 cup cooked chickpeas
2 tablespoons olive oil
½ cup vital wheat gluten
½ cup plain bread crumbs
¼ cup vegetable broth or water
2 tablespoons soy sauce
2 cloves garlic, pressed or grated with a microplane grater
½ teaspoon lemon zest
½ teaspoon dried thyme
½ teaspoon Hungarian paprika
¼ teaspoon dried rubbed sage
Olive oil for pan frying
Beanball Sub
This is a conglomeration of a few recipes from the cookbook that also would make great use of leftover Beanballs (page 189). We throw in a handful of spinach just for posterity; you need not be so healthy if you don’t feel like it. Also, if you don’t want to make the Pine Nut Cream (page 164) and just want to use some soy cheese, we won’t judge you. These would be perfect for a Super Bowl party, or since you are a vegan and hate football, a Nobel Prize party. Ooh, we can’t wait to see who wins for physics this year!
1 recipe Beanballs (page 189)
1 recipe (4 cups) Marinara Sauce, or any of the variations (page 205)
1 recipe Pine Nut cream (page 164)
4 hoagie rolls, split open
2 cups fresh spinach leaves, well washed
*
Tip: To toast sesame seeds: Preheat a small pan over medium-low heat. Pour in the sesame seeds and toast them, stirring often, for about 3 minutes. Once they are browned, immediately remove them from the pan to prevent burning.
*
Tip: This is our favorite way to prep collards: To get rid of the tough stem without having to sit there cutting it, you can actually easily tear the leaves from the stem with your hands. Fill the sink with water, pull off the leaves, rip them into large pieces (collards are tough, they can take it) and put the leaves into the water to rinse them. No need to drain, just give them a shake before adding to the pan.
Simply Vegan

When I went vegan, I was 14 years-old (14 years later, I still am). At the time, my parents made me sell them on the idea of maintaining my health sans animal products. At first the task seemed incredibly daunting. Once I found Simply Vegan, I had all the answers.
This book is perfect for beginning vegans because it has specific sections on how to be a healthy vegan, as opposed to a “Fritos and Sprite” vegan. The text goes into various sources of proteins and minerals, and includes ready-to-go weekly shopping lists and daily meal lists. If you’re getting into veganism, you can do it safely and intelligently with a minimal amount of work; just buy the stuff on the shopping list and cook it.
I won’t say the recipes in this book are the best ever. They certainly can’t hold a candle to much of Veganomicon. But if you know your way around a spice rack, they’re pretty good. Either way, there’s no better book I’ve found which covers the nutritive bases and really can set a new vegan on the right path to whole health. 14 years later, I’m still vegan and my folks are mostly vegan as well.
—Ian Hall
- Wasserman, Debra and Reed Mangels. 2006. Simply Vegan: Quick Vegetarian Meals, Fourth Edition. Baltimore, MD: Vegetarian Resource Group.
- 224 pages
- $11
- Available from Amazon
Sample Excerpts
Generally, vegan diets can be low in fat if they emphasize grains, legumes, fruits, and vegetables. Some foods vegans eat such as oils, margarine, nuts, nut butters, tofu, tahini, avocado, and coconut are high in fat. These foods should not be the center of one’s diet but should be used sparingly. For example, tofu is high in fat. If you ate a pound of tofu, you would eat about 22 grams of fat. Eating a smaller amount of tofu (4 ounces) and serving it over rice with vegetables could provide the same number of calories and less fat.
*
Calcium, needed for strong bones, is found in dark green leafy vegetables, tofu made with calcium sulfate, calcium-fortified soy milk and orange juice, and many other foods commonly eaten by vegans. Although lower animal protein intake may reduce calcium losses, there is currently not enough evidence to suggest that vegans have lower calcium needs. Vegans should eat foods that are high in calcium and/or use a calcium supplement.
The Mushroom Bible
Mushrooms Demystified

Veterans of wild mushrooming quickly graduate to author David Arora’s masterpiece, Mushrooms Demystified, which is the undisputed bible of mushroom knowledge in North America. Where All That the Rain Promises and More... is breezy and succinct, Demystified is encyclopedic and exhaustive. You take Rains out to the mushrooms in the woods; you bring the mysterious ones back to the heavy Demystifed tome at your kitchen table.
—KK
- Arora, David. 1986. Mushrooms Demystified. Berkeley, CA: Ten Speed Press.
- 1020 pages
- $26
- Available from Amazon
Sample Excerpts
Boletus appendiculatur (Butter Bolete); pores normally stain blue when bruised.
*
LBM’s: Little Brown Mushrooms
The cap is brown, the stem a shade browner, the gills browner still. This can be said of nearly one half of all the mushrooms you find. On even the most casual jaunt through the woods, you’ll find dozens and dozens of Little Brown Mushrooms sprouting at your feet, and very likely under them as well. The fact is, Little Brown Mushrooms (“LBM’s”) are so overwhelmingly abundant and uncompromisingly undistinguished that it is more than just futile for the beginner to attempt to identify them—it is downright foolish.
Food with Few Dishes
Glorious One-Pot Meals

Elizabeth Yarnell has developed an easy, tasty, and fast method of one-pot cooking she calls “infusion cooking.” More or less, it’s the opposite of slow-cooker cooking. The ingredients are layered in a two-quart cast-iron Dutch oven, which is covered and placed in a 450°F oven for 45 minutes. I’ve found that I can assemble one of Yarnell’s meals in the time it takes the oven to heat. That makes two servings: one for a couple or, in my case, one for lunch and dinner. Although the recipes in Glorious One-Pot Meals need a bit of spicing up, after making a couple, you get the idea and improvisation is easy.
Yarnell recommends an enameled cast-iron Dutch oven. Although it’s not enameled, I’ve found the Texsport two-quart Dutch oven ($25 at Amazon) to be my favorite. It’s pre-seasoned and easy to clean and use. Most of the two-quart Dutch ovens are squat and short. The Texsport is narrower and taller, which seems to work best for this method of cooking (I’ve tried several different ovens). Plus, when it’s filled to the brim, the Texsport is actually 2.5 quarts. The extra room is useful if you’re including leafy greens. If you have your heart set on using an enameled pot, I recommend the Staub 2.25-quart round cocotte ($100 at Amazon) instead of the Le Creuset dutch oven ($140), because the Staub is higher quality and better made.
—Michael Ham
- Yarnell, Elizabeth. 2009. Glorious One-Pot Meals. New York: Broadway Books.
- 240 pages
- $25
- Available from Amazon
Sample Excerpts
To give you an idea, here’s a recipe I came up with, layer by layer, starting with the bottom and moving up:
¼ large onion, chopped coarsely
½ c uncooked converted rice (this makes 2 servings: for some reason in the book Yarnell consistently cooks a full cup—4 servings—of rice: too much for me)
2 Tbsp vinegar over the rice (sherry, rice, balsamic, Chinese black, whatever)
8 oz protein (I’ve successfully used lamb, chicken breast, tempeh, and a variety of fish—I cut the protein into bite-size pieces)
salt, pepper, crushed red pepper (just a little to provide some body), perhaps some herbs—with fish I usually squeeze half a lime over them and add some capers to this layer
4 mushrooms, sliced
½ bell pepper (green, red, or yellow), cut into squares
1 yellow crookneck squash, coarsely chopped
½ bulb fennel, cored and sliced
Fill the remaining space with your choice of: green beans, broccoli, red chard, spinach, or any other leafy greens.
2 Tbsp Bragg’s vinaigrette
2 Tbsp sherry
1 Tbsp Worcestershire sauce (I use homemade)
1 tsp Dijon mustard
Whisk together in a small bowl, then pour over the top.
Cover and cook for 45 minutes in 450°F oven. Serves two.
You will discover through experience the amount of liquid you’ll need with different vegetables. With bok choy, for example, no additional liquid is needed. For the starch layer, I’ve also used: baby potatoes, quinoa, egg noodles, pasta, and the like. This method is terrific and generally will up your vegetable consumption without raising calories.
Fermented Food Cookbook
Wild Fermentation

Yogurt, bread, beer, kimchi, wine, cheese, miso, kraut, and vinegar are among the many foods produced with the aid of microorganisms. Those are living beasties of a type that we ordinarily try to remove from what we eat. This cookbook is full of fermentation recipes. It presents a unified theory of “live-culture foods,” a way of connecting their different methods in order to understand why fermentation is a Good Thing, and why there should be more of it.
Fermentation is fairly easy to do. It can self-correct many beginner’s errors. It is definitely a slow-food process, but at the same time, a low-effort process since the bugs do most of the work. The recipes here are starter ones, broad in scope, easy to do, just to get you going. The appendix contains a good roundup of sources for a large variety of live cultures. You can find deeper more complex recipes in specific books, but here in one slim volume is a great introduction to how to ferment. At least once, you should make your own yogurt, bread, beer, kimchi, wine, cheese, miso, kraut, and vinegar. Find what you do well and make more of it.
More importantly, ferment something new.
—KK
- Katz, Sandor Ellix. 2003. Wild Fermentation. White River Junction, VT: Chelsea Green Publishing Company.
- 200 pages
- $17
- Available from Amazon
Sample Excerpts
By eating a variety of live fermented foods, you promote diversity among microbial cultures in your body.
*
Timeframe: 1 to 4 weeks (or more)
Special Equipment:
Ceramic crock or food-grade plastic bucket, 1-gallon/4-liter capacity or greater
Plate that fits inside crock or bucket
1-gallon/4-liter jug filled with water (or a scrubbed and boiled rock)
Cloth cover (such as a pillowcase or towel)
Ingredients (for 1 gallon/4 liters):
5 pounds/2 kilograms cabbage
3 tablespoons/45 milliliters sea salt
*
I know of no food that is without some tradition of fermentation.
*
Hamid Dirar has identified eighty distinct fermentation processes in The Indigenous Fermented Food of the Sudan, a book describing an incredible array of ferments that result in consumption of every bit of animal flesh and bone.
Low Temperature Cooking
Beginning Sous Vide

There’s a new way of cooking. When food is simmered in a sealed pouch at low temperatures for long periods of time the food flavors are surprisingly enhanced. Meats in particular benefit from this type of preparation, called sous vide in French. I found fish and veggies made by this method to be amazingly tasty, with a unique texture and bursting with savories. Meats are stunningly moist without being overdone or underdone. This method is neither roasting, stewing, or searing. It’s a whole new method of cooking that brings a new set of flavors, textures, and treats.
But lower cooking temperatures require more exactitude, and the food pouches need to have their air removed to ensure even cooking, so the equipment to cook this way has been expensive and confined to fancy restaurants. Naturally, amateurs quickly figured out home versions, while appliance makers started selling cheaper residential gadgets.
But know-how was still in short supply. I found this cookbook the best one to start out with. Low temperature or souz vide cooking requires a whole new set of recipes. Cooking times are so different you need charts to determine duration and temperature, which this book provides. This guide explains the principles extremely well and they assume you’ll be using homemade or home grade equipment. Basically what you need is a water bath that can maintain its temperature to within a few degrees over several hours or more. Dedicated units have bubblers and thermostats to keep very even water temperatures. And an ordinary FoodSaver freezer vacuum unit will produce airless watertight pouches of food.
However there is an extremely easy and cheap way to try out sous vide cooking for the first time without buying any equipment at all. You are limited in what you can do, but you’ll get an idea of what the process can do. All you need is a cooler, a kitchen thermometer, and a vacuum packed hunk of food from the grocery store.
As an example, we took some frozen vacuum packed fish from Trader Joe’s. First you defrost it.

Then you fill up the cooler halfway or so with water heated on the stove to the appropriate low temperature (found in the book or online). In the case of fish it’s probably not much above the maximum temperature coming out of your water heater. Let the food steep in the water for the required time. (It can be up to hours for meat.) You may need to add some hot water if your thermometer shows the water cooling. Unwrap the finished fish and add sauce.
If you like the results you can build your own bath, or purchase a home unit, and use this book to guide your exploration.
—KK
- Logsdon, Jason. 2010. Beginning Sous Vide. Seattle, WA: CreateSpace.
- 201 pages
- $24
- Available from Amazon
Sample Excerpts
The basic concept of sous vide cooking is that food should be cooked at the temperature it will be served at. For instance, if you are cooking a steak to medium rare, you want to serve it at 131°F.
With traditional cooking methods you would normally cook it on a hot grill or oven at around 400°F-500°F and pull it off at the right moment when the middle has reached 131°F. This results in a bulls eye effect of burnt meat on the outside turning to medium rare in the middle. This steak cooked sous vide would be cooked at 131°F for several hours.
This will result in the entire piece of meat being a perfectly cooked medium rare. The steak would then usually be quickly seared at a high heat to add the flavorful, browned crust to it.
*
A great low-cost method of sealing your food is food-grade ziploc bags. They have a few drawbacks but work great for short cooked foods, especially if you are just getting started with sous vide cooking and do not want to spend any up-front money. In most cases sealing your foods with ziploc bags is also a lot easier than using a vacuum sealer.
*
The main advantage is price. If you already have a cooler and ziploc bags then it is basically free to try.
Another advantage is that the water coming out of many home faucets is around 131°F-139°F, meaning it is the perfect temperature to cook steak in. If your faucet is in that range it just means you rink up the tap water, fill the cooler, and throw in the steak. It can be very simple.
*
Some of the most impressive results of sous vide are created with tough cuts of beef. Sous vide allows you to do things that traditional methods are unable to accomplish, such as cooking short ribs medium-rare but still tenderizing them, or creating fall-apart medium-rare roasts.
This is accomplished because cooking tough cuts of beef with sous vide allows you to break down and tenderize the meat without cooking it above medium-rare and drying it out. Once temperatures in beef go above 140°F the meat begins to dry out and become more bland. However, they also start to tenderize more quickly above this temperature which is why tough roasts and braises are done for hour at high temperatures. Using sous vide, you can hold the meat below 140°F for a long enough time for the tenderizing process to run its course.
*
Most tough cuts of beef are cooked sous vide for between 1 and 2 days. However, for some more tender beef roasts shorter cooking times of 4 to 8 hours will be enough time to tenderize the meat fully.
7. Services


Efficient Recipe Search
Recipe Aggregators
As much as I like cooking from any of the several cookbooks in my library, I often look for new recipes online. It’s not an easy task. I’m amazed at the number of ad-riddled pages I find by Googling the name of a dish. I do have an online subscription to Cook’s Illustrated (previously reviewed), and there are a handful of other individual free sites I turn to for recipes and technique info. However, as a research librarian, I’m always keen to execute a search in a manner that maximizes the number of relevant results by querying a specific set of targeted resources. For scientific queries, I use freely accessible databases such as Public Library of Science PubMed, or I use one of my library accounts to access subscription-based databases such as Wiley InterScience or Elsevier’s Science Direct. When I put my home-cook hat on, I approach recipe-finding with a similar set of expectations. Though there’s no shortage of recipe information online, there’s not really an equivalent set of databases for cookery. Here’s a round-up of the best recipe aggregation resources I’ve found.

Epicurious is my go-to recipe site; I’ve used it for four years. One of the aspects I like most about it is the user comments. Because the site is older, most recipes have at least a handful of comments, and I’ve found that most users leave really helpful feedback (usually suggestions for how to scale or tweak recipes). However, it’s also very easy to ignore user comments if you just want to stick to the original recipe. I usually cook from printed versions of the recipes (rather than bringing my laptop in the kitchen), and Epicurious offers several options for the size of the printed page, whether or not images are included, and even the option to print a separate shopping list.
Most recipes come from Gourmet and Bon Appetit magazines (the site is owned by Conde Nast). Some come from cookbooks published by Random House, with whom Epicurious has some kind of republication agreement, it seems. Some have also been reprinted from other cookbooks, with permission. In addition to the 25,000 recipes from these professional resources, they also boast 50,000 member-submitted recipes. Epicurious is the online food site to beat.

Cookstr publishes recipes by professional chefs, including Mario Batali, Jamie Oliver, Alice Waters, Jacques Pepin, Michael Recchiuti, Mark Bittman, and on and on. In addition to recipes, the site also provides informative profiles for each chef. Features are fairly minimal, with a video section still under development, but I do like the simplicity of the site. Site registration allows you to save and comment on recipes. Although Cookstr only has a few recipes from each chef, it’s the closest thing to a massively cross-cook[book] database I’ve found. I hope it grows.

I learned about Food52 when the New York Times ran a round-up of new, crowd-sourced food sites. The hook of this site, founded by two food writers, is that every week there’s a theme-based competition; after a year of these contests, the winning recipes will be collected in a book. Any registered user can compete in the competitions, the founders select finalists and post slideshows of them testing the recipes, and then users vote for a winner. The focus of the site is the contests, and all recipes submitted for the contests are accessible, but registered users can upload any type of recipe. Although there is a pretty sizable diversity of recipes on the site, I most often use it when I’m looking for inspiration to try something new, not when I have a few keystone ingredients I’m trying to hang together.

Serious Eats is another curated food community with some social features, including a set of forums, and original video content in addition to a large collection of recipes. Recipes come largely from featured cookbook writers and chefs, but also the wider community base (in the forums). It’s more inclusive than Food52, because of its forums, and it’s more polyphonous because its cast of contributors is quite long and revolving. However, it’s less inclusive in the sense that the Recipes section of the site is limited to those curated by contributors (mostly recipes from featured books and chefs).

Foodbuzz is a network of foodbloggers (more than 10,000). They offer a set of services for “featured publishers,” including ad management and other perks, as well as several social networking-type features for individual users. Foodbuzz is one of the few sites I’ve found that actually aggregates recipes from across the web. You can submit links to recipes to be indexed, and you can also submit recipes for direct publication at the site. It displays some characteristics of a curated site in as much as it highlights recipes from members of its featured publishers network, but overall it’s quite open since anyone can submit a recipe or recipe link.
Epicurious, Cookstr, Food52, SeriousEats, and Foodbuzz are my favorite recipe aggregators. To reduce my search load even further, I’ve created a custom Google search engine that queries these sites in addition to a few of my favorite individual sources.
—Camille Cloutier
Ingredient Substitutions
The Cook’s Thesaurus

Although it has been online for years, I only recently discovered this incredibly handy resource. Use this simple website to find substitutes for cooking ingredients. Say a recipe calls for buckwheat flour, which you most likely don’t have on hand. What do you use? Type in the term and presto: The links take you to an entry which will suggest alternatives. I also find the site helpful in quickly introducing myself to new ingredients. While not exhaustive, it lists about 90% of the ingredients you’ll probably encounter, including many exotics, usually with a helpful photo and a short summary of its origin. This thesaurus of ingredients is fast, simple, and just right.
—KK
Sample Excerpts
Pigeon Pea = goongoo pea = gunga pea = gungo pea = congo pea = congo bean = no-eyed peas = gandules Shopping hints: These are usually sold dried, but fresh, frozen, and canned peas also are available. They have a strong flavor, and they’re popular in the South and in the Caribbean. Substitutes: yellow-eyed peas OR black-eyed peas
*

Jocoque = labin Notes: This is a Mexican product that’s halfway between buttermilk and sour cream. Substitutes: salted buttermilk OR sour cream OR yogurt OR crema
CSA Finder
LocalHarvest

LocalHarvest is a comprehensive one-stop resource for finding locally-grown food in the continental U.S. The site provides a customizable search feature on its homepage, and a simple zip code input provides you with a description and link to your closest Community Supported Agriculture option. Other search options include farmer’s markets, grocery co-ops, and restaurants that serve food made with organic ingredients.
—Elon Schoenholz
Sample Excerpts
Shared Risk
There is an important concept woven into the CSA model that takes the arrangement beyond the usual commercial transaction. That is the notion of shared risk. When originally conceived, the CSA was set up differently than it is now. A group of people pooled their money, bought a farm, hired a farmer, and each took a share of whatever the farm produced for the year. If the farm had a tomato bonanza, everyone put some up for winter. If a plague of locusts ate all the greens, people ate cheese sandwiches. Very few such CSAs exist today, and for most farmers, the CSA is just one of the ways their produce is marketed. They may also go to the farmers market, do some wholesale, sell to restaurants, etc. Still, the idea that “we’re in this together” remains. On some farms it is stronger than others, and CSA members may be asked to sign a policy form indicating that they agree to accept without complaint whatever the farm can produce.

Advantages for consumers
Eat ultra-fresh food, with all the flavor and vitamin benefits
Get exposed to new vegetables and new ways of cooking
Usually get to visit the farm at least once a season
Find that kids typically favor food from “their” farm—even veggies they’ve never been known to eat
Develop a relationship with the farmer who grows their food and learn more about how food is grown
It’s a simple enough idea, but its impact has been profound. Tens of thousands of families have joined CSAs, and in some areas of the country there is more demand than there are CSA farms to fill it. The government does not track CSAs, so there is no official count of how many CSAs there are in the U.S.. LocalHarvest has the most comprehensive directory of CSA farms, with over 2,500 listed in our grassroots database. In 2008, 557 CSAs signed up with LocalHarvest, and in the first two months of 2009, an additional 300 CSAs joined the site.
Variations
As you might expect with such a successful model, farmers have begun to introduce variations. One increasingly common one is the “mix and match,” or “market-style” CSA. Here, rather than making up a standard box of vegetables for every member each week, the members load their own boxes with some degree of personal choice. The farmer lays out baskets of the week’s vegetables. Some farmers encourage members to take a prescribed amount of what’s available, leaving behind just what their families do not care for. Some CSA farmers then donate this extra produce to a food bank. In other CSAs, the members have wider choice to fill their box with whatever appeals to them, within certain limitations. (e.g. “Just one basket of strawberries per family, please.”)
Global Spice Source
Penzeys Spices

The spices of life. All of them, in subtle variations, from around the world. By mailorder.
—KK
- Penzeys Spices
- Muskego, WI 53150, 800-741-7787
Sample Excerpts
Saffron
Saffron is the stigma of the fall flowering crocus. Peek inside most any flower and you will see three threadlike filaments. These are stigma—but only in the saffron crocus are these stigma worth thousands of dollars per pound. Saffron is so valuable because it is a very labor intensive crop; only 5–7 pounds of saffron can be produced from each acre of land. This makes saffron the most expensive spice by weight—it has always been—but by use saffron isn’t that expensive, because a little goes a long way. A single gram of saffron easily translates into golden color and fragrant flavor.
Saffron contains 450–500 saffron stigmas to the gram. The stigma are also called threads, strings, pieces or strands. 1 gram equals 2 tsp. whole, 1 teaspoon crumbled or 1/2 teaspoon powdered. Don’t buy pre-powdered saffron because it loses flavor quickly and is usually cut with turmeric or something else.
Mace
Mace, the lace-like, dried covering of the nutmeg, is a sweet and flavorful spice well worth using. Mace has a softer flavor than nutmeg, and for a nice change of pace it can be used in place of nutmeg in any recipe. Blade Mace can also be added to clear soups and sauces where nutmeg powder might spoil the appearance. Mace is a traditional flavoring for doughnuts and hotdogs.
Ajwain Seed
Ajwain (or Ajowan) is a traditional addition to many Indian and Pakistani dishes. It’s especially useful in vegetarian lentil and bean dishes, as a flavoring, and to temper the effects of a legume-based diet. From Pakistan.
50113 1 lb bag 13.90
50184 8 oz bag 7.49
50142 4 oz bag 4.29
Kashmir “Mogra Cream” Indian Saffron is the world’s finest saffron. The dark red color and long perfect strands are as beautiful as they are colorful and flavorful. Kashmir saffron is awfully tough to obtain, which makes it higher in price, but Kashmir Mogra Cream Saffron is truly wonderful.
Spanish Coupe Saffron is the top grade of the Spanish Saffron crop. Extra hand labor is used to remove every bit of the yellow saffron style material, leaving 100% beautiful pure red saffron threads—hence the name: coupe means “to cut”, as in cutting off all the yellow bits. Spanish Coupe Saffron is a truly excellent crop, especially nice for the traditional Spanish dishes.
Spanish Superior Saffron is the most widely available saffron and is a very good crop. Spanish Superior Saffron has a bit of the yellow style material left attached to some of the saffron stigmas (see photo), so it is not quite as strong as Spanish Coupe or Kashmir Indian Saffron.
Coffee Roasting Supplier
Sweet Maria’s

My particular enthusiasm is home-roasted coffee and Sweet Maria’s is my go-to supplier. Not only do they offer everything you need to roast your own coffee at home, but they also carry a great range of products from inexpensive entry-level roasters to top-of-the-line home roasters. (I’ve been using the Hottop roaster for many years now and am very satisfied).
The best thing about Sweet Maria’s is that it is also a great source of information about coffee, roasting, brewing, and drinking. I’ve been a coffee nut for quite a few years now and have learned a fair bit about the subject. As far as I can tell, everything on the Sweet Maria’s site is either correct or clearly marked as opinion. What more could you want?
—Dudley Irish
8. Quick Tips


Scrub with an Onion Bag

Everyone knows the worst part about baking bread: Having to clean up the sticky, floury mess from counter tops, bowls, and utensils. The gluey mass refuses to come out of sponges, and gums up anything it touches.
I recently discovered a solution: The netting that onions and other vegetables come packaged in. By cutting up the stiff netting into about 6-inch squares you can make reusable super scrubbing tools. A few bags will produce more than you’ll need. When you’re finished scrubbing, just rinse off the gunk, recycle the netting, and marvel at your flour- and cheese-free sponges.
—Pen Duby
Remedy Garlic Hand Smell
I cook a lot and like to use garlic. One downside of properly cleaning and chopping and slicing garlic is the smell permeates your skin. Years ago, I heard on NPR that if you rubbed your hands under cold water with something made of stainless steel, the smell would be eliminated. I didn’t believe it, but it works. You can buy “fancy” soap-shaped or garlic-shaped stainless steel objects to do this with, but no need. Go into your drawer and get out a butter knife or spoon instead. This really works!
—Michael Raab
Whisk with Chopsticks
On one of my trips to Asia, I noticed an omelet chef at breakfast using a pair of chopsticks to whisk the eggs. Since then, I have kept several pairs of good quality chopsticks in my kitchen for whisking and stirring jobs where a traditional balloon whisk is simply too big and can’t get into the container’s corners, or if the pot does not have a rounded bottom. Simply grasp the chopsticks together as if they were a pair of pencils; hold towards the thick end. For more whisking power, slightly separate the two thin ends. As with a balloon whisk, most of the power should come from moving your forearm from the elbow, with your wrist providing a whip-like follow through.
—Aryeh Abramovitz
Preserve Food with Office Supplies
Sure you can buy special plastic “chip-clips” to keep your snack bags closed, but they’re expensive. Or you can use clothespins, but they’re bulky and don’t always stay put. Binder clips, those little spring steel clamps available at any office supply store, are perfect for resealing opened bags of dried snacks or or frozen food. The versatile little jaws are strong enough you can even use them on cardboard containers. I fold my bags at the corners and roll them down to keep things really airtight. The clips also come in a variety of different sizes.
—Tom Lundin
About Cool Tools
At the Cool Tools website, we post just one review per work day, five times a week. Not just kitchen stuff, but all kinds of useful things. One day you’ll hear about a solar-powered flashlight. The next, a book on how to build an igloo, or the best heart rate monitor. We pride ourselves on the mix.
The Cool Tools website began in 2003. However Cool Tools started even earlier, in 2000, as an email list run by Kevin Kelly, a founding editor of Wired Magazine and, prior to that, publisher and editor of the Whole Earth Catalog and its quarterly journal. The Whole Earth Catalog was a reader-written publication, with no ads, long before the web. Much of Cool Tools’ DNA stems from the passionate amateur’s spirit of the Catalog. As Catalog founder Stewart Brand wrote in in the first Whole Earth Catalog in 1969:
An item is listed in the CATALOG if it is deemed:
- Useful as a tool,
- Relevant to independent education,
- High quality or low cost,
- Easily available by mail.
We continue to uphold this standard and sense of community. It is that lineage which attracted me to Cool Tools in 2007, when I became its editor. Web culture is obsessed with the latest and, supposedly, greatest. But bloggers and writers may only briefly test an item before submitting a review. They don’t know what came before. Therefore, they are primarily concerned with what is new, rather than what is best. In contrast, the Whole Earth Catalog and, therefore, Cool Tools only draws attention to what works and stands the test of time.
That means that if you buy an item or try a tip included in this ebook, you should count on it. If, for whatever reason, our recommendation doesn’t quite satisfy, please let us know. If you use an item that’s superior to anything we’ve featured in this ebook, please let us know. If you have any questions or comments about this ebook, please let us know.
We hope this ebook is the beginning of how we can help you. Our website, which now has over 2,000 tool reviews, remains perfectly searchable and free. We encourage you to click around to discover some great classic tools and uncommon gems. Suggestions for tools much better than what we recommend are always wanted. If you use an item that’s superior to anything we’ve featured online, please let us know.
In case you couldn’t tell, Cool Tools thrives on feedback. Readers like you keep improving our recommendations, which in turn inspire others to recommend something better yet. In fact, if it weren’t for contributions from the readers below, this ebook wouldn’t exist. We thank the following readers for their submssions:
Aaron Scrignar, Adam Fields, AK, Amy Thomson, Aryeh Abramovitz, Bob Callaway, Brad Zebal, Bruno Teersteeg, Bryn-Ane MacKinnon, Chris Hecht, Chris Lewis, Christopher R. Carlson, David Jacoby, David King, Debora Dekok, Dudley Irish, Ellen Rocco, Ethan Stettner, Gareth Branwyn, Ginger Cooper, J. P. Roosma, Jay Allison, Jeff Jewell, Jeff Zimmerman, Jim Rubel, Jon Braun, Jon Margolis, Kelly Spitzer, Kurt Bollacker, Mark D. Esswein, Mark Frauenfelder, Marsh Gardiner, Matt Field, Michael Ham, Michael Krakovskiy, Michael Raab, Patrick Handley, Paul Knuth, Paul Saffo, Pen Duby, Raquel Maria Dillon, Rene, Robert Narracci, Sam Putman, Sessalee Hensley, Steve Allen, Steve Golden, Stewart Brand, Ted Boydston, Tim Plumley, Tom Lundin, Tom Streeter, Walter Susong III.
In addition, there are a handful of other people who’ve had a hand in keeping Cool Tools alive and well: Oliver Hulland is the site’s current editor; Wayne Bremser masterfully implements all changes to our CMS (Movable Type). Over the years, Cool Tools has been helmed by these previous editors: Elon Schoenholz, Bruce Sterling, and Charles Platt.
We’d love to have you among our future contributors. Tell us what you love.
—Steven Leckart
December 2011
Table of Contents
Super Peel
Polder Thermometer/Timer
Royal VKB Oven Mitt Apron
Stainless-Steel Locking Tongs
Excalibur Food Dehydrator
Nesco Food Dehydrator
The Excalibur vs. the Nesco
Egg Timer
All-Clad Roaster
Silicone Baking Mat
Solaire Anywhere Portable Infrared Grill
Back to Basics Toaster and Egg Poacher
Big Green Egg
Progressive Apple Peeler
Microplane Grater
Magic Fish Scaler
Pineapple Slicer/Corer
OXO Apple Divider
Dexter-Russell Fillet Knives
Whizard Handguard
Pumpkin Gutter
Spyderco Sharpmaker
Forschner Victorinox Chef’s Knife
OXO Peeler
Fiskars Kitchen Shears
Rösle Garlic Press
Kiwi Knives
CocoTap
Joyoung Soy Milk Maker
Spout Ladle
Waring Pro YM350 Yogurt Maker
Hamilton Beach Commercial Juicer
OXO Salad Spinner
Quick Snap Ice Tray
Peanut Butter Mixer
Sodastream Home Soda Maker
Citrus Squeezers
OXO Splatter Screen
Cuisinart Smart Stick Hand Blender
Omega Juicer
Zojirushi Electric Dispensing Pot
VitaMix 5200 Countertop Blender
Lee Valley Jar Opener
Bottle Scraper
King Arthur Dough Whisk
Give It A Rest Bamboo Utensils
Zeroll Ice Cream Scoops
Kuhn Rikon Safety Lid Lifter
Best Flour Duster
Spice Jar Measuring Spoons
Dexter-Russell Dough Scraper
Collapsible Silicone Funnel
Dexas Pop Silicone Colander
Simplehuman Flip-Top Dishrack
King Arthur Sugar/Flour Dispenser
Spice Stack Rack
Mr. Bento Lunch Jar
Butter Bell
Norpro Stainless Steel Pail
Kamenstein Paper Towel Holder
On Food and Cooking
How to Cook Everything
How To Cook Everything (iPhone app)
The Cambridge World History of Food
Cook’s Illustrated
The Bread Baker’s Apprentice
How to Grill
Veganomicon
Simply Vegan
Mushrooms Demystified
Glorious One-Pot Meals
Wild Fermentation
Beginning Sous Vide
Recipe Aggregators
The Cook’s Thesaurus
LocalHarvest
Penzeys Spices
Sweet Maria’s
Scrub with an Onion Bag
Remedy Garlic Hand Smell
Whisk with Chopsticks
Preserve Food with Office Supplies


Cool tools really work. A cool tool can be any tried-and-true book, gadget, software, video, map, hardware, material, or website. The reviews in this book were written by those of us who have actually used the tool and others like it. We only review things–old or new–that we like and ignore the rest.