Hacker Monthly: April 2011 – Read Now and Download Mobi
Curator
Lim Cheng Soon
Proofreader
Emily Griffin
Printer
MagCloud
Contributors
ARTICLES
Tom Preston-Werner
Adam Cecchetti
Tracy Osborn
Amir Khella
Ruben Berenguel
Joshua Johnson
Abhijit Menon-Sen
John Bartholdi
Edward Z. Yang
COMMENTARIES
Ed Weissman
Jonathan Rockway
Hamlet D’Arcy
Peter Scott
Advertising
[email protected]
Contact
[email protected]
Published by
Netizens Media
46, Taylor Road,
11600 Penang, Malaysia.
Hacker Monthly is the print magazine version of Hacker News — news.ycombinator.com, a social news website wildly popular among programmers and startup founders. The submission guidelines state that content can be “anything that gratifies one’s intellectual curiosity.” Every month, we select from the top voted articles on Hacker News and print them in magazine format. For more, visit hackermonthly.com.
For links to the posts on Hacker News, visit http://hackermonthly.com/issue-11. All articles and comments are reprinted with permission of their original author. Hacker Monthly is published by Netizens Media and not affiliated with Y Combinator in any way.
The Git Parable
By TOM PRESTON-WERNER
Git is a simple, but extremely powerful system. Most people try to teach Git by demonstrating a few dozen commands and then yelling “tadaaaaa.” I believe this method is flawed. Such a treatment may leave you with the ability to use Git to perform simple tasks, but the Git commands will still feel like magical incantations. Doing anything out of the ordinary will be terrifying. Until you understand the concepts upon which Git is built, you’ll feel like a stranger in a foreign land.
The following parable will take you on a journey through the creation of a Git-like system from the ground up. Understanding the concepts presented here will be the most valuable thing you can do to prepare yourself t harness the full power of Git. The concepts themselves are quite simple, but allow for an amazing wealth of functionality to spring into existence. Read this parable all the way through, and you should have very little trouble mastering the various Git commands and wielding the awesome power that Git makes available to you.
The Parable
Imagine that you have a computer that has nothing on it but a text editor and a few file system commands. Now imagine that you have decided to write a large software program on this system. Because you’re a responsible software developer, you decide that you need to invent some sort of method for keeping track of versions of your software so that you can retrieve code that you previously changed or deleted. What follows is a story about how you might design one such version control system (VCS) and the reasoning behind those design choices.
Snapshots
Alfred is a friend of yours that works down at the mall as a photographer in one of those “Special Moments” photo boutiques. All day long he takes photos of little kids posing awkwardly in front of jungle or ocean backdrops. During one of your frequent lunches at the pretzel stand, Alfred tells you a story about a woman named Hazel who brings her daughter in for a portrait every year on the same day. “She brings the photos from all the past years with her,” Alfred tells you. “She likes to remember what her daughter was like at each different stage, as if the snapshots really let her move back and forth in time to those saved memories.”
Like some sort of formulaic plot device, Alfred’s innocent statement acts as a catalyst for you to see the ideal solution to your version control dilemma. Snapshots, like save points in a video game, are really what you care about when you need to interact with a VCS. What if you could take snapshots of your codebase at any time and resurrect that code on demand? Alfred reads the dawning realization spreading across your face and knows you’re about to leave him without another word to go back and implement whatever genius idea he just caused you to have. You do not disappoint him.
You start your project in a directory named working. As you code, you try to write one feature at a time. When you complete a self-contained portion of a feature, you make sure that all your files are saved and then make a copy of the entire working directory, giving it the name snapshot-0. After you perform this copy operation, you make sure to never again change the code files in the new directory. After the next chunk of work, you perform another copy, only this time the new directory gets the name snapshot-1, and so on.
To make it easy to remember what changes you made in each snapshot, you add a special file, named message, to each snapshot directory that contains a summary of the work that you did and the date of completion. By printing the contents of each message, it becomes easy to find a specific change that you made in the past, in case you need to resurrect some old code.
Branches
After a bit of time on the project, a candidate for release begins to emerge. Late nights at the keyboard finally yield snapshot-99, the nascent form of what will become Release Version 1.0. It comes to pass that this snapshot is packaged and distributed to the eagerly awaiting masses. Stoked by excellent response to your software, you push forward, determined to make the next version an even bigger success.
Your VCS has so far been a faithful companion. Old versions of your code are there when you need them and can be accessed with ease. But not long after the release, bug reports start to come in. Nobody’s perfect, you reassure yourself, and snapshot-99 is readily retrievable, glad to be brought back to life for the purposes of applying bug fixes.
Since the release, you’ve created 10 new snapshots. This new work must not be included in the 1.0.1 bug fix version you now need to create. To solve this, you copy snapshot-99 to working so that your working directory is at exactly the point where Version 1.0 was released. A few swift lines of code and the bug is fixed in the working directory.
It is here that a problem becomes apparent. The VCS deals very well with linear development, but for the first time ever, you need to create a new snapshot that is not a direct descendent of the preceding snapshot. If you create a snapshot-110 (remember that you created 10 snapshots since the release), then you’ll be interrupting the linear flow and will have no way of determining the ancestry of any given snapshot. Clearly, you need something more powerful than a linear system.
Studies show that even short exposures to nature can help recharge the mind’s creative potential. You’ve been sitting behind the artificially polarized light of your monitor for days on end. A walk through the woods in the brisk autumn air will do you some good,and, with any luck, will help you arrive at an ideal solution to your problem.
The great oaks that line the trail have always appealed to you. They seem to stand stark and proud against the perfectly blue sky. Half the ruddy leaves have departed from their branches, leaving an intricate pattern of branches in their wake. Fixating on one of the thousands of branch tips you idly try to follow it back to the solitary trunk. This organically produced structure allows for such great complexity, but the rules for finding your way back to the trunk are so simple, and perfect for keeping track of multiple lines of development! It turns out that what they say about nature and creativity are true.
By looking at your code history as a tree, solving the problem of ancestry becomes trivial. All you need to do is include the name of the parent snapshot in the message file you write for each snapshot. Adding just a single upstream pointer will enable you to easily and accurately trace the history of any given snapshot all the way back to the root.
Branch Names
Your code history is now a tree. Instead of having a single latest snapshot, you have two: one for each branch. With a linear system, your sequential numbering system let you easily identify the latest snapshot. Now, that ability is lost.
Creating new development branches has become so simple that you’ll want to take advantage of it all the time. You’ll be creating branches for fixes to old releases, for experiments that may not pan out; indeed it becomes possible to create a new branch for every feature you begin!
But like everything good in life, there is a price to be paid. Each time you create a new snapshot, you must remember that the new snapshot becomes the latest on its branch. Without this information, switching to a new branch would become a laborious process indeed.
Every time you create a new branch you probably give it a name in your head. “This will be the Version 1.0 Maintenance Branch,” you might say. Perhaps you refer to the former linear branch as the master branch.
Think about this a little further, though. From the perspective of a tree, what does it mean to name a branch? Naming every snapshot that appears in the history of a branch would do the trick, but requires the storage of a potentially large amount of data. Additionally, it still wouldn’t help you efficiently locate the latest snapshot on a branch.
The least amount of information necessary to identify a branch is the location of the latest snapshot on that branch. If you need to know the list of snapshots that are part of the branch you can easily trace the parentage.
Storing the branch names is trivial. In a file named branches, stored outside of any specific snapshot, you simply list the name/snapshot pairs that represent the tips of branches. To switch to a named branch, you need only look up the snapshot for the corresponding name from this file.
Because you’re only storing the latest snapshot on each branch, creating a new snapshot now contains an additional step. If the new snapshot is being created as part of a branch, the branches file must be updated so that the name of the branch becomes associated with the new snapshot. A small price to pay for the benefit.
Tags
After using branches for a while you notice that they can serve two purposes. First, they can act as movable pointers to snapshots so that you can keep track of the branch tips. Second, they can be pointed at a single snapshot and never move.
The first case allows you to keep track of ongoing development, things like “Release Maintenance.” The second case is useful for labeling points of interest, like “Version 1.0” and “Version 1.0.1.”
Mixing both of these uses into a single file feels messy. Both types are pointers to snapshots, but one moves and one doesn’t. For the sake of clarity and elegance, you decide to create another file called tags to contain pointers of the second type.
Keeping these two inherently different pointers in separate files will help you from accidentally treating a branch as a tag or vice versa.
Distributed
Working on your own gets pretty lonely. Wouldn’t it be nice if you could invite a friend to work on your project with you? Well, you’re in luck. Your friend Zoe has a computer setup just like yours and wants to help with the project. Because you’ve created such a great version control system, you tell her all about it and send her a copy of all your snapshots, branches, and tags so she can enjoy the same benefits of the code history.
It’s great to have Zoe on the team but she has a habit of taking long trips to far away places without internet access. As soon as she has the source code, she catches a flight to Patagonia and you don’t hear from her for a week. In the meantime you both code up a storm. When she finally gets back, you discover a critical flaw in your VCS. Because you’ve both been using the same numbering system, you each have directories named snapshot-114, snapshot-115, and so on, but with different contents!
To make matters worse, you don’t even know who authored the changes in those new snapshots. Together, you devise a plan for dealing with these problems. First, snapshot messages will henceforth contain author name and email. Second, snapshots will no longer be named with simple numbers. Instead, you’ll use the contents of the message file to produce a hash. This hash will be guaranteed to be unique to the snapshot since no two messages will ever have the same date, message, parent, and author. To make sure everything goes smoothly, you both agree to use the SHA1 hash algorithm that takes the contents of a file and produces a 40-character hexadecimal string. You both update your histories with the new technique, and instead of clashing snapshot-114 directories, you now have distinct directories named 8ba3441b6b89cad23387ee875f2ae55069291f4b and db9ecb5b5a6294a8733503ab57577db96ff2249e.
With the updated naming scheme, it becomes trivial for you to fetch all the new snapshots from Zoe’s computer and place them next to your existing snapshots. Because every snapshot specifies its parent, and identical messages (and therefore identical snapshots) have identical names no matter where they are created, the history of the codebase can still be drawn as a tree. Only now, the tree is comprised of snapshots authored by both Zoe and you.
This point is important enough to warrant repeating. A snapshot is identified by a SHA1 that uniquely identifies it (and its parent). These snapshots can be created and moved around between computers without losing their identity or where they belong in the history tree of a project. What’s more, snapshots can be shared or kept private as you see fit. If you have some experimental snapshots that you want to keep to yourself, you can do so quite easily. Just don’t make them available to Zoe!
Offline
Zoe’s travel habits cause her to spend countless hours on airplanes and boats. Most of the places she visits have no readily available internet access. At the end of the day, she spends more time offline than online.
It’s no surprise, then, that Zoe raves about your VCS. All of the day to day operations that she needs to do can be done locally. The only time she needs a network connection is when she’s ready to share her snapshots with you.
Merges
Before Zoe left on her trip, you had asked her to start working off of the branch named math and to implement a function that generated prime numbers. Meanwhile, you were also developing off of the math branch, only you were writing a function to generate magic numbers. Now that Zoe has returned, you are faced with the task of merging these two separate branches of development into a single snapshot. Since you both worked on separate tasks, the merge is simple. While constructing the snapshot message for the merge, you realize that this snapshot is special. Instead of just a single parent, this merge snapshot has two parents! The first parent is your latest on the math branch and the second parent is Zoe’s latest on her math branch. The merge snapshot doesn’t contain any changes beyond those necessary to merge the two disparate parents into a single codebase.
Once you complete the merge, Zoe fetches all the snapshots that you have that she does not, which include your development on the math branch and your merge snapshot. Once she does this, both of your histories match exactly!
Rewriting History
Like many software developers you have a compulsion to keep your code clean and very well organized. This carries over into a desire to keep your code history well groomed. Last night you came home after having a few too many pints of Guinness at the local brewpub and started coding, producing a handful of snapshots along the way. This morning, a review of the code you wrote last night makes you cringe a little bit. The code is good overall, but you made a lot of mistakes early on that you corrected in later snapshots.
Let’s say the branch on which you did your drunken development is called drunk and you made three snapshots after you got home from the bar. If the name drunk points at the latest snapshot on that branch, then you can use a useful notation to refer to the parent of that snapshot. The notation drunk^ means the parent of the snapshot pointed to by the branch name drunk. Similarly drunk^^ means the grandparent of the drunk snapshot. So the three snapshots in chronological order are drunk^^, drunk^, and drunk.
You’d really like those three lousy snapshots to be two clean snapshots. One that changes an existing function, and one that adds a new file. To accomplish this revision of history you copy drunk to working and delete the file that is new in the series. Now working represents the correct modifications to the existing function. You create a new snapshot from working and write the message to be appropriate to the changes. For the parent you specify the SHA1 of the drunk^^^ snapshot, essentially creating a new branch off of the same snapshot as last night. Now you can copy drunk to working and roll a snapshot with the new file addition. As the parent you specify that snapshot you created just before this one.
As the last step, you change the branch name drunk to point to the last snapshot you just made.
The history of the drunk branch now represents a nicer version of what you did last night. The other snapshots that you’ve replaced are no longer needed so you can delete them or just leave them around for posterity. No branch names are currently pointing at them so it will be hard to find them later on, but if you don’t delete them, they’ll stick around.
Staging Area
As much as you try to keep your new modifications related to a single feature or logical chunk, you sometimes get sidetracked and start hacking on something totally unrelated. Only half-way into this do you realize that your working directory now contains what should really be separated as two discrete snapshots.
To help you with this annoying situation, the concept of a staging directory is useful. This area acts as an intermediate step between your working directory and a final snapshot. Each time you finish a snapshot, you also copy that to a staging directory. Now, every time you finish an edit to a new file, create a new file, or remove a file, you can decide whether that change should be part of your next snapshot. If it belongs, you mimic the change inside staging. If it doesn’t, you can leave it in working and make it part of a later snapshot. From now on, snapshots are created directly from the staging directory.
This separation of coding and preparing the stage makes it easy to specify what is and is not included in the next snapshot. You no longer have to worry too much about making an accidental, unrelated change in your working directory.
You have to be a bit careful, though. Consider a file named README. You make an edit to this file and then mimic that in staging. You go on about your business, editing other files. After a bit, you make another change to README. Now you have made two changes to that file, but only one is in the staging area! Were you to create a snapshot now, your second change would be absent.
The lesson is this: every new edit must be added to the staging area if it is to be part of the next snapshot.
Diffs
With a working directory, a staging area, and loads of snapshots lying around, it starts to get confusing as to what the specific code changes are between these directories. A snapshot message only gives you a summary of what changed, not exactly what lines were changed between two files.
Using a “diffing” algorithm, you can implement a small program that shows you the differences in two codebases. As you develop and copy things from your working directory to the staging area, you’ll want to easily see what is different between the two, so that you can determine what else needs to be staged. It’s also important to see how the staging area is different from the last snapshot, since these changes are what will become part of the next snapshot you produce.
There are many other diffs you might want to see. The differences between a specific snapshot and its parent would show you the “changeset” that was introduced by that snapshot. The diff between two branches would be helpful for making sure your development doesn’t wander too far away from the mainline.
Eliminating Duplication
After a few more trips to Namibia, Istanbul, and Galapagos, Zoe starts to complain that her hard drive is filling up with hundreds of nearly identical copies of the software. You too have been feeling like all the file duplication is wasteful. After a bit of thinking, you come up with something very clever.
You remember that the SHA1 hash produces a short string that is unique for a given file’s contents. Starting with the very first snapshot in the project history, you start a conversion process. First, you create a directory named objects outside of the code history. Next, you find the most deeply nested directory in the snapshot. Additionally, you open up a temporary file for writing. For each file in this directory you perform three steps.
Calculate the SHA1 of the contents.
Add an entry into the temp file that contains the word “blob” (binary large object), the SHA1 from the first step, and the filename.
Copy the file to the objects directory and rename it to the SHA1 from step 1. Once finished with all the files, find the SHA1 of the temp file contents and use that to name the temp file, also placing it in the objects directory.
If at any time the objects directory already contains a file with a given name, then you have already stored that file’s contents and there is no need to do so again.
Now, move up one directory and start over. Only this time, when you get to the entry for the directory that you just processed, enter the word “tree,” the SHA1 of the temp file from last time, and the directory’s name into the new temp file. In this fashion you can build up a tree of directory object files that contain the SHA1s and names of the files and directory objects that they contain.
Once this has been accomplished for every directory and file in the snapshot, you have a single root directory object file and its corresponding SHA1. Since nothing contains the root directory, you must record the root tree’s SHA1 somewhere. An ideal place to store it is in the snapshot message file. This way, the uniqueness of the SHA1 of the message also depends on the entire contents of the snapshot, and you can guarantee with absolute certainty that two identical snapshot message SHA1s contain the same files!
It’s also convenient to create an object from the snapshot message in the same way that you do for blobs and trees. Since you’re maintaining a list of branch and tag names that point to message SHA1s, you don’t have to worry about losing track of which snapshots are important to you.
With all of this information stored in the objects directory, you can safely delete the snapshot directory that you used as the source of this operation. If you want to reconstitute the snapshot at a later date it’s simply a matter of following the SHA1 of the root tree stored in the message file and extracting each tree and blob into their corresponding directory and file.
For a single snapshot, this transformation process doesn’t get you much. You’ve basically just converted one file system into another and created a lot of work in the process. The real benefits of this system arise from reuse of trees and blobs across snapshots. Imagine two sequential snapshots in which only a single file in the root directory has changed. If the snapshots both contain 10 directories and 100 files, the transformation process will create 10 trees and 100 blobs from the first snapshot, but only one new blob and one new tree from the second snapshot!
By converting every snapshot directory in the old system to object files in the new system, you can drastically reduce the number of files that are stored on disk. Now, instead of storing perhaps 50 identical copies of a rarely changed file, you only need to keep one.
Compressing Blobs
Eliminating blob and tree duplication significantly reduces the total storage size of your project history, but that’s not the only thing you can do to save space. Source code is just text. Text can be very efficiently compressed using something like the LZW or DEFLATE compression algorithms. If you compress every blob before computing its SHA1 and saving it to disk, you can reduce the total storage size of the project history by another very admirable quantity.
The True Git
The VCS you have constructed is now a reasonable facsimile of Git. The main difference is that Git gives you very nice command line tools to handle such things as creating new snapshots and switching to old ones (Git uses the term “commit” instead of “snapshot”), tracing history, keeping branch tips up-to-date, fetching changes from other people, merging and diffing branches, and hundreds of other common (and not-so-common) tasks.
As you continue to learn Git, keep this parable in mind. Git is really very simple underneath, and it is this simplicity that makes it so flexible and powerful. One last thing before you run off to learn all the Git commands: remember that it is almost impossible to lose work that has been committed. Even when you delete a branch, all that’s really happened is that the pointer to that commit has been removed. All of the snapshots are still in the objects directory, you just need to dig up the commit SHA. In these cases, look up git reflog. It contains a history of what each branch pointed to, and in times of crisis, it will save the day. §
Tom Preston-Werner lives in San Francisco and is a cofounder of GitHub and the inventor of Gravatars. He loves giving talks about entrepreneurship, writing Ruby and Erlang, and mountain biking through the Bay Area’s ancient redwood forests.

($=[$=[]][(__=!$+$)[_=-~-~-~$]+({}+$)[_/_]+($$=($_=!''+$)[_/_]+$_[+$])])()[__[_/_]+__[_+~$]+$_[_]+$$](_/_)
By ADAM CECCHETTI
Care to guess what language that is and what it does?
How about if it is typed like this?
($=[$=[]][(__=!$+$)[_=-~-~-~$]+({}+$)[_/_]+
($$=($_=!''+$)[_/_]+$_[+$])])()[__[_/_]+__
[_+~$]+$_[_]+$$](document.cookie)
That’s right. This is a JavaScript alert(), and if it lands anywhere in an executable section of JavaScript/DOM it pops up the browser cookie.
If you want to test this out make a sample HTML file and put the first line inside a <script> tag, open it in your browser, and it will pop up a “1”.
This JavaScript itself is not a new form of Cross Site Scripting attack but an interesting form of obfuscation. It also should be the final comment when someone says they are protecting against Cross Site Scripting attacks by filtering bad characters or using simple regular expressions to filter “script” or “document.cookie”.
I started to reverse this JavaScript because it fascinated me and I wanted to know how it worked.
Firstly, I realized there are really two different lines here. First,
($ = [ $=[]] [ (__ = !$ + $ )[ _ = -~-~-~$] + ({} + $)[_/_] + ( $$ = ($_ = !'' + $)[_/_] + $_[+$] )])()
Which becomes a sort() command. And,
[__[_/_]+__[_+~$]+$_[_]+$$](_/_)
Which becomes an alert(1).
So, the entire two lines break down to:
[]["sort"])()["alert"](1)
The execution of which becomes Window.alert(1).
$ = [] is a blank array that gets assigned as an object to the main Window, so we can think of this as Window.Array.
[] is our original Array which gets a reference to [[]]["sort"]().
The browser executes Window.Array["sort"]() which returns a reference to Window. And this reference is used to call,
Window["alert"](1)
Which executes as,
Window.alert(1)
Let’s start to tear this apart bit by bit and see how we get ["sort"] and ["alert"] out of the jumble above:
__ = "false" via [(__ = !$ + $ )]
__ = [(!Array + Array.ToString())]
__ = false + Array.ToString()
__ = "false"
_ = -~-~-~$
The ~ operator in JavaScript means -(N+1), so operating '-~' = '+1'. So, '-~-~-~$' = '3'.
And, '_' = '3', and thus '_/_' = '3/3' = '1'.
(__ = !$ + $ )[ _ = -~-~-~$]
("false")[_]
("false")[3]
"false"[3] = "s"
({} + $)[_/_]
{} + $ = object + Array.ToString()
{} = “[object Object]”
"[object Object]"[_/_]
"[object Object]"[1]
"[object Object]"[1] = "o"
$$ = ( $_ = !'' + $)[_/_]
$$ = ( "true")[1]
"true"[1] = "r"
$_[+$] =
“true”[+$]
“true”[+[]]
+[] calls Array.prototype.toString() for its primitive value and then converts the empty string to a 0.
"true"[0] = "t"
$_ = "true"
$$ = "rt"
($$ = ( $_ = !'' + $)[_/_] + $_[+$] ))
($_ = !'' + $)
$_ = true + Array.ToString()
$_ = "true"
$_[_/_] + $_[+$]
"true"[_/_]
"true"
$_[0] = "t"
$$ = "rt"
Thus, the first line becomes sort():
($ = [] ["s" + "o"+ "r"+ "t" ] )()
The second line is:
[__[_/_]+__[_+~$]+$_[_]+$$](_/_)
$ = 0
_ = 3
__ = "false"
$_ = "true"
$$ = "rt"
[__[_/_]+__[_+~$]+$_[_]+$$](_/_)
Which becomes,
[__[1] + __[3 + -1] + $_[3] + $$)(1);
Which becomes,
["false"[1] + "false"[3 + -1] + "true"[3] + "rt"(1)[ "a" + "l" + "e" + "rt" ](1)
alert(1)
I’d like to give credit where credit is due in a few places. I didn’t write or find this JavaScript. I saw it in a slide deck from BlackHat DC 2011. This line caught my eye in the middle of the presentation. I learned a lot of strange things about JavaScript looking at these two lines, and some folks were nice enough to point out a few errors in assumptions I had made. §
Adam Cecchetti is a founding partner of Deja Vu Security where he specialized in hardware penetration testing.
Commentary
By Jonathan Rockway (jrockway)
(On the purpose of the script...)
Some people think that they can secure their sites against XSS by regexing all the “bad JavaScript” out. If the “security software” sees “document.cookie”, then it stops the script from executing. (Or it just replaces it with the empty string, etc.)
The problem is, there are a lot of ways to say document.cookie, and a blacklist is going to miss one of them.
Moral of the story: if people can execute scripts on your page, you’re 0wned. Everyone competent knows this, but sometimes the less competent are slow to realize this.
So, the script that the article describes is for their benefit. Good luck writing a regex to stop this one.
(There are also even simpler “exploits”, if you regex document.cookie to the empty string, then “document.document.cookiecookie” regexes to “document.cookie”. Ooops!)

The Designer Who Learned Django and Launched Her First Web App in 6 Weeks
By TRACY OSBORN
I’m a designer and front-end developer. After being turned down by Y Combinator, I decided to launch a simple webapp to get myself on the path of development.
Say hello to the final product: WeddingInviteLove.com. It’s not too complex, code-wise. I deliberately chose something that would be rather simple to get myself off the ground. This web app was a departure from my earlier project, WeddingType.com, where I launched my cofounder search on Hacker News in August, found a cofounder, started building the product, applied to Y Combinator for Winter 2011, got an interview, was turned down, and decided to part ways from the cofounder. I’m still planning on launching WeddingType, but if was going to learn how to code, I would have to take baby steps first — thus, WeddingInviteLove.
Working on a different idea, but not pivoting
If your idea doesn’t initially work out, try working on a related project that’ll enhance your original idea while keeping your enthusiasm for the area. Both WeddingType and WeddingInviteLove are in the same space — wedding invitations — but catering to two different types of customers. WeddingType, the invitation typography generator, is for non-designer couples looking to save some money by creating their own invitations. WeddingInviteLove is a directory of boutique wedding invitation designers, for couples who are looking to spend more for a professional, higher quality design. They both increase my prominence and reach within the wedding invitation industry, but also avoid poaching customers from each other.
Take advantage of help
Why did I choose Python and Django over Ruby or any other programming language? I needed to take advantage of the resources I had, mainly, @shazow, my bf, who’s an expert in Python but specializes in Pylons, a different framework. I’ve heard a lot of quality discussions between Pylons and Django, but for me, Django has a lot more hand-holding than other frameworks and a lot of tutorials online. For nitty-gritty Django questions that Andrey couldn’t answer, I tweeted that I needed some help and got two awesome advisors, @kantrn, who I met in person several times to work out problems I was having, and @kennethlove, who I’d IM at all points in the night for help with specific bugs. I also used @kennethlove’s screencast blog tutorial [hn.my/djangostart], since I could relate it directly to my project. Profiles on WeddingInviteLove are like blog posts on a blog; I just changed some names around. All code was written by me while I took advantage of the numerous Django applications, such as django-registration.
Build the web app first, then design it
It was tempting to build the entire interface first, but I deliberately ignored the design until I had things 90% working. This got me to constantly work on the code before working on the “fun stuff.” Plus, it encouraged me to launch quickly since as soon as the code was finished, all I had to do was “skin” it before getting it live with the assumption that I would be iterating on the design after it launches. Also, if I needed to abandon the project due to some insurmountable code problem, the time wasted wouldn’t include the time spent on design.
Launch as fast as possible
Nothing kills a new idea better than taking too much time on it. There are thousands of things more that I could have done to improve WeddingInviteLove before I launched it, but getting it out and generating feedback was much, much more important. I don’t mean you should launch an incomplete project, but pare down your features to the very minimum and get it live as fast as possible.
One problem I faced was convincing designers to sign up before the site was live, so I created three fake profiles and emailed 10+ designers with screenshots of the homepage and future profile pages, explaining that I was building it for fun and it would be free to list them. It’s a win-win scenario for the designers and myself, but emailing out of the blue can look shady. One designer replied that my email looked like spam, but the professional design in the screenshot I linked convinced her to sign up anyways. My design meant the difference between someone ignoring my email versus taking it more seriously.
Once the website received its first 3 profiles, I got it live (onDotcloud), but continued to email designers directly, now pointing to the live site. Overall, I emailed 67 designers directly (see screenshot), with an approximate 50% response rate and slightly less sign-up rate.
The “real” launch — landing a major blog post
I was up to about 20 designers (not that big of a deal to any potential customer looking for a full fledged directory), when I traveled to New York and decided to chat up one of my favorite design bloggers, Tina Roth Eisenberg (Swiss Miss). The tactic of traveling and emailing someone “famous” randomly in that area and inviting them to lunch has worked well in the past (I landed a guest spot on The Big Web Show after inviting Jeffery Zeldman for lunch). After the lunch I was able to show her WeddingInviteLove and got some great feedback, all I was expecting and hoping from the visit. Awesomely, after I left, WeddingInviteLove was blogged about on Swiss Miss. Getting profiled on one of the best design blogs out there was the best beginner boost that I could ask for, launching a trend of blog posts and tweets, and landing WeddingInviteLove another 60 designers to a total of 83, a week after the Swiss Miss blog post.
Future monetization
I get asked a lot on how I’ll monetize. I have no intention of ever taking away free profiles, charging customers to search, or acting as a middleman and taking commission. My current plan is to launch pro profiles, with support for more portfolio images and other features for every upgraded profile. Before I can launch this, however, I have to get more links and traffic to ensure a pro profile is “worth it” to designers, so I’ve been focusing on promotion for the last few weeks.
Conclusion
If you’re a designer, picking up development looks really tough, but stick it out for a couple of months — being enabled with the ability of creating your vision is worth it.
If you’re learning a new language, don’t do tutorials verbatim — take what they’re teaching, apply it to a different product, and you will learn a lot faster.
Launch as fast as possible, since feedback on the product is the most important.
Don’t be afraid of asking “big wigs” for their advice — buying someone’s lunch is a small price to pay for knowledgeable feedback.
Ask for help as much as possible and wherever you can find it. §
Tracy Osborn is a designer, front-end developer, and future superhero, currently working on WeddingInviteLove.com, an online directory of wedding invitation designers. Her portfolio and articles are located at Limedaring.com, and she tweets odd and curious things at @limedaring.

What I Wish Someone Had Told Me About Startups 4 Years Ago
By AMIR KHELLA
The year is 2007, and I had just left Microsoft to dive into the startup world. Like many first-time entrepreneurs, I was very excited about the adventure. And like many first-time entrepreneurs, I didn’t know where to start.
So I attended events, meetups, conferences, and mingled with the local startup community in Seattle. When time came to move to the Bay Area, I found even more events, more meetups, and more conferences. The startup ecosystem was so busy and alive, and I found a wealth of knowledge and experience being shared, which I consumed eagerly.
There were also blogs, videos, interviews, and books that I ingested with passion. They made great conversation topics during the events, the meetups, and the conferences.
I even joined a startup incubator!
It wasn’t until I decided to launch my own startup that I realized that nothing I’ve read, watched, or attended really prepared me for it. And I mean it. Absolutely nothing. I had forgotten most of what I’ve learned, and what I remembered didn’t apply much to my situation. I’ve been snacking on other people’s experiences and successes, and like good junk food, it made me feel bloated and satisfied.
Sorry to be a party pooper, but that’s reality.
In the beginning, I tried applying the things I’ve learned to my situation. That didn’t work. The magic moment really happened when I made peace with the fact that I’d just wasted a good deal of time learning things I didn’t really need, believing there was a magic word someone would utter that would launch me into action. Every event, every conference, and every blog post was just another excuse to postpone action one more day. I made peace with it and moved on with a beginner’s mindset, believing that I will figure out what I need along the way.
And that made all the difference.
There is a part in each one of us that wants to create, deliver, and launch into an entrepreneurial adventure with all the uncertainty and risk that it brings. But there is also the other part, the one that wants to feel certain and confident that we’re making the right decision, and we’re not going to fail and hurt ourselves along the way. And that’s where most of the friction comes from.
But these blogs, these events, and these interviews didn’t really remove that friction. For a while, it just gave me some comfort knowing there were enough people doing the same things. Going into entrepreneurship was outside of my comfort zone, and I’d just I moved from one comfort zone into another. And you know what? I was in good company!
One day I had my reality check and saw that I was busy doing many things, except working on my product. A couple of months later, I can say with full confidence: the only thing that counted was to actually sit down and do the work.
Don’t get me wrong. I think some blogs and conferences are valuable. But unless you’re already working on something that provides the framework for your learning and networking, you’d be wasting some valuable time.
Here are some action steps that helped me overcome the “startup friction syndrome”:
I stopped reading startup news and blogs for a few weeks, and I realized I didn’t miss anything related to my products. It didn’t matter who got funded, who got acquired, or why Internet Explorer was losing market share against Google Chrome. The only “who”s I care about are the customers, and the only “what”s I focus on are their needs and desires, and how to best deliver value to them.
I stopped going to startup events for a couple of months, and started catching up with friends over coffee or drinks instead. I still go to one or two events each month, but I do it for fun. I no longer confuse going to entrepreneurship events with being an entrepreneur.
I taught myself through small projects. I broke down ideas into small manageable chunks, and gave myself deadlines to finish each of them. Projects and experiments are amazing teaching devices, because you learn as needed, and you learn first-hand. Keynotopia has helped tremendously in getting ideas out of my head and into a format that I can quickly see, interact with, and show to potential customers — that’s why I created it in the first place!
In each step, I came up with a list of questions that would help me move to the next step. Whether it was getting more traffic, improving the product, or increasing revenue without increasing traffic, I came up with the best questions I could, then I did research, asked people, and I put the answers into action immediately. Every piece of information not acted on takes too much space in my biological memory stick.
This is my favorite: I created more fear of not starting than the fear of starting. I realized that every day I waited a customer was not getting my solution, and a competitor was getting closer to that solution before I did. I even imagined my worst nightmare if I’d failed to take action: I was Milton from Office Space, tucked in the corner cubicle of Innotech, staring at my red stapler, and waiting for my next paycheck. That was the magic kick-in-the-butt I was looking for.
I first got things done, then I got them done right. I learned (the hard way) that momentum mattered most. If I can’t take action right away on my idea, chances are I never will. Whenever I get an idea nowadays, I do something to pin it to my reality, and to make it tangible. I do it in a quick and ugly way, then figure out how to do it better, and learn only what I need for that.
I faced reality: nothing was going to happen until I went out of my comfort zone and did it. Many wait, but a few act.
I want to leave you with a quote that changed my life: “successful people aren’t necessarily smarter or luckier than others. They just try so many things and fail until something works out.”
Don’t be an entrepreneur by association. Be an entrepreneur by action and results. §
Amir is an entrepreneur, hacker, designer, and artist. He enjoys simplifying complex problems and launching small profitable products. His latest venture, Keynotopia.com, was launched in 3 hours, with a $47.50 budget, and had its first paying customer within 10 minutes of launch.
Commentary
By Ed Weissman (edw519)
AFAIC, Success = (BuildingStuff) * (TheValueOfEverythingElse)
If you’re not building stuff, it doesn’t matter how much value you get out of everything else. Zero is still zero.
Sorry it took you 4 years to learn that lesson. It took me a while, too. I don’t really know how long because I don’t look back. I suspect none of us should.

How to Train Your Brain to Flip to a New Language
By RUBEN BERENGUEL
When you start learning a new language, common wisdom suggests that you have two possible goals (not mutually exclusive). One is passing an exam. Maybe you took French while in High School with no other goal than getting a good grade, not giving a damn about the country, the language, or the people. The other common goal is the dreaded F-word: fluency. Forget common wisdom — there is something more important than the vague notion of fluency.
The term “fluency” is very ambiguous, because there is no scale in measuring fluency. Personally, I can get by in most situations with the English language, but I only consider myself fluent when talking about mathematics, where my vocabulary is almost complete and the grammar I know is enough for all possible themes that can occur.
When I am starting with a new language, I don’t set my views in some abstract fluency. I want what may be called “working fluency,” or as I put in a post in my blog, “getting to the language switch [hn.my/switch].” What is the language switch?
It’s like feeling that, unexpectedly, you have a button in your brain. When you push it you can get thoughts straight to your target language. This is not the same as being fluent, because you can get to the point of being able to push the switch way before you are fluent. You can be happily talking (or writing) in Irish and suddenly one of the words you want to say just isn’t there. You have a small short-circuit in your switch, easily repaired by learning (or relearning) the troublesome word.
Once you are there and have a nice switch inside you, you can be pretty sure of at least being able to interact with locals and stop feeling out of place. Maybe you will have to stop in the middle of a phrase and look at your dictionary, or ask in some common language, or just point your finger to the moon. The million-dollar question is then, how do you get there? More to the point: how do you get there when your target language does not have a lot of speakers?
The language switch is not built. It is trained. As Vince Lombardi said, “Perfect practice makes perfect.” Keep on drilling standard phrases. For example, something I usually do is say to myself, komdu sæll og blessaður! when I pass a man by the street, and komdu sæl og blessuð! when I pass a woman. These are two common greetings in Icelandic, and you need to get used to the correct form for men and women. The best way to make it part of you is just to drill it in some funny way like this, until it is as natural as saying “hello!”
You can also use old business cards (or here in Spain, train tickets, which are credit card sized) to practice verb conjugation. Write in the blank side of one the conjugation of “to be” (in Icelandic, að vera, in Irish bí) and put it in your pocket. Whenever you have a few spare seconds, like waiting in queue to pay at the store or waiting for the streetlight to turn green (as a pedestrian), take a look at it and repeat them to yourself. You will be amazed how easily this hard-wires constructs into your brain.
You can extend these “cheap 'n easy” drilling techniques to harder stuff like conditional forms, future, colors, numbers, and whatever, just by sheer persistence and a constant, playful spirit. Throw a few dice and say the number they spell. Count your pocket money in Irish. Plan your weekend in Icelandic. Be creative! If what you really want is to be able to communicate, being playful is a must. This is especially important if you’re trying to pass an exam!
Keep in mind that perfect practice makes perfect. You should try to pronounce words correctly and (if necessary) have a clear idea of how they are written. And mixing different kind of drills will also help: keep a stack of verbs by your door and pick one different each morning!
Do a little of this each day, and without even realizing it, you will be able to generate phrases without effort, whether speaking or writing. Read a little daily, and the future with your language could not be any brighter. §
Ruben Berenguel is a mathematician finishing his PhD about invariant manifolds in infinite dimensional dynamical systems. A lifelong language geek, he is currently trying to learn Irish and Icelandic, and setting sights on Norwegian and Swedish. He blogs in mostlymaths.net and tweets as @berenguel.
Commentary
By Hamlet D'Arcy (hamletdrc2)
I moved to a German-speaking country about a year ago. I’m not brilliant at languages, but I’ve made great progress, and most people are surprised to find out how little German I spoke a year ago. Here are some of my tips:
Use Mnemosyne every day. It is computerized flash cards based on the SuperMemo algorithm. Do not skip days. At around 2,000 words memorized (9 months) the “switch flipped”. At 2,000 words you can have conversations with about anyone. Business is still hard, but small talk is easy.
Read trashy literature — People, In Touch, Celebrity Rags — these are all written so 10-year-olds can read it. Newspapers use bigger words and don’t have pictures. Reading about celebrities is a hassle, but it helps and it’s an appropriate level.
Got kids? Turn the Wii and Cartoons to the foreign language. This makes your play time also a learning process.
Do not turn your computer to a foreign language. This will cripple your productivity. I am forced to work in German on a Windows box now and it is really awful and frustrating. Not recommended at all. Not one bit.
German Tuesday - Deutsche Dienstag - Every Tuesday was German Tuesday. Anyone caught speaking English to me had to pay a Franc into a Jar. If I spoke English then I paid. This makes my German a fun game in the office. Plus we had Bier Freitag at the end of the week. I stole this idea from an outsourcing company I worked with where Tues and Thur were English-only days.
Rock Solid Website Layout Examples
By JOSHUA JOHNSON
Layout can be both one of the easiest and one of the trickiest facets of web design. Sometimes a designer can bust out an amazing layout in minutes, and sometimes that same designer can struggle for the better part of day with the same task.
Each project is unique and calls for a unique solution, but I’ve found it helpful to keep a few rock solid and incredibly versatile alignments in mind that I can bust out when I get stuck. The ten layouts below should be enough to get you through even the worst cases of designer’s block when you can’t figure out the best way to arrange the content on your page.
Keeping It Simple
Page layout is equal parts art and science. Creating something that’s visually attractive and unique takes an artist’s eye. However, there are several very easy-to-follow guidelines that you can use to create solid layouts that work for any number of cases. These principles include choosing and sticking to an alignment, structuring your whitespace properly, and highlighting important elements through size, positioning, etc.
Designers often stress out far too much about the layout process. We have a tendency to approach a project while thinking that it needs to be completely unique in every respect to be worth our time and the client’s money. However, if you have a good look around the web you’ll see that this isn’t necessarily the case. Great looking websites often use layouts that are fairly simple and not the least bit unique. It’s true that the pages we designers marvel at the most are often from the peculiar sites that break the mold, but your average client just wants something usable, clean, and professional.
In this article we’re going to take a look at ten very common layouts that you can find on countless sites across the web. Notice that the way these sites are styled — meaning the colors, graphics and fonts — is unique, but the basic structure of the sites themselves are based on tried and true methods for laying out a webpage. We’ll emphasize this by first showing you a simple silhouette of the layout so that you can project your own thoughts and designs onto it. Then we’ll follow it up with one or two examples of real sites that use the layout.
Three Boxes
This is probably the simplest layout on the list. In fact, you’ll be tempted to think that it’s far too simple to ever fit your own needs. If this is the case, you’ll be surprised if you really put some thought into how versatile the arrangement really is.
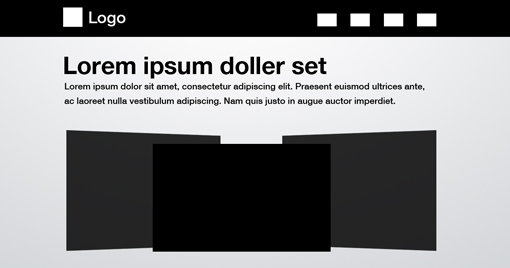
The three-box layout features one main graphic area followed by two smaller boxes underneath. Each of these can be filled with a graphic, a block of text, or a mixture of both. The main box in this layout is often a jQuery slider, capable of showcasing as much content as you want!
The silhouetted shapes along the top are areas that can be used for logos, company names, navigation, search bars and any other informational and functional content typically on a website.

This design is ideal for a portfolio page or anything that needs to show off a few sample graphics. Each of the images could be a link that leads to a larger, more complex gallery page. Later in the article we’ll see how to mix this idea up even further.
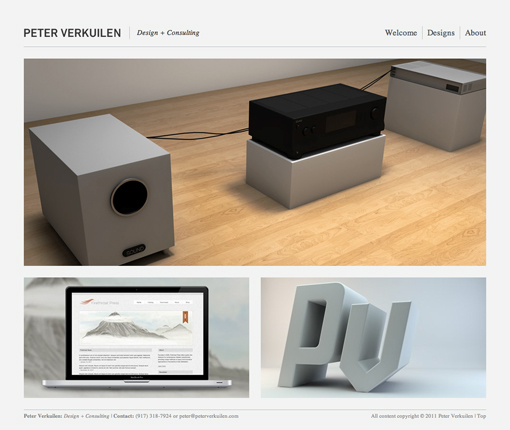
Next we see a beautiful implementation of the three box layout in Peter Verkuilen’s portfolio. As suggested above, the primary graphic rotates and displays a number of Peter’s recent projects. Clicking on one of the boxes will bring you to that project’s dedicated page where you can find out more information.
Simple, effective, and attractive. You can probably pull off a full, live web page with this layout in under an hour!
3D Screenshots
As developers continue to create an endless collection of web apps, the 3D screenshots layout seen below, or some variant of it, is becoming more and more popular. The basic idea is to top your page with a headline and then toss in some stylized previews of your application. These often come with reflections, heavy shadows, big background graphics, or even complex adornments such as vines crawling all over the screenshots, but the core idea is always really simple.
Another place I see this trick used a lot is in pre-built themes. In these cases, a designer is selling a stock layout and really needs his/her placeholder graphics to shine, and nothing says cool and modern like some fancy 3D effects!
Pixelworkshop uses this technique, not as a stock theme, but to actually showcase stock themes! Here the 3D screenshots swap out in a slideshow and come up in a number of different arrangements. Stop by and take a look to see all the various ways the designer presents the images.

Advanced Grid
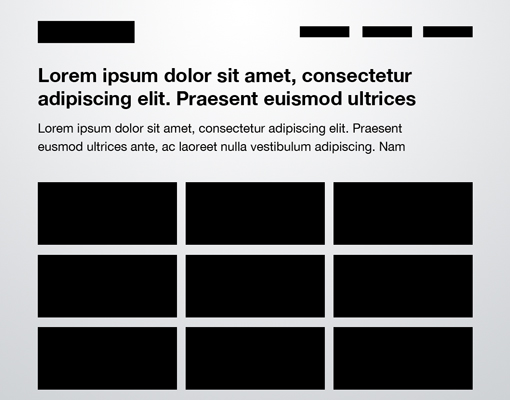
Many of the layouts that you’ll see in this article adhere to a pretty strict grid alignment. However, for the most part, they don’t simply suggest a page full of uniform thumbnails. For instance, the layout below mixes up the size of the images to avoid redundancy.

As with the three boxes example, there’s one primary graphic heading up the page. This is followed by a simple twist on the idea of a uniform grid of thumbnails. The space would allow for a span of four squares horizontally, but instead we’ve combined the first two areas so that the left half of the page differs from the right.
As we mentioned with the first layout, the blocks don’t have to be images. For example, you can imagine this as blocks of text on the left flanking square images on the right.
In the gorgeous example below, this layout is used for a children’s clothing website. Notice that near the bottom of the alignment, they’ve switched things up even further so that the left side features an almost oddly-sized image followed by a paragraph, neither of which perfectly line up with the content on the right side.

Again, once you’ve got your basic layout in mind, you can make subtle changes like this while maintaining the integrity of the underlying structure. Another interesting trick they used was to split up the main graphic into two areas. It’s actually all one JPG, but it has been divided into two images to show off even more content.
Featured Graphic
Sometimes you don’t have enough content for a page full of images. So what do you do if you want to showcase one icon, photo, or perhaps even a symbol such as an ampersand? The layout below is a super easy solution that is quite popular and reads very well due to the lack of distractions.

The result is a page that is bold, yet minimal and clean. The statement it makes is strong and impossible to miss, just make sure your graphic is good enough to be featured so prominently!
Just how common is this layout? A lot more common than you might think! With minimal effort, I was immediately able to come up with two sites that use some close variant of this technique. Notice that you have options for how you want to format the text and even where you want to place the navigation. The second site rearranges the secondary elements quite a bit, but it’s instantly recognizable as the same basic layout.


Five Boxes
The five-box layout is simply an evolution of the three-box layout. All of the same logic applies, it’s just been modified to hold even more content. It could easily be four boxes as well, it just depends on what you want to showcase. It also makes it look like you put a little more effort into the design!
Obviously, as you add to the layout, the secondary items become smaller and smaller so for most uses, five boxes is probably going to approach the limit.

Just as with the three box layout, this one is so versatile that it can literally be used on just about any type of site. Ideas for switching it up include adding a large background graphic, rounding the corners, adding shadows and/or reflections, or perhaps even adding an interactive element to the smaller thumbnails. You could easily add in buttons that cause them to scroll horizontally.
Here again we have two examples of this layout being used in slightly different ways. The big thing to notice here is that despite having similar layouts, these two sites almost couldn’t appear more different from each other if they tried. One uses a hand drawn illustration style, the other photographs and gradients. The first one uses muted colors and script fonts, the second bright colors and modern fonts.
This drives home the argument that using one of the layouts in this article won’t kill your creativity. Once you’ve arranged the content, there’s still plenty to be done in the area of aesthetics. This is what will really define the site’s personality and often make or break a client proposal.


Fixed Sidebar
Thus far all the sites that we’ve seen have had a top-side horizontal navigation. The other popular option is of course a vertical navigation, which lends itself to creating a strong vertical column on the left side of the page. Often this is a fixed element that stays where it is while the rest of the page scrolls. The reason for this is so the navigation can stay easily accessible from any point in the site.
The rest of the content can borrow from one of the other layouts on this list. Notice that I’ve again modified the three-box layout, this time in a four-box arrangement. Once you’re done reading this article, look at all the layouts again and think about how you can mix and match the ideas to create new layouts.

As with the previous example, the two sites below actually look very different, even from a layout standpoint. However, if you look again you’ll notice that they both use a left-side vertical sidebar and the four-box layout. The second example has simply moved the smaller boxes to the top of the page! Yet another interesting idea that you should keep in mind when creating a site based on these examples.


Headline & Gallery
Everyone loves a good gallery page. From a layout perspective, what could be simpler? All you need is a solid, uniform grid of images and some room for a headline with an optional sub-head. The key here is to make your headline big and bold. Feel free to use this as a point of creativity and include a script or some crazy typeface.
This example uses squished rectangles to mirror the real site below, but this can and should be modified to fit whatever you’re showing off. The point here is to get you to think outside the box and not default to a square, maybe you could use vertical rectangles or even circles in your own gallery!
The developer below used this design to create a gallery of the logos for clients that he has worked with. Notice that he’s not suggesting that he created the logos, but is simply showing off his client base in a very visual fashion. This goes to show that even if you’re not a designer, a thumbnail gallery might be a great way to showcase an otherwise plain and boring list of items.

Featured Photo
The layout below is extremely common, especially among the photography community. The basic idea here is to have a large image displaying either your design or photography (anything really), accompanied by a left-side vertical navigation.

The navigation might be the strongest in a left alignment, but feel free to experiment with a center or even right alignment to compliment the straight edge of the photo.
The site below really makes the most of this layout by turning the one featured image into a horizontal slider. One image is featured at a time but you can see the next one peaking onto the right side of the page. When you hover over this, an arrow appears that allows you to slide through the photos.
As an alternative, why not try to make a site that utilizes this same layout but with a vertically sliding image gallery? The space almost seems more suited for this as you won’t have to include an awkward cutoff area to protect the navigation.

Power Grid
The power grid is the most complex layout in this article, but it is one of the most effective layouts I’ve seen for pages that need to contain all kinds of various related content. From images and music players to text and videos, you can cram just about anything into this layout and it stays strong.

The key lies in the bottom half of the preview above. Notice that there’s actually a large container that holds a series of rectangles. This container provides you with the boundaries for your space, and all the content you place inside should be formatted in a strong but varied grid, not unlike the advanced grid layout near the beginning of this article.
This one can be really hard to wrap your mind around until you see some live examples. The first is a showcase of art and culture. That description alone tells us that the content is going to be all over the board, and indeed we see that the page is filled with Twitter feeds, photos, lists, images and more.
However, it all fits tightly inside the grid that the designer has established. This layout is easily extendable so that no matter how much you throw at it, the overall appearance should remain fairly logical and uncluttered as long as you format and arrange your content properly.

This layout above heavily reminded me of a tutorial I wrote a while back on designing a website for a rock band. Here we have a very different looking page, but a nearly identical arrangement of content, especially in the lower half. The real trick to pulling this layout off right is to start with a few really big boxes, which are then broken up into smaller areas of content as needed.
Full Screen Photo
The final layout on the list is another that is ideally suited for photographers, but will work on any site with a big, attractive background graphic to display and a limited amount of content.
It can be really hard to read content when it is laid over a background image, so the basic idea here is to create an opaque (or nearly opaque) horizontal bar that sits on top of the image and serves as a container for links, copy, logos and other content.

Rather than using the bar as one really wide content area, try splitting it into a few different sections. This can be done by varying the background color, adding some subtle vertical lines as dividers, or even breaking the big box into smaller disconnected boxes as I’ve done above.
This layout might feel incredibly restrictive, but below we get a glimpse into just how much it can hold. This photography site fills the bar with navigation, an “About” block of text, a few recent photos with descriptions, and a large logo! Not bad for such a small space, and it pulls all this off in a very clean and non-cluttered way.

Conclusion
There were a few key points made above that I want to reiterate in closing. First, even though page layout definitely isn’t necessarily a “one size fits all” practice, there is a science to it that can be quickly and easily applied in an incredibly vast number of circumstances.
Next, the layout ideas presented above need not result in cookie cutter websites that all look the same, but instead merely provide you with a basic canvas on which to build a notably unique, finished design.
Finally, the key to successfully implementing these ideas is to remember that they’re not set in stone. Each should be changed to fit your specific project and can even be mixed and matched to create new ideas! §
Josh Johnson is a freelance designer and writer from Phoenix, Arizona. He’s currently the editor of both DesignShack.co.uk and iPhone.AppStorm.net and regularly contributes to a number of other online publications including Smashing Magazine and Six Revisions.
Using Git to Manage a Web Site
By ABHIJIT MENON-SEN
The HTML source for my web site lives in a Git repository on my local workstation. This article describes how I set things up so that I can make changes live by running just git push web.
The one-line summary: push into a remote repository that has a detached work tree, and a post-receive hook that runs git checkout -f.
The Local Repository
It doesn’t really matter how the local repository is set up, but for the sake of argument, let’s suppose you’re starting one from scratch.
$ mkdir website && cd website
$ git init
Initialized empty Git repository in /home/ams/website/.git/
$ echo 'Hello, world!' > index.html
$ git add index.html
$ git commit -q -m "The beginnings of my web site."
Anyway, however you got there, you have a repository whose contents you want to turn into a web site.
The Remote Repository
I assume that the web site will live on a server to which you have ssh access, and that things are set up so that you can ssh to it without having to type a password (i.e., that your public key is in ~/.ssh/authorized_keys and you are running ssh-agent locally).
On the server, we create a new repository to mirror the local one.
$ mkdir website.git && cd website.git
$ git init --bare
Initialized empty Git repository in /home/ams/website.git/
Then we define and enable a post-receive hook that checks out the latest tree into the web server’s DocumentRoot (this directory must exist; Git will not create it for you):
$ mkdir /var/www/www.example.org
$ cat > hooks/post-receive
#!/bin/sh
GIT_WORK_TREE=/var/www/www.example.org
git checkout -f
$ chmod +x hooks/post-receive
Back on the workstation, we define a name for the remote mirror, and then mirror to it, creating a new master branch there.
$ git remote add web ssh://server.example.org/home/ams/website.git
$ git push web +master:refs/heads/master
On the server, /var/www/www.example.org should now contain a copy of your files, independent of any .git metadata.
The Update Process
Nothing could be simpler. In the local repository, just run:
$ git push web
This will transfer any new commits to the remote repository, where the post-receive hook will immediately update the DocumentRoot for you.
(This is more convenient than defining your workstation as a remote on the server, and running git pull by hand or from a cron job, and it doesn’t require your workstation to be accessible by ssh.)
Notes
First, the work tree (/var/www/www.example.org above) must be writable by the user who runs the hook (or the user needs sudo access to run git checkout -f, or something similar).
Also, the work tree does not need to correspond exactly to your DocumentRoot. Your repository may represent only a subdirectory of it, or even contain it as a subdirectory.
In the work tree, you will need to set the environment variable GIT_DIR to the path to website.git before you can run any git commands (e.g. git status).
Setting receive.denycurrentbranch to “ignore” on the server eliminates a warning issued by recent versions of git when you push an update to a checked-out branch on the server.
You can push to more than one remote repository by adding more URLs under the [remote "web"] section in your .git/config.
[remote "web"]
url = ssh://server.example.org/home/ams/website.git
url = ssh://other.example.org/home/foo/website.git
There are also other hooks. See githooks(5) [hn.my/githooks] for details. For example, you could use pre-receive to accept or deny a push based on the results of an HTML validator. Or you could do more work in the post-receive hook (such as send email to co-maintainers; see contrib/hooks/post-receive-email).
I wrote this after reading Daniel Miessler’s piece, “Using Git to Maintain Your Website [hn.my/gitmaintain].” His setup is straightforward: push to a bare repository on the server and pull the changes into a second clone that is used as the DocumentRoot. My implementation has the same effect, but there are fewer moving parts, and .git is far from the DocumentRoot. §
Abhijit Menon-Sen is a freelance Unix programmer in New Delhi, India. He switched from Perforce to Git some years ago, and enjoys helping people to understand Git better.
Combinatorial Applications of Spacefilling Curves
By JOHN BARTHOLDI
A spacefilling curve is a continuous mapping from a lower-dimensional space into a higher-dimensional one. A famous spacefilling curve is that due to Sierpinski, which is formed by repeatedly copying and shrinking a simple pattern (the convoluted tour in Figure 1).

Figure 1: A heuristic solution to the Traveling Salesman Problem is to visit the points in the same sequence as the Sierpinski spacefilling curve.
A useful property of a spacefilling curve is that it tends to visit all the points in a region once it has entered that region. Thus, points that are close together in the plane will tend to be close together in appearance along the curve.
This forms the basis of the heuristic, invented by L. Platzman and me, to produce a reasonably short tour of n given locations (the so-called Traveling Salesman’s Tour). Simply visit them in the same sequence as does the spacefilling curve. For example, a short tour of the points marked in red is indicated by the green lines, which connect the points in the same sequence as their appearance on the spacefilling curve.
The spacefilling curve heuristic (SFC) has many advantages, if you are willing to accept solutions that are about 25% longer than optimum (expected, for random point sets). These advantages include:
The SFC algorithm is fast. It is essentially sorting, and so it requires only O(n log n) effort to construct a tour of n points and only O(log n) effort to update the solution by adding or removing points.
The SFC heuristic does not need explicit distances between points and so there is no need to compute or measure these, as most other heuristics must.
The algorithm is parallelizable. In comparison, the comparable algorithm, Nearest Neighbor, is apparently not parallelizable.
The length of links in the SFC tour of random points is expected to be small and of small variance, so that (1/k)-th of the stops account for about (1/k)-th of the travel time. This means that an SFC tour can easily be converted to tours for k vehicles simply by partitioning the SFC route into k contiguous pieces.
The spacefilling curve heuristic has been used in many applications, including:
To build a routing system for Meals-on-Wheels in Fulton County (Atlanta, GA), which delivers hundreds of meals daily to those too ill or old to shop for themselves. We built this on two rolodex card files.
To route blood delivery by the American Red Cross to hospitals in the Atlanta metropolitan area.
To target a space-based laser for the Strategic Defense Initiative (commonly known as the “Star Wars” program). This application was communicated to us by scientists from TRW Systems, an SDI contractor, who chose the spacefilling curve heuristic over alternatives because it was well-analyzed, parallelizable, and could run on a computer that was boostable to orbit.
To control a pen-plotter for the drawing of maps. (M. Iri and co-workers at the University of Tokyo showed how it could be used to reduce drawing time for large road maps by routing the pen efficiently. They gave an example in which drawing time was reduced from 10 hours to 1/2 hour.)
The idea of routing by spacefilling curve has subsequently been incorporated into the ARC/Info Geographical Information System, the CAPS Logistics Toolkit of Baan Systems, and other commercial systems managing 2-dimensional data.
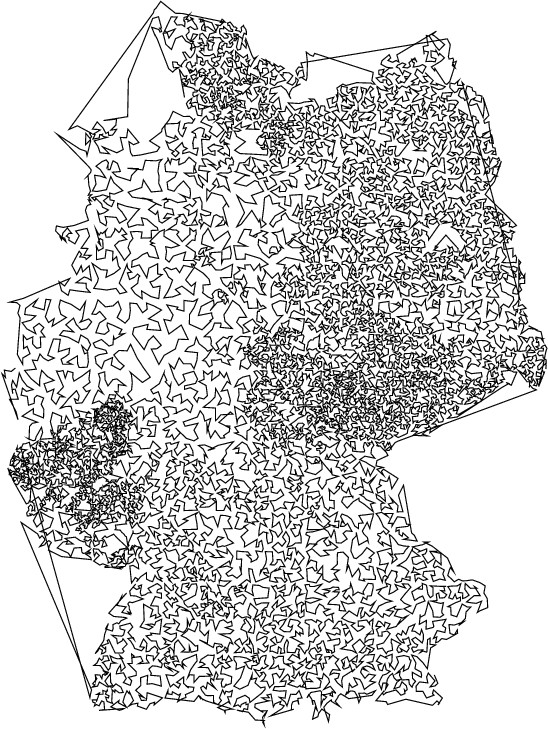
Figure 2: A TSP tour of 15,112 cities in Germany. This tour was induced by the Sierpinski spacefilling curve in less than a second and is about 1/3 again as long as the shortest possible.

Figure 3: All the points of a triangulated irregular network can be indexed continuously by finding a Hamiltonian path or circuit of the triangles and filling each with a suitably-oriented spacefilling curve.
A summary of the ideas, minus technical details but with pointers to technical literature, may be found in my class notes, A routing system based on spacefilling curves [hn.my/mow, pdf format, 22 pages]. To accompany this is a table of Sierpinski indices of the points of a 100 x 100 grid [hn.my/tbl, pdf format, 22 pages], with which you can set up your own routing system in an afternoon. Technical details about algorithm performance, along with citations to related work, may be found in “Spacefilling curves and the planar travelling salesman problem” with L. K. Platzman, Journal of the Association for Computing Machinery 36(4):719-737 (1989).
It is interesting to compare this lightweight heuristic with a heavy-duty optimization package, such as the one developed by D. Applegate, R. Bixby, V. Chvatal, and W. Cook. Their TSP package is a tour-de-force of mathematical optimization technology and it has been used to solve a traveling salesman problem for 15,112 cities in Germany. This is the largest non-trivial problem for which a proven optimal solution has been generated. Applegate et al. describe the computational resources used:
The computation was carried out on a network of 110 processors located at Rice University and at Princeton University. The total computer time used in the computation was 22.6 years, scaled to a Compaq EV6 Alpha processor running at 500 MHz. The optimal tour has length 1,573,084 in the units used in TSPLIB; this translates to a trip of approximately 66,000 kilometers through Germany.
For comparison, Paul Goldsman used the spacefilling curve heuristic to solve the same instance. Our solution was about 34% longer (Figure 2). At a leisurely 600 km of travel per day this means the time to drive our solution would be about 147 days versus 110 days for the solution of Bixby, Chvatal, and Cook. But our computation took less than a second on a cheap laptop, so here is the tradeoff: use our heuristic and get a reasonable route immediately. Alternatively, configure a network of 110 processors, then spend two months computing the shortest route to save a month of driving.
Loren Platzman, Bill Nulty, Paul Goldsman, and I have extended some of these ideas in several directions:
The vertex adjancency dual of a triangulated irregular network has a Hamiltonian cycle [hn.my/hamiltonian]by J. Bartholdi and P. Goldsman. This appeared in slightly revised form in Operations.Research Letters 32: 304-308 (2004). The ideas here have been very nicely summarized and illustrated with a Java applet [hn.my/perouz] by Perouz Taslakian.
Multiresolution indexing of triangulated irregular networks [hn.my/tins] by J. Bartholdi and P. Goldsman, IEEE Transactions on Visualization and Computer Graphics 10(3):1-12 (May/June 2004)
Continuous indexing of hierarchical subdivisions of the globe [hn.my/hglobec] by J. Bartholdi and P. Goldsman. This appeared in slightly revised form in Int. J. Geographical Information Science 15(6):489-522 (2001).
Vertex-labelling algorithms for the Hilbert spacefilling curve [hn.my/hilbert] by J. Bartholdi and P. Goldsman. This appeared in slightly revised form in Software — Practice and Experience 31:395-408 (2000). A clever adaptation for use in wavelet image compression appears here [hn.my/wavelet].
Robust Multidimensional Searching with Spacefilling Curves by J. Bartholdi and W. Nulty, Proceedings of the Sixth International Symposium on Spatial Data Handling, Edinburgh, Scotland, September 1994.
Design of efficient bin-numbering schemes for warehouses [hn.my/binscheme] by J. Bartholdi and L. Platzman, Material Flow 4:247-254 (1988). Shows how to create short order-picking routes by numbering bins according to a spacefilling curve. §
John Bartholdi is a professor in the School of Industrial and Systems Engineering at Georgia Tech.
DP Zoo Tour
By EDWARD Z. YANG
I’ve always thought dynamic programming was a pretty crummy name for the practice of storing sub-calculations to be used later. Why not call it table-filling algorithms, because indeed, thinking of a dynamic programming algorithm as one that fills in a table is quite a good way of thinking about it.
In fact, you can almost completely characterize a dynamic programming algorithm by the shape of its table and how the data flows from one cell to another. And if you know what this looks like, you can often just read off the complexity without knowing anything about the problem.
So what I did was collect a bunch of dynamic programming problems from Introduction to Algorithms and draw up the tables and data flows. Here’s an easy one to start off with, which solves the Assembly-Line problem:
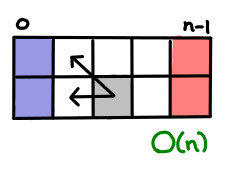
The blue indicates the cells we can fill in “for free”, since they have no dependencies on other cells. The red indicates cells that we want to figure out, in order to pick the optimal solution from them. And the grey indicates a representative cell along the way and its data dependency. In this case, the optimal path for a machine to a given cell only depends on the optimal paths to the two cells before it. (Because, if there was a more optimal route, then it would have shown in my previous two cells!) We also see there is a constant number of arrows out of any cell and O(n) cells in this table, so the algorithm clearly takes O(n) time total.
Here’s the next introduction example, optimal parenthesization of matrix multiplication.
Each cell contains the optimal parenthesization of the subset i to j of matrices. To figure out the value for a cell, we have to consider all of the possible combos of existing parentheticals that could have lead to this (thus the multiple arrows). There are O(n²) boxes, and O(n) arrows, for O(n³) overall.
Here’s a nice boxy one for finding the longest shared subsequence of two strings. Each cell represents the longest shared subsequence of the first string up to x and the second string up to y. I’ll let the reader count the cells and arrows and verify the complexity is correct.
There aren’t that many ways to set up dynamic programming tables! Constructing optimal binary search trees is a lot like optimal matrix parenthesization. But the indexes are a bit fiddly. (Oh, by the way, Introduction to Algorithms is 1-indexed; I’ve switched to 0-indexing here for my examples.)
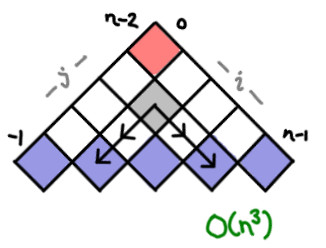
Here we get into exercise land! The bitonic Euclidean traveling salesman problem is pretty well-known on the web, and its tricky recurrence relation has to do with the bottom edge. Each cell represents the optimal open bitonic route between i and j.
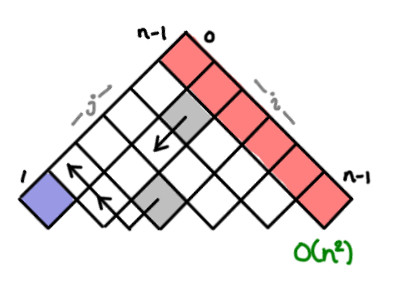
The lovely word wrapping problem, a variant of which lies at the heart of the Knuth TeX word wrapping algorithm, takes advantage of some extra information to bound the number of cells one has to look back at. (The TeX algorithm does a global optimization, so the complexity would be O(n²) instead.) Each cell represents the optimal word wrapping of all the words up to that point.
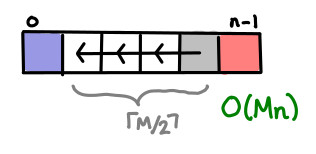
Finally, the edit problem, which seems like the authors decided to pile on as much complexity as they could muster, falls out nicely when you realize each string operation they order you to design corresponds to a single arrow to some earlier cell. Useful! Each cell is the optimal edit chain from that prefix of the source to that prefix of the destination. §
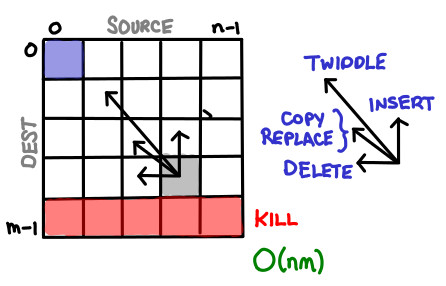
Edward Z. Yang is an undergraduate currently studying computer science at MIT/University of Cambridge. He is interested in topics related to functional programming, and he plays the oboe.
Commentary
By Peter Scott (pjscott)
For the people who’ve always wondered why it was called “dynamic programming”, there’s a funny story there. I’ll quote Richard Bellman, who coined the term:
“I spent the Fall quarter (of 1950) at RAND. My first task was to find a name for multistage decision processes. An interesting question is, “Where did the name, “dynamic programming” come from?” The 1950s were not good years for mathematical research. We had a very interesting gentleman in Washington named Wilson. He was Secretary of Defense, and he actually had a pathological fear and hatred of the word “research.” I’m not using the term lightly; I’m using it precisely. His face would suffuse, he would turn red, and he would get violent if people used the term “research” in his presence. You can imagine how he felt, then, about the term “mathematical.” The RAND Corporation was employed by the Air Force, and the Air Force had Wilson as its boss, essentially. Hence, I felt I had to do something to shield Wilson and the Air Force from the fact that I was really doing mathematics inside the RAND Corporation. What title, what name could I choose? In the first place, I was interested in planning, in decision making, in thinking. But “planning” is not a good word for various reasons. I decided therefore to use the word “programming.” I wanted to get across the idea that this was dynamic, this was multi-stage, this was time-varying — I thought, let’s kill two birds with one stone. Let’s take a word that has an absolutely precise meaning, namely “dynamic,” in the classical, physical sense. It also has a very interesting property as an adjective. And that is: it’s impossible to use the word “dynamic” in a pejorative sense. Try thinking of some combination that will possibly give it a pejorative meaning. It’s impossible. Thus, I thought dynamic programming was a good name. It was something not even a Congressman could object to. So I used it as an umbrella for my activities.”
So there you go: it was supposed to sound cool — and dynamic — and like something that any self-respecting congressman would want to fund. I’d always vaguely suspected.
Hacker Jobs
Senior Developer
youDevise, Ltd.
London, England
60-person agile financial software company in London committed to learning and quality (dojos, TDD, continuous integration, exploratory testing). Under 10 revenue-affecting production bugs last year. Release every 2 weeks. Mainly Java, also Groovy, Scala; no prior knowledge of any language needed.
To Apply: Send CV to [email protected]
Front-end and Back-end Engineers
Meetup
New York
Meetup thinks the world is a better place when groups of people meetup locally, in person, around a common interest. We’re reinventing how this is done, but we can’t do it alone! We value iterating/launching quickly, pragmatism, and long walks on the beach.
To Apply: meetup.com/jobs

Table of Contents
($=[$=[]][(__=!$+$)[_=-~-~-~$]+({}+$)[_/_]+($$=($_=!''+$)[_/_]+$_[+$])])()[__[_/_]+__[_+~$]+$_[_]+$$
The Designer Who Learned Django and Launched Her First Web App in 6 Weeks
What I Wish Someone Had Told Me About Startups 4 Years Ago
How to Train Your Brain to Flip to a New Language
Rock Solid Website Layout Examples
Using Git to Manage a Web Site
Combinatorial Applications of Spacefilling Curves