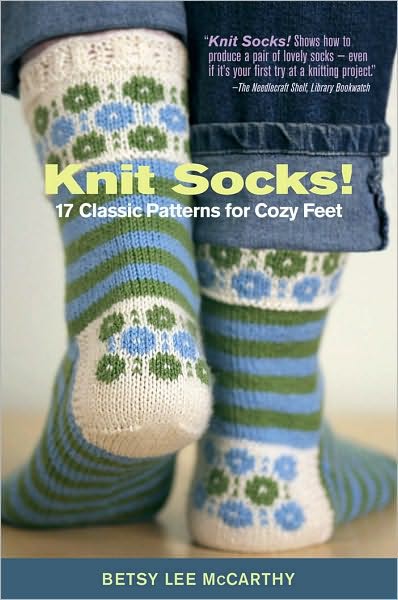
Knit Socks!

The mission of Storey Publishing is to serve our customers by
publishing practical information that encourages
personal independence in harmony with the environment.
Edited by Gwen Steege and Kathy Brock
Art direction and book design by Mary Winkelman Velgos
Text production by Jennifer Jepson Smith
Photography by © John Polak Photography, except back cover photograph
by Kevin Kennefick and author photo by www.smilingwillow.com
Illustrations by Alison Kolesar
Indexed by Nancy D. Wood
© 2010 by Betsy Lee McCarthy
Previously published in hardcover in 2004
All rights reserved. No part of this book may be reproduced without written permission from the publisher, except by a reviewer who may quote brief passages or reproduce illustrations in a review with appropriate credits; nor may any part of this book be reproduced, stored in a retrieval system, or transmitted in any form or by any means — electronic, mechanical, photocopying, recording, or other — without written permission from the publisher.
The information in this book is true and complete to the best of our knowledge. All recommendations are made without guarantee on the part of the author or Storey Publishing. The author and publisher disclaim any liability in connection with the use of this information.
Storey books are available for special premium and promotional uses and for customized editions. For further information, please call 1-800-793-9396.
Storey Publishing
210 MASS MoCA Way
North Adams, MA 01247
www.storey.com
Printed in China by Toppan Leefung Printing Ltd.
10 9 8 7 6 5 4 3 2 1
Library of Congress Cataloging-in-Publication Data
McCarthy, Betsy Lee, 1942–
Knit socks! : 15 cool patterns for toasty feet / Betsy Lee McCarthy.
p. cm.
Includes index.
ISBN 978-1-60342-549-0 (pbk : alk. paper)
1. Knitting—Patterns. 2. Socks. I. Title.
TT825.M383 2004
746.43’20432—dc22
2004001522
Contents
Handmade Is Beautiful!
Starter Stockinette
Checkered Textures
Classy Slip-Up
Winter Garden
Little Guys
Low-Roll Sporty
Yoga Moves
Best Foot Forward
You've Got Rhythm (3 variations)
Off the Cuff
Lacy Days (3 variations)
Fireside Stripes
Diamonds & Cables (2 variations)
Straight-Laced
Peaks ‘n’ Valleys
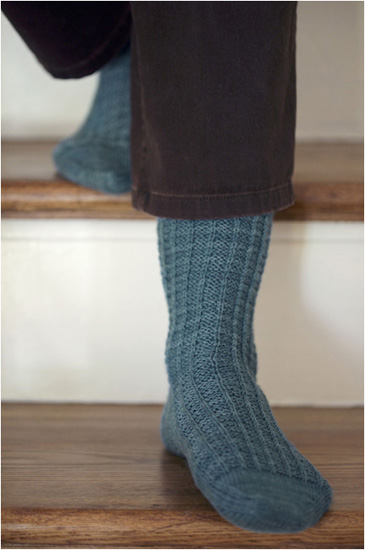
Simple Ribs
Shadow Box
Resources
Acknowledgments
Index
Handmade Is Beautiful!
I'm pleased to present new patterns and material in this revised edition of Knit Socks!, a step-by-step book I wrote six years ago to guide knitters gently through the process of knitting top-down socks. I had previously taught hundreds to knit socks at various classes, workshops, and kitchen tables, and the book enabled me to share my experience with thousands more. I'm pleased that Storey Publishing wanted to reissue this expanded edition as well. My heart sings when I hear about people who were helped by the first book, and this revised edition provides an opportunity to reach even more knitters.
My mother helped me to see special beauty in handmade items back when the word “homemade” implied that the item wasn't necessarily of good quality. My passion for knitting and teaching others to knit emerged from this awareness of beauty in the handmade. The more mechanized and computerized our world becomes, the more we yearn to create items of beauty from our own hearts and hands — items like hand-knit socks! Giving yourself time and permission to learn such activities is a wonderful, soul-nourishing gift, as well as a benefit to others who receive the special socks you knit.
I'm hoping this book will encourage you to try knitting socks and to see that with a little guidance, regardless of your skill level, making a sock is not only easy, but also great fun. The patterns range in knitting challenge from easy to intermediate and thus support gradual skill building. If you can comfortably cast-on, knit, purl, slip, increase, and decrease, you should be able to make most of the socks in this book. I've designed the patterns to provide opportunities to try new techniques on a small project and thus expand your knitting repertoire. Colorful Fair Isle stranding, simple no-cable-needle cables, slip stitches, easy lace, and attractive textured designs, as well as fun-to-create stripes in many varieties, all find their way into these pages.
Since the first book came out, I've listened to sock knitters, and in response, I added new material to answer a question frequently asked by knitters who learned to knit socks on circular needles: “How can I knit socks on one or two circular needles if the pattern is written for double points?” The simple answer is that you can knit any sock pattern on any type of needle, and this edition explains how to do that. (See pages 19–22.) Most of the patterns here are written for beginning and ending on the right-hand side of the sock as worn. Needles 1 and 2 (with a few exceptions that are spelled out) hold the instep stitches, and Needles 3 and 4 hold the heel/sole stitches. A few patterns start and end in the middle of the heel/sole to hide color changes.
Additionally, three new patterns, each with several interchangeable stitch patterns that turn those three patterns into eight, are included in this expanded edition. I hope they will provide hours of knitting pleasure and encouragement to knitters who want to create their own patterns once they see how one basic pattern can be developed into others. I also provide information on the expanding sock yarn fiber options, as well as new sock knitting tips and suggestions for taking your sock knitting to a new level.
More experienced knitters, be assured that this book isn't just for beginners. If you're already a sock knitter, you'll find 17 sock patterns, with size and yarn-weight options, plus tips and techniques for increasing the beauty, durability, and fit of your handmade socks. Most are easy to learn, making them perfect candidates for hours of relaxing, meditative, or social knitting.
Yes, it's an exciting time in the sock knitting universe. While almost nothing seems impossible, I encourage future sock knitters to learn by knitting one sock at a time or to knit a pair simultaneously on separate needles/needle sets (see Tea for Two, page 12). This book is for sock knitters — past, present, and potential. May our spirits be uplifted as we bring joy to ourselves and others by knitting socks together!
What You'll Need for the Journey
All you really must have to knit socks is some pleasing yarn, appropriately sized needles, a pattern, basic knitting skills, and a commitment to the project. That being said, a well-equipped knitting bag will enhance your knitting pleasure and increase the likelihood of your success. While you can always discover more gizmos, the few basic items recommended are highly portable, simple, and fairly inexpensive:
• Needles in size required for your project (double point, or one or two circulars)
• Adequate yarn for the project (Each pattern gives the required amount.)
• A working copy of the pattern (Photocopies allow you to make notes on your pattern without marring your book; make photocopies only from your own book, for your own use.)
• Needle and stitch gauge with a built-in ruler and holes for measuring needle size
• Retractable measuring tape showing inches and centimeters
• Tapestry needle (blunt) and a large-eyed sharp needle
• Plastic stitch markers or coilless safety pins
• Small sewing scissors or a yarn snipper
• Crochet hooks in several sizes (Look for a hook slightly smaller than the project needles, so you won't stretch the stitches when you use it; hook sizes B, D, and F cover the patterns here.)
• Pencil and small eraser
• Self-sticking notepads
• Knitting bag that functions well — and makes you smile!
In addition to these essentials, you may also find the following useful:
• Knitting needle point protectors or double-point needle holders (these keep stitches from slipping off the needle when it's not being used)
• Small hand calculator (if you're likely to modify pattern sizes)
• Sock heel and toe reinforcement yarn or thread
Selecting Your Yarn
Once upon a time, selecting sock yarn was simple. Available fingering-weight yarns were limited to “baby colors” (often acrylic and not good sock choices), a few primary colors, and drab “man colors.” Blue Moon Fiber Arts and Koigu had not yet been conceived, and the Yarn Harlot had yet to emerge. What an extreme contrast to what we have before us today in local yarn shops, on Ravelry, and on the Internet — seemingly infinite and ever-growing options.
Colors seduce us, as does the feel of the yarn. Everywhere we look, we see an abundance of spectacular yarn: hand painted, kettle dyed, long color runs in beautiful solids and near solids, self-patterning and/or striping, randomly variegated in addition to endless solids. Wool yarns are long lasting and strong, especially when blended with 10 to 30 percent nylon or mohair and nylon. The softer merino yarns are also durable when spun with a good twist or blended with nylon, silk, bamboo, Tencel, or SeaCell, to name a few of my favorite add-ins. Alpaca blends are an affordable treat, making soft, warm socks that hold their shape and are durable when blended with wool and nylon. (If you choose 100 percent wool or a wool blend without nylon or one of the other fibers listed above, you can reinforce the heels and toes with a special reinforcing yarn to increase durability; see Reinforcing Socks, page 148.) And the combinations get more luxurious and exotic — merino, cashmere, and nylon; merino, nylon, alpaca, and possum; angora, merino, and nylon; angora and nylon; and more recently, buffalo undercoat with wool and nylon.
Wool, the traditional choice, has some real advantages for contemporary sock makers. Wool or wool-blend socks have “memory,” which makes them warmer and less likely to stretch out of shape than, for example, socks made of cotton or synthetic yarn without wool. The choice of a superwash yarn over one that requires hand washing is another consideration. When I need to be practical, I choose superwash (which has the added benefit of generally being softer than regular wool).
Options to wool are also available and include wonderful fibers, such as bamboo, cotton, corn, soy, hemp, SeaCell, silk, microfibers, and viscose. For many knitters, these are the yarns of choice, either because of climate and/or skin sensitivity, or just because they love them — how they look, feel, and wear.
Looking at the who, where, and how of yarns is yet another element of choice. Foreign and domestic producers range from large- to small-scale commercial manufacturers to independent dyers, co-ops, and boutique dye artists whose small batches are snapped up online as soon as they are available. Political choices can be made based on how green the yarn production method is, where the yarn is produced, and whether the yarn is organic. In the end, personal preference trumps. Color calls out loudly to most of us, as do the hand of the yarn, the way the yarn feels and knits up, its durability, and its ease of care. We want yarn that is consistent with our values, our expectations, and our pocketbooks.
For socks, I most often choose yarn blended with some tough stuff, such as nylon, bamboo, mohair, silk, or Tencel, to increase the likelihood that my considerable investment of love, time, and money will pay off in socks that last. I spend 20 to 40 hours knitting a pair of fingering-weight socks; in addition I spend considerably more dollars on yarn alone than it would cost for commercially produced socks. I think of my choice as “durable beauty”: The socks need to have a long, useful life, as well as being knit from yarn I love for whatever reasons. When I buy special yarn that may be less durable, I try to do it with realistic expectations — about the care that will be required, the appropriate recipient, and how often the socks will be worn. And I remember that knitting with yarn I love is a passion and an indulgence, sort of like salmon fishing or making one's own furniture from beautiful woods.
The vast array of yarn colors, weights, and fibers now available make gathering the yarn one of the most pleasurable aspects of creating the project. With each pattern, I've provided information about the type, brand, color, and yardage of the yarn used in the pictured sock. You may substitute a similar weight if you can achieve the same gauge (number of stitches per inch) as specified in the pattern. Frequently, yarn manufacturers discontinue individual yarn colors or even an entire yarn line. This makes substituting yarns a necessity. Or you may fall in love with a yarn and want to use it as an alternative to what is used in a pattern. The choices waiting in local yarn shops and elsewhere are vast compared to what was available just a few years ago. This is a perfect time to embark upon sock knitting!
Selecting Sock Needles
I currently use mainly two circulars or five double-point needles for my sock knitting. I probably knit more socks on circulars because it feels faster and is easy to carry around without losing a needle. However, I love my old bamboo needles as well as my new, high tech, very pointy stainless steel-tipped, double-point needles. Sitting in my grandmother's antique oak sewing chair, rocking and knitting with these double-point needles, I become one with the long line of sock knitters that stretches across the world and time, and I feel happy.
Needle selection can require more thought than in the past because again we are blessed with so many options. I have several favorites in each type of needle. In circulars, I'm particular about the flexibility of the cord, the smoothness of the join (where the cord and needle connect), and how pointed the tips are, because my favorite kinds of knitting (socks, lace, and Fair Isle) tend to be done on small needles. I don't enjoy knitting with blunt needle tips, and I'm willing to risk occasional puncture wounds when using the sharpest points in very small needle sizes! It's all about what you prefer and what works for you. Just as a person can use the same map to get from one place to another whether driving a car, riding a horse, or walking, the same sock pattern can be knit with different types of needles. Although this book's original patterns specify double-point needles, the new patterns do not. You should feel free to use whatever type needle you want for any of the sock patterns. Needle-specific patterns are not necessary if you understand the steps involved in the sock-knitting process and how the selected needle(s) works to make a sock.
Stitch layout must be understood so instep and heel stitches can be differentiated both in the pattern and on the needles regardless of what needle(s) you are using. Know which stitches are for the instep and which are for the heel/sole. As might be obvious, Needle #1 is where you begin the round of knitting, and Needle #4 is the end of the round. If the round starts and ends on the right-hand side of the sock, as most of my original patterns do, Needles #1 and #2 are the instep-stitch needles, and #3 and #4 are for the heel/sole. However, if the sock rounds start and end in the center heel/sole or the bottom of the sock, as many traditional patterns written for double-pointed needles do, then #1 is for half of the heel/sole stitches, #2 and #3 are for the instep stitches, and #4 is for the other half of the heel stitches. Your pattern will differentiate instep from heel stitches, allowing you to work the pattern on double-point needles, two circulars, or one long circular needle.
No method of knitting a sock is superior to any other in terms of the needle(s) chosen. Expand your options by trying them all, then select the one you like best. Once you've made a few socks, you may also want to experiment with different needle materials. Metal needles can be slippery for new sock knitters, but they also provide the speed that more experienced knitters appreciate when working with certain yarns.
Diving Right In
Despite the wisdom of working gauge swatches, many sock knitters bravely sally forth, knitting a sock with needles they believe likely to produce the right gauge or fit based on their previous experience. Sock rounds happen quickly. If you're not discouraged by ripping out and starting over, then you can use the beginning of an actual sock as your gauge swatch.
For example, while wooden needles provide some resistance or drag, thus lessening the possibility of dropped stitches, that same resistance may interfere when you're working with yarns containing cotton. Bamboo needles are a nice compromise, providing the flexibility and warmth of wooden needles, but offering less drag because of their smooth finish. Practice with various yarn-and-needle combinations to find your own favorites. Your preference will likely be determined by which methods are easiest for you and most enjoyable and/or which tools feel best for a specific project. We have many people to thank for giving us alternatives to traditional double-point needles.
Getting the Right Gauge
Needle size and yarn together determine the gauge of your knitting. Once you have selected a pattern and compatible yarn, knitting a gauge swatch is the best way to determine what needles to use to achieve the desired stitch gauge. Too many stitches to the inch produces a smaller sock; too few, a larger one. One advantage to using circular needles is that you can try on your sock while it's still on the needle(s) before you've gone very far. And if you are using double-point needles, you can slip your stitches onto a circular needle (or a long piece of smooth cotton yarn threaded through a blunt tapestry needle) to see how the beginning of the sock fits. Another way to give it a quick “sniff test” is to see how the beginning sock fits over your hand. In most cases, that is how it will fit your foot! This is not to suggest that swatching is unnecessary; it is just acknowledging that we all like being reassured that we are pointed in the right direction.
With each pattern, I suggest the needle size that is likely to work for a knitter with average tension on the yarn. When you make your swatch, this advice is a good starting point, unless you already know that you usually knit loosely or tightly. Those who knit loosely may want to start with a smaller size needle than is suggested; those who knit tightly may want to start with a larger size. It's not the needle size that's important, but what gauge you, the sock knitter, get from a specific needle and yarn. There's no wrong or right in this. The tension with which we knit is as much a part of us as the size and slant of our handwriting. Gauge may change over time and in response to circumstances that may make you feel rushed or stressed.
Tea for Two
Knit both socks in a pair at the same time rather than knitting them sequentially. To do this, you'll need two sets of needles (double-point needles or circulars) in the same size. Knit the cuffs on one sock, followed by the cuffs on the other. Then continue knitting the various parts of the two socks alternately until the pair is completed. Taking this approach, you have the satisfaction of truly finishing when you get to the toes, rather than needing to start all over again. The dreaded SSS (second sock syndrome) overtakes many sock knitters who wait to tackle sock #2 until sock #1 has dimmed in their memories.
Durability and Needle Size
Some experienced knitters may be surprised at the yarn and needle combinations I recommend. I've found that to achieve a long-lasting sock fabric, I generally need a needle three to five sizes smaller than the size recommended by the manufacturer for general knitting (that is, for sweaters, hats, and so on). For example, for a worsted weight yarn that states on the label “4½ stitches = 1” on a US #8 (5mm) needle,” I would probably use a US #3 (3.25mm) needle to make a sock with a gauge of 6 stitches = 1”. Yarns made specifically for socks often provide both a suggested gauge appropriate for socks and a needle recommendation, for example, 7½ stitches = 1” on US #1–2 (2.25–2.75mm) needles. I want you to be happy for a long time with the socks you knit with such care!
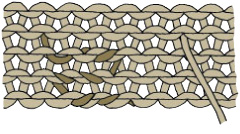
Since you're knitting your sock in the round, you should also knit your gauge swatch in the round. Gauge in stockinette stitch worked in the round (which means that you're knitting every round) is often different from the gauge that same knitter achieves in straight knitting (knitting one row, turning, and purling back on the reverse side). Here's a quick two-needle version of knitting in the round.
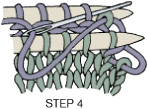
1. Cast enough stitches onto a needle to make a gauge swatch approximately 3“– 4” wide. For example, if the suggested gauge is 6 stitches = 1“, cast on 18–24 stitches plus 4 extra stitches. (These end stitches are ignored in the measurement as they tend to loosen when knitting this type of swatch in the round.)
2. Knit the cast-on stitches onto the empty right-hand needle or needle tip (for circular needles).
3. Slide all stitches on the right-hand needle/needle tip to the opposite end of the needle. Then loop the yarn around the back of your hand to create a tube effect as you knit the swatch. Drape the yarn behind your swatch loosely enough so that you will be able to flatten the swatch to measure your gauge.
4. Repeat Steps 2 and 3 until the piece measures 3”– 4” (7.5 –10cm).
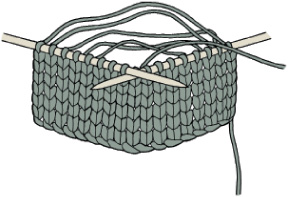
Working a gauge swatch in the round
The Anatomy of a Sock
You can make socks from the top down to the toe, from toe up to the top, up from a hollow knitted foot, and probably other ways as well. All patterns in this book, however, are knit from the top to the toe in the round on double-point or circular needles. Whatever way you knit them, socks are little engineering miracles whose shapes emerge and become recognizable during the knitting process — a special delight for first-time sock knitters!
Top to Toe

Cuff and leg. You begin each sock in this book by creating the cuff (or other top treatment) and the leg. The cuff needs to be stretchy enough to keep the sock up and wide enough to allow your whole foot to be inserted.
Heel. When you get to the place at the ankle where you begin the heel, you set aside half the stitches, leaving them on their needle(s). You'll use these stitches later to knit the instep (top of the foot), but for now, they wait on their needle(s) while you knit the heel flap.
Heel flap. The heel flap is a rectangle that covers the back of the heel. It's created by knitting back and forth in rows using two needles or needle tips (if you are using circular needles), rather than being knit in the round. Then, working back and forth in short rows that gradually become longer, you turn the heel, creating the cuplike portion of the sock that fits under your heel.
Gusset. Next, you pick up and knit stitches along the right side of the heel flap, work across the instep stitches, and then pick up and knit stitches on the left side of the heel flap. At this point, you are positioned again to knit circularly. To accommodate the shape of the foot, the circumference of the sock is wider here than at the leg and the foot, so you must make a series of decreases at each side to form the gusset. To see why you need this extra space, measure the circumference of the widest part of your foot and then measure on the diagonal from the bottom and back of your heel around to the top of your instep.
Foot and toe. Once you complete the gusset reductions, you'll find it's quick to knit the sock foot and finish the sock by shaping the toe with a series of paired decreases that create a nicely rounded toe. Close the stitches at the end of the toe, usually by grafting them together. Voila! A sock is waiting to have its mate finished and then to be worn.
Casting On and Dividing
Start knitting any top-down sock by loosely casting the total number of stitches onto one needle — one double-point needle, one 24” circular, or one long (32” to 40“) circular. Stitches are then most often divided evenly, either among three or four double-point needles (one-third or one-fourth on each needle), two circulars (half on each), or one long circular (half on each tip, a feat accomplished by pulling up a big loop — approximately one-third of the cord — between the two middle stitches). These are general guidelines for three reasons: occasionally a different division of stitches is recommended in a pattern to make it easier to knit; the instep and heel stitches may differ in number; or the total number of stitches doesn't divide evenly on the needle(s) you are using. Details are given with each pattern.
THE LONG-TAIL CAST-ON
The socks in this book are made with a long-tail cast-on, a very useful and nicely stretchy cast-on that should be in every sock knitter's bag of tricks. Other castons may be used, too, as long as they do not form rigid edges, such as cable castons do. The key is to keep the cast-on top stretchy. Here's how it's done:
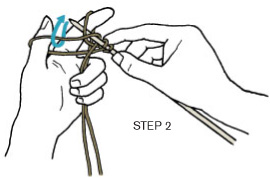
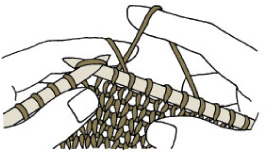
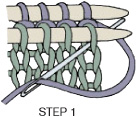
1. Estimate how long to make the tail by wrapping the yarn around the needle one time for each cast-on stitch you need, then adding a few extra inches. Make a slipknot right here, and slide the knot over your knitting needle. Hold that needle in your right hand; hold the tail and the working end of the yarn in your left hand, as shown in Step 1. Insert the needle through the front loop of the working yarn loop on your thumb. Wrap the tail from back to front around the needle.
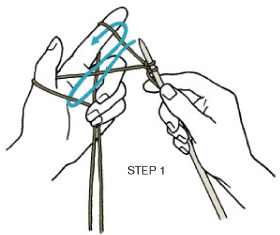
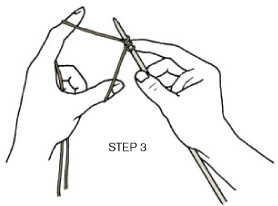
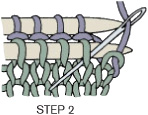
2. Use the needle to draw the tail through the loop on your thumb.
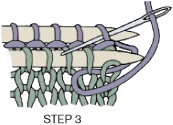
3. Release the loop on your thumb, place your thumb underneath the working thread, and draw both toward you while holding the working thread and tail firmly in your fingers.
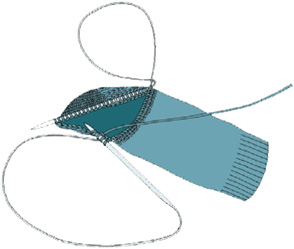
Joining: Trading Places and Getting Ready to Work
After the stitches are divided on the needle(s), the circle needs to be joined one time. Regardless of the type of needle(s) you are using, place the skein so the working yarn will be outside the circle once it is joined. There is a difference in how I trade places of two stitches (the first and the last cast on), depending on the type needle. Methods for double-point and circular needles are described on the following pages.
Stay Loose
Be sure to cast on loosely so that the top is nicely elastic, allowing the foot to fit into the sock, the sock to stay up, and the top edge to fit comfortably around the calf. Practice casting on loosely so that you can do it with the same needle size as used for the rest of the sock. This technique enables you to create uniform stitches along the sock top. If you're still having trouble, here are some tips that will help you stay loose:
• Try holding two needles together and casting the stitches onto both of them. Once the stitches are all cast on, carefully remove one of the needles.
• Cast stitches onto a needle one or two sizes larger than the pattern needles, then slip the cast-on stitches onto the smaller needles before joining and beginning the sock.
• Use a larger needle for the cast-on as above, then after joining, work the first few rows with the slightly larger-sized needles.
• Avoid tightening up your stitches or pulling them too close together. Leaving a little more space between cast-on stitches produces an elastic top band and stitches that can be worked much more easily.
DOUBLE-POINT NEEDLES
With double-point needles, I use the tips of the needles with the first and last cast-on stitches to join stitches. Be careful not to twist the stitches when you join them to knit in the round. If the stitches twist around the needle, you won't get the nice, flat tube you need for a sock, and the flaw will be very apparent after you've knit the first few rows. If this happens, smile, pull out your knitting, cast on again, and charge ahead.
A common way to join for circular knitting on double-point needles is simply to hold the first and last needles closely together and begin to knit clockwise with the empty needle, giving the first few stitches little tugs. But my favorite way is to work a join that connects the stitches into a round by trading the places of the first and last cast-on stitches. I use a variation of this technique for both two circulars and one long circular needle joins.
To join the first and last stitches on three or four double-point needles:
1. Distribute the stitches among the needles as indicated in the pattern, checking to be sure they are not twisted. With double-point needles, hold the needle with the first cast-on stitch in your left hand, and the needles with the working yarn and the last cast-on stitch in your right hand. Place the skein so it will be outside the circle once the yarn is joined.
2. Use the tip of the right needle to move the first stitch on the left needle to the right needle.
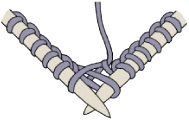
3. Use the tip of the left needle to lift the current second stitch on the right needle up and over the first, and slip it on the left needle to become the new first stitch on the left. Pull both ends of the yarn to snug up. (You can also use a crochet hook to pull the last cast-on stitch from the right needle through the first cast-on stitch now on the right needle, lifting it onto the left needle.)
Note: After completing this join, check to be sure you still have the number of stitches originally cast on. You simply made the first and last stitches trade places; no stitches were eliminated.
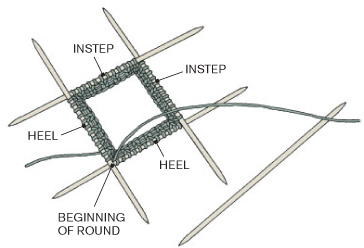
After joining, knit the stitches from the first needle (held in your left hand) onto the empty needle (held in your right), going right to left (clockwise). As you complete the stitches on each needle, use the newly empty needle to knit the stitches off the next needle. Always work with the right side of the sock to the outside when knitting in the round. (Every five-needle pattern in this book follows one of the needle configurations in the illustration below, but socks knit with four needles may also begin at either the right or the back.)
Round starts at side.

To keep track of where you are on any type of needle, place a marker between the last two stitches of a round, slipping the marker from one needle to the next when working stitches.
Round starts at center of heel.
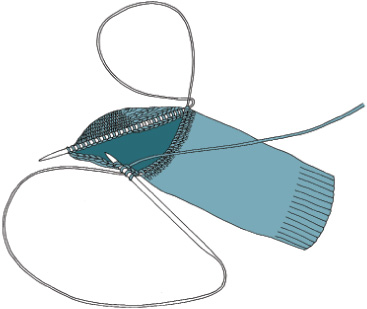
TWO CIRCULAR NEEDLES
I recommend using 24” circulars when you knit socks on two circular needles because each one is just long enough to stay out of the way when you're knitting with the other needle.
1. To join the stitches now divided onto two circular needles, hold the needles together vertically and parallel. Carefully slide the stitches on both needles together toward the needle tips of the open end of the cast-on stitches.
2. As with double-point needles, join the first and last cast-on stitches without twisting and using the same crossover, as illustrated at the top of page 18. However, unlike double-point needles, you cannot move the two circular needles held parallel into a tip-to-tip position to cross the stitches over each other because they are connected with the yarn between the two middle stitches. For me, what works best is to choose either of the two dangling needle tips as the tool to help manipulate the stitches. I move the first cast-on stitch from its position as the first stitch on the left needle to become the first on the right.
3. Use the same dangling end to move the current second stitch on the right needle (which was originally the first on that needle) over to become the first stitch on the left needle. This transfer can be accomplished most easily by using the left needle to loosen that “live” stitch a little and then lifting it over the first stitch to become the new first stitch on the left needle. Again, when the join has been made, tug the working yarn and the tail to cinch the last transferred stitch up a bit.
The Rule for Two Circular Needles
With stitches ready to work, you're good to go once you understand the one rule about knitting socks on two circular needles. The stitches have been divided between the two needles, to be either instep stitches or heel stitches. The rule is that you always knit the instep stitches only with the instep needle and the heel stitches only with the heel needle. Many find it easier to learn this technique by using two different kinds of needles; for example, one circular with metal needle tips and the other with wood or bamboo. If you see a wooden and a metal tip poised to work together, it's a sure sign that the rule is about to be violated, that is, you're about to work instep stitches with the heel needle, or heel stitches with the instep needle. The predictable result of making this mistake is that all the stitches end up corkscrewed onto one needle and the other needle clatters to the floor. Regardless of experience level, this happens at least once to all knitters who use two circulars, and it's not the end of the world. The knitter need only take a deep, cleansing breath, pick up the fallen needle, carefully back off half of the stitches purlwise onto the suddenly empty needle, and knit on.
One more step must be taken before stitches on the two circulars are ready to be knit in the round: making half the stitches ready to be knit, or “ready to be worked,” while the other half are put in a “rest position.” To do this, the stitches that will be held in your left hand need to be slid up close onto the working end of that needle so they are ready to be knit using the other end of the same needle. The stitches on the other needle need to be resting on the middle of their cord with the needle tips dangling down on each side.
After all the stitches on one needle have been knit, slide the working needle away from the stitches just worked (either heel or instep stitches) so the stitches are resting totally on the flexible circular cord. You then slide the stitches on the other needle up toward their working needle point to be knit off onto the other end of the same circular needle. If a phone rings or someone comes to the door and you throw the sock-in-progress down, it really is easy to get started again. Don't panic. Look carefully at your work. The next stitch that you should work is the stitch to the left of the last stitch worked, or to the left of the one with the yarn coming out of it. This is true for any sort of needle configuration. Knitting in the round on two circulars proceeds in this manner, working the stitches with one needle, then working the other half of the stitches with the other.
ONE LONG CIRCULAR NEEDLE
To join the two ends of one long circular needle, I prefer to use another tool for two reasons: First, the two working ends of the needle will be held together parallel (and thus cannot be held tip to tip). Second, there are no dangling ends to be used as lifting tools as when working with two circular needles.
1. Hold the needle as if it were a squatty capital C, with the two tips pointing toward the right. Hold the needle with the last stitches cast on at the bottom, and a very large loop off to the left (most of the cord). Use a small crochet hook to transfer the first cast-on stitch (now on the top needle) to the bottom needle. (See drawing at top, facing page.)
2. Next, move the second stitch on the bottom needle to the top needle, stretching out the loop out a bit. (This is the last cast-on stitch, and contains the working yarn, so it is a live stitch and therefore can be stretched.) Alternatively, you can use a crochet hook to pull this stitch up through the new first stitch and place it on the top needle.
3. Now that the join is accomplished, one more step must be taken here to be ready to work in the round. Pull out the bottom needle quite a bit, leaving a large loop (about one-third of the cable) on the knitter's left-hand side. At the same time, create a second large loop (approximately the same size) on the right between the place where the crossover just occurred and the needle tip. Insert this needle into the first stitch on the left. As you begin working the first half of the stitches, you'll have a very large loop on each side, which led Sarah Hauschka, who developed this Magic Loop technique, to call it “Mickey Mouse Ears,” because we all know what they look like! (See drawing below.)

Working in rounds on one long circular needle involves pulling the needle back through the end of the stitches just worked (either the heel or the instep stitches) to create a loop, or ear. Then, knit across the next set of either heel or instep stitches, snuggling the first few stitches up against the stitches just worked, which are now resting. When you have knit all the stitches off the tip of one needle, back the other needle into the next stitches to be worked (your needle tips are again parallel to each other and both point toward your left), turn your work around and, with both needles pointing to your right, pull the needle tip through the stitches just worked to make another loop, or ear, and proceed in the same manner as above. Sarah Hauschka has a “mantra” to remember what to do when knitting on one circular needle:
• Find home position after you've turned your work around and both needles point to your right;
• Find the needle with the yarn attached, which is the needle tip of the stitches just worked;
• Pull that needle out far enough to give yourself enough slack, that is, make the ear;
• Continue knitting the stitches off the next needle. Continue this process of pulling the cord to create a loop, working across, backing the left needle into a knit-ready position, turning the work around and leaving a loop between stitches, and pulling the needle just used out for another ear.
On the Decrease
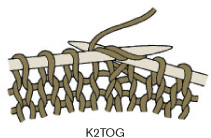
Because the decreases that you work for the heel gusset and toe shaping show in the finished sock, it's important to use the decrease method that makes the finished stitches lean in the correct direction. Decreasing by knitting two stitches together (K2tog) results in a right-leaning stitch, whereas decreasing by knitting slipped stitches together (ssk) results in a left-leaning stitch. The patterns specify which of these two to use. Here's how to do them:
K2TOG
For a finished stitch that slants to the right, simply knit two stitches together by inserting the needle into both loops, just as you would to knit. K2tog (knit 2 together) is generally used at the end of a row or round.
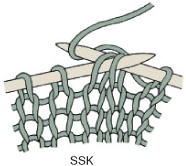
SSK
For the method known as ssk (slip, slip, knit the two slipped stitches together), slip two stitches knitwise, one at a time, from your left needle tip to your right. Then, insert the left needle tip from left to right through the front loops of the slipped stitches, and knit the two stitches together from this position. This technique makes a finished stitch that slants to the left on the finished side and is often used at the beginning of a row or round.
A Better SSK?
Some sock knitters prefer using an alternative ssk at the gusset and toe for the shaping. Slip the first stitch knitwise, then slip the second stitch purlwise from your left needle to your right, and knit them together.
On the Increase
Occasionally, you'll need to increase the number of stitches you're working on. This might happen when a pattern on the leg requires more stitches than you used for the ribbed cuff. Either the bar increase or the technique known as “make 1” is appropriate for these sock patterns. Note that when you use make 1, it's important to twist the new stitch so that you don't leave a hole at the point of increase.
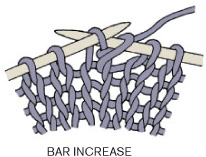
BAR INCREASE
This is a tight increase that leaves no hole, but it does show as a short, horizontal bar on the right side of the fabric. Make it by knitting into the front of the loop in the usual way, but do not remove the stitch from the needle. Instead, knit into the back of the same stitch, and slip both new stitches onto the right needle.
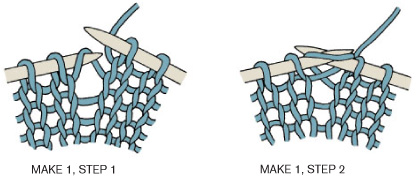
MAKE 1
1. Look for the horizontal strand of yarn between the first stitch on your left needle and the last stitch on your right needle. With the tip of your left needle, pick up this strand from back to front.
2. Knit into the front of the bar, which twists the new stitch to the left and avoids any holes.
Adding in New Yarn
When you run out of yarn or need to change yarn colors, try to start the new yarn in a place where it will not be very noticeable, such as in the middle of the sole of the sock or at the beginning of a new round. Here are some ways to add yarn easily:
• Overlap the new yarn with the old, then hold the two yarns together while you work three or four stitches before dropping the old yarn. Leave enough of a tail on both ends so that you can weave them in later with a yarn needle. This is not a good method to use if you're working with heavy yarn; it may leave a lumpy place in your sock.

Join by overlapping old and new yarns
• Drop the old yarn, leaving a tail adequate for weaving in later, and begin knitting with the new yarn, also leaving a tail for weaving in. This is what I usually do. The first few times you come around to the place where the new yarn was added, you may want to snug up the two yarn tails. And you may even feel a bit anxious; however, it will all stay together — no need to worry. After that, the knitting itself will hold everything together — really! Avoid any little holes when weaving them in by carrying the old yarn on the diagonal up to the left and the new yarn on the diagonal down to the right. To ensure an invisible join, separate the plies of the yarn ends and weave them in separately.
• When you see that you're about to run out of yarn, carry the new yarn along the back of the work for six or seven stitches before it is needed for knitting in much the same way as is done for stranded Fair Isle knitting.
Carrying new yarn along the back
• “Spit splice” the ends of the old and new yarn together, if the yarn content allows it to felt. For instructions, see Splicing Ends Together, page 123.
Carried yarn on back
• If you're working with a new color, as in striping, you may want to follow the Striping without Jogs instructions, page 58.
Knitting Leg to Heel (and Beyond)
Once you've joined the stitches and are knitting the leg tube on any type of needle, it should be smooth sailing until it's time to work the heel flap. Remember to snug up a bit after the first two new stitches on any new needle or needle tip to help prevent “ladders,” loose places that can show when you move from one needle to the next if you aren't careful.
Many patterns divide the stitches 50-50 between the instep and the heel/sole. Others divide them differently, in order to make the instep pattern stitches symmetrical by adding another stitch or so to the left side of the instep (as you wear the sock) or accounting for a center panel with an uneven number of stitches. So check the pattern to see how many stitches the heel is going to be worked on, and make any transfers that are needed before beginning the heel flap. It's also important to remember that the transfer occurred so that you can reverse it before shaping the toe with 50 percent for the instep and 50 percent for the heel. When moving stitches, remember to slip them purlwise, or “point to point,” so that your stitches are not twisted. When using one long circular needle, however, you will pull up the cord to create the new stitch division.
Making the Heel Flap and Turning the Heel
Heel flaps are made in the same way no matter whether you're working with double point or one or two circular needles. The instep stitches are not used during the heel construction process. Those stitches just wait patiently until the heel is formed and it's time to begin again knitting in the round. Heel turning (see You Can Do It!, page 26) is also done in the same manner on two needle points, either from two different double-point needles, from the two ends of one 24” circular, or from the two tips of one long circular. The process is the same no matter what your choice of needles.
Turning the heel
YOU CAN DO IT!
Someone somewhere started a rumor about heel turning being difficult, if not impossible, to do. Supposedly, this is the part of the sock that's likely to trip up unwary knitters and derail the whole project. This rumor definitely is not true and, in fact, turning the heel of a sock is very possibly the part that you'll find to be the most fun. This is the point when you see an identifiable sock shape emerge and realize that the whole sock will be finished before long — the light at the end of the leg tunnel. The key to turning a heel is to believe the pattern and follow it for a few rows before forging off on your own. Like the heel flap, the heel is turned by working back and forth on two needles/needle tips. When you first read the instructions, you may think they can't be right. Knitters are accustomed to working all the stitches on a needle before turning the needle over to work back across it. But when you turn a heel, you work fewer than all the stitches on a row, turn, and then work fewer than all the stitches on the next row. This practice is called “short rowing.” With each row, however, you work your way closer and closer to the last stitches on either end of the needle.
You create a small gap where you turn the needle over each time. You should have an equal number of stitches on both ends of the needle after the gaps when the same number of rows has been worked on both right and wrong sides. After a few rows, you'll see the gap and know that you knit (or purl, depending on which side you're working on) until there is one stitch before the gap. Then you will knit (or purl) that stitch together with the stitch on the other side of the gap, followed by a K1 (or a P1). This moves you closer to each end of the needle, until finally you will have worked all the stitches. At that point, you'll see a heel, that place where the sock changes from being a cylinder into a recognizable sock shape.
SECRETS FOR TIGHT, SMOOTH GUSSETS
Gussets are those little triangular shapes that provide the extra room we need for getting heels in and out of socks; they differentiate shaped socks from tube socks. To create gussets on each side of the sock, a number of stitches need to be picked up and knit, first along the right side of the heel flap and then, after knitting across the instep stitches, down the left side of the heel flap. The technique for picking up stitches is the same for all needles. Pick up and knit gusset stitches with an empty needle for double-point needles and the appropriate needle tip for circulars. The stitches can be picked up with the needle tip itself or with another helper needle or crochet hook.
A nice, tight join between the heel and the point where gusset stitches are picked up is one characteristic of a well-constructed sock. The number of new stitches picked up along each side of the heel flap is generally the number of rows in the heel flap divided by two, give or take one or two. If you're making a heel flap in which the first stitch in each row is slipped, pick up one stitch for each of the chain selvage stitches created (one for every two rows worked). You do this by going down into the outside loop of each stitch, under a whole stitch.
Weaving in Loose Ends
Weave the old yarn on the diagonal forward to where the new yarn is worked, and weave the new yarn on the diagonal back to where the old yarn was worked. Weave them into the back of purl bumps, a few stitches one way, then turn and go back into a few purl bumps in the other direction, and then turn again and tuck them into a few more purl bumps, in a Z-like configuration.
It's important that you pick up enough stitches to avoid holes along the edge of the heel flap and top of the gusset triangle. If you're concerned, pick up one or two more stitches than the pattern calls for. It will just take a little longer to work the decrease rounds to get down to the original number of stitches. This will not adversely affect the appearance of your sock, but gussets with gaps or loose spots will. Another way to get a smooth, tight pick-up edge is to knit into the back of the stitches picked up on either side of the heel flap the first time you knit around after the pick-up round. To minimize any looseness at the top of the heel gusset at either side of the instep stitches, lift up onto the instep needle the bar between the heel and instep stitches (on both sides of the instep) and knit them together with the first and last instep stitches.
Tighten up and tack down looseness or holes after the sock is completed. When Lucy Neatby, a well-known sock designer, called this strategy “selectively suturing” in a class I took from her years ago, she made this all okay for me! In fact, for a while it didn't seem like I'd really finished a sock unless it was properly and selectively sutured. Additionally, and even more importantly, it helped me not be discouraged when the socks were not at or above perfection, in every way, once I completed them. Yes, we can cinch up the looseness and tighten things up if need be. It's just fine.
Gusset stitches on two circulars. Using only the heel needle that has the stitches remaining after you've turned the heel, pick up and knit stitches up the right side of the heel flap. Then work across the instep stitches with the instep needle — the first time in a while that these rested stitches have had to work. Now we are ready for a potentially tricky bit: picking up gusset stitches down the left side of heel flap when using two circulars. What must be done seems counter-intuitive or at least highly unlikely. Your working instep needle is so handy and close to the top of the left side of the heel flap, as is the working yarn. However, the rule is that for heel stitches, only the heel needle must be used (see The Rule for Two Circular Needles, page 19). So, reach across the sock and bring the tip of the heel needle resting near the top of the right side of heel flap over and across the sock to the top of the left heel flap.

Picking up stitches on left side of heel using needle holding heel stitches
When stitches have been picked up along the left side of the flap, as was done for right side, and the working needle is now next to the stitches leftover from turning the heel, readjust the needles so that you can continue knitting around on the heel needle until you reach the beginning of the instep stitches. Generally, this is the beginning of a round for me. I find starting and ending socks on the right-hand side is easier because it avoids shifting stitches to center the round in the bottom of the heel/sole. There are times when I start and end a round in the center of the heel/sole; for example, when working patterns or stripes, or when it would be best to have any evidence of the beginning and ending hidden on the bottom of the foot for aesthetic reasons.
Gusset stitches on one long circular. Picking up and knitting gusset stitches on one long circular needle differs from two circular needles because one needle handles both instep and heel stitches. The needle tips alternate between working only heel stitches and then working only instep stitches. The tip of the needle that has just finished turning the heel continues to work to pick stitches up along the right side of the flap. That same tip will be used to continue working across the instep stitches. At this point, the needle tips point to the left, looking like a backward C. The nonworking needle tip can be used as a helper to pick up stitches on either side of the heel flap. Picking up stitches also can be done with one needle tip alone or with help from a crochet hook or double-point needle. Back the needle tip into the instep stitches to be ready to be worked and pull the tip of the needle with the stitches just worked out to creating a loop or ear on both sides of the instep (again, each ear is made up of about one-third of the cord).
Picking up stitches on left side of heel when using one circular needle
To pick up stitches down the left side of the heel flap, gently pull the needle tip away from the instep stitches and the other tip away from the heel stitches, once again creating loops on both sides of the work. Position one loop between the instep stitches and left side of the heel flap with the needle tip coming out from the heel-turning stitches. Pick up stitches along the left heel flap in same manner as done on right, using the non-working needle tip as a helper if desired. When all gusset stitches are picked up down the left side of the heel flap, back the nonworking needle tip into the heel stitches. With loops at each side of the instep, work around to the end of the heel stitches. Back the emptied tip into the instep stitches, in readiness for working the first round of gusset decreases, with the needle tip with the yarn attached pulled out and a loop at each side of the instep stitches.
Closing the Toe with Kitchener Stitch
Most of the toes in the patterns in this book are closed using an invisible weaving technique known as Kitchener stitch. To anchor the stitches before weaving:
• Distribute the remaining toe stitches evenly between two needles/needle tips. Hold the tips together so that the stitches align, with wrong sides of the sock facing. Thread the yarn through a yarn needle, and insert the needle through the first stitch on front needle as if to purl. Draw the yarn through the stitch, leaving the stitch on the needle. (The yarn in the tapestry needle needs to stay under the knitting needles when moving from front to back.)
• Insert the yarn needle through the first stitch on the back needle as if to knit. Draw the yarn through the stitch, leaving the stitch on the needle. Now that you're ready, here is how to begin weaving:
1. Insert the yarn needle through the first stitch on front needle as if to knit. Drawing the yarn through the stitch, slip the stitch off the needle.
2. Insert the yarn needle through the second stitch on the front needle as if to purl; draw the yarn through, but leave the stitch on the needle. Snug up yarn.
3. Insert the yarn needle through the first stitch on the back needle as if to purl; draw the yarn through and slip the stitch off.
4. Insert the yarn needle through second stitch on back needle as if to knit; draw the yarn through, but leave the stitch on the needle. Snug up yarn.
Repeat Steps 1– 4 until you have worked all stitches and none remain on needles.
For an alternate closure method, you can draw the remaining stitches together by running a thread through them and pulling tightly to close. On the other hand, if you prefer to close the toe with Kitchener stitch but want a more rounded toe, see the sidebar on page 75.
With all needle configurations, toes are grafted together with stitches evenly divided on two needles (or needle tips) held parallel to each other and grafted together using a tapestry needle and 8” to 10” length of the sock yarn. Now that the sock is complete, if there was no slack accidentally created when changing from one needle to another, no one should be able to tell what type of needles you used. For a top-down sock, the same steps are followed in the same order regardless of the needles used. It's time for you to admire your new sock!
To the Task
My father told me many years ago that if a person could read, there was little that person couldn't do. I believed him then and attempted many things I might not have otherwise thought I could do. So, gather your determination, courage, knitting needles, and some yarn, and let's move forward together and knit some basic socks. In doing so, you become part of a wonderful tradition spanning cultures around the globe across many centuries. Enjoy!
Multiple Possibilities: Pattern Substitution
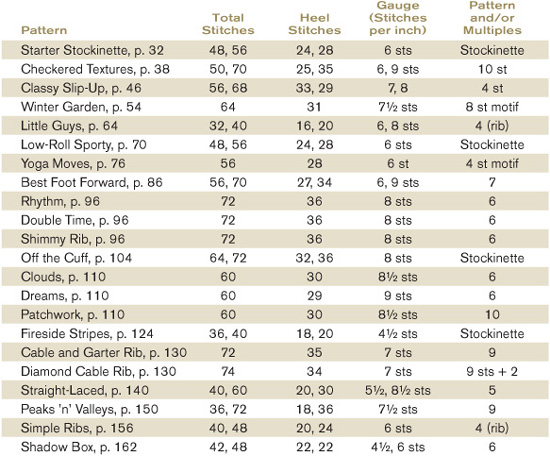
It won't be long before you're ready to branch out and modify designs or create your own patterns. For example, if you wanted to make a baby-sized version of Shimmy Rib, you could refer to the 36-stitch sock in Peaks ‘n’ Valleys and insert the Shimmy Rib pattern into it. Shimmy Rib has a 6-stitch pattern repeat; Peaks ‘n’ Valleys a 9-stitch. This substitution works because both are even multiples of 36 (6×6 and 4×9 both equal 36). Or if you wanted to make a 64-stitch sock in fingering-weight yarn with an 8-stitch repeat pattern, you could use the pattern Off the Cuff, substitute your choice of ribbing or top treatment instead of the cuff, and substitute your chosen 8-stitch pattern for the stockinette. Additionally, to balance the pattern on the instep (that is, to make the instep symmetrical), you may need to transfer a stitch or two from the instep or heel stitches and then move them back to their original needle either after finishing the gusset decreases or just before closing the toe.
Be sure to knit a gauge swatch before making substitutions (see Getting the Right Gauge, page 12). A sock knit in a very open, lacy stitch pattern will likely be much larger in circumference than one knit in stockinette. A cabled pattern may be tighter than one in stockinette because cables pull it in. You may thus need fewer stitches for the lace sock and more for the cable.
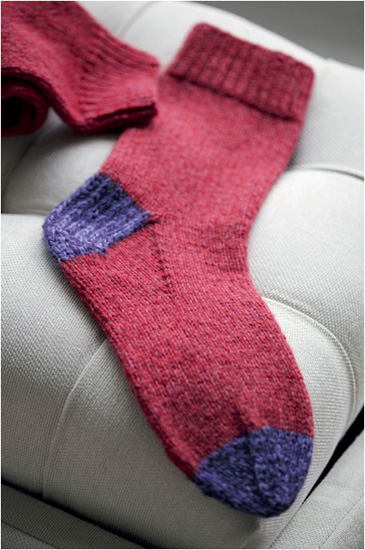
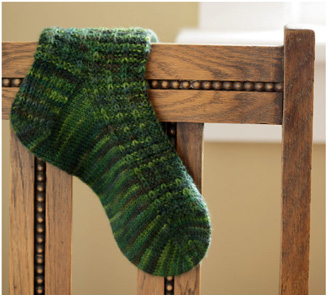
Starter Stockinette
Make these basic socks in one color or spice them up with contrasting heels and toes. Since this classic worsted-weight pattern knits up quickly and can be used as a sock design template, it will soon become an old favorite.


A Slippery Slope
I always carry small pieces of wax paper and very fine sandpaper in my knitting bag. A little rubdown with wax paper helps stitches slide better on wooden needles (and even bamboo). If any rough spots appear, I sand them lightly and then polish the spots with wax paper.
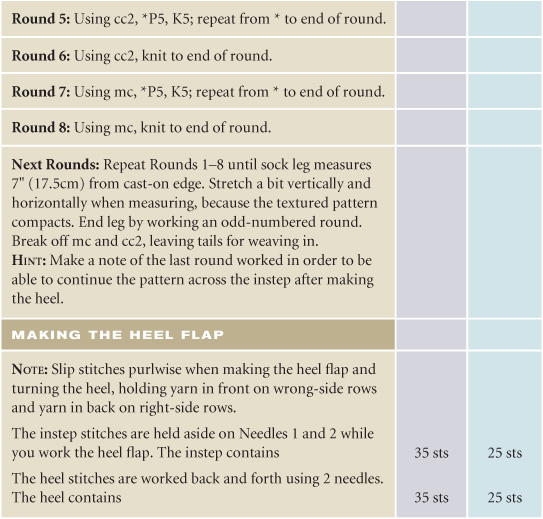
Checkered Textures
Mix multicolored and solid yarns to create a fascinating array of colors and textures on these socks. The easy-to-learn colorwork pattern makes it simple to create your own combo. And the stretchy stitch pattern ensures a comfortable, well-fitting sock that will hug your feet when you're out and about.

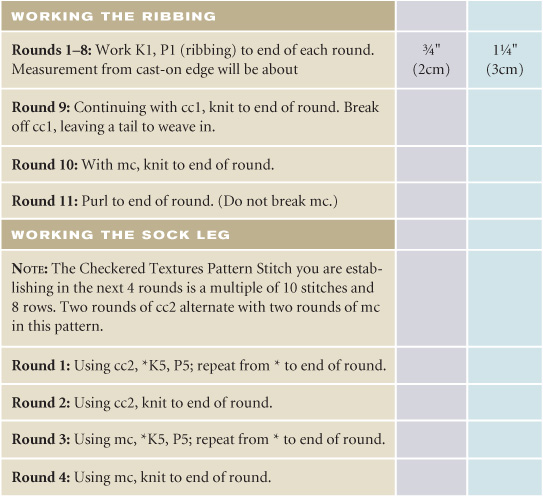

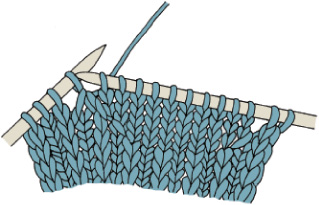
Easy Pick Up
You can use just the right-hand needle to pick up and knit the stitches along the edge of the heel flap, as shown below. Or, if you prefer, use either of the following tools. The second is one of my favorites, and it's one that new sock knitters catch onto very quickly.
• A crochet hook
• One double-point needle used as a “helper” to find the place for the other needle to pick up the new stitch
Classy Slip-Up
Slipped stitches highlight the changes in multicolored yarns and enliven solid colors on these unisex socks. They can be knit in either sport- or fingering-weight yarns. The stitch pattern is easy to memorize, and the alternating rows of stockinette and reverse stockinette rib between the slipped stitches create a cozy sock with thermal warmth.


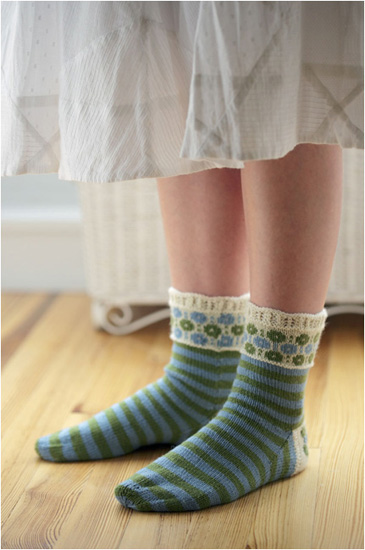
Winter Garden
Lace edging tops a traditional Estonian patterned cuff paired with lively stripes, for a sock that is fun to knit and fun to wear. The color pattern on the cuff provides another opportunity to try two-color stranding. For variety, knit the entire cuff in lace by continuing it to the desired length. This pattern was inspired by socks designed by Nancy Bush.
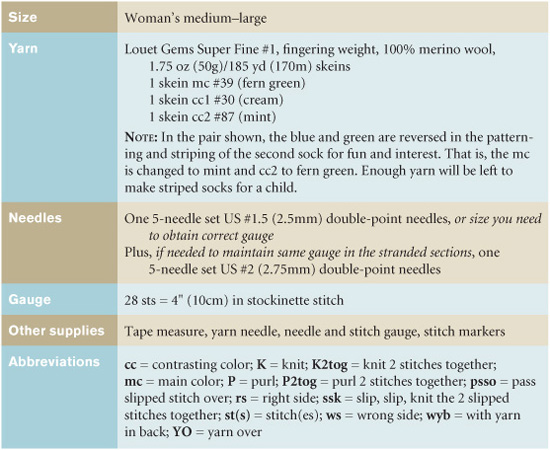
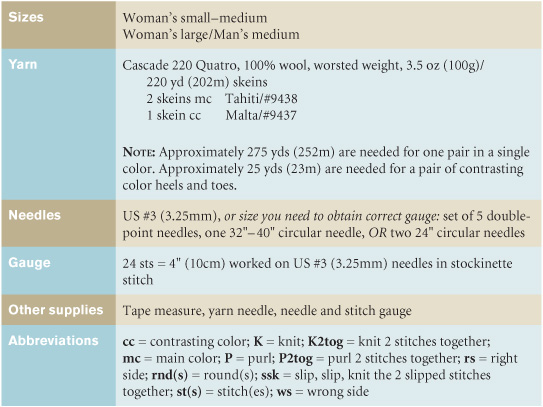
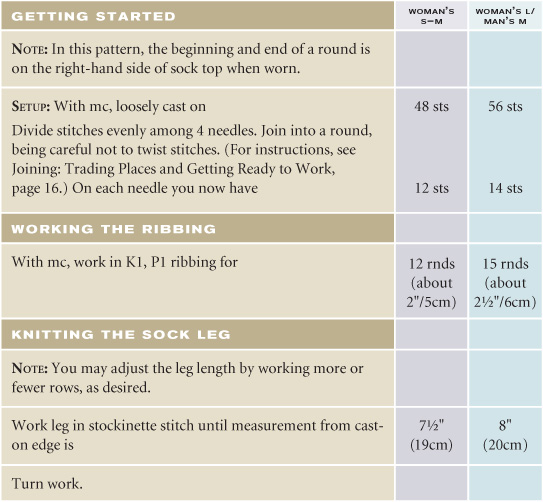
GETTING STARTED
SETUP: Using smaller needles and cc1, loosely cast on 64 stitches. Divide evenly among needles. There will be 32 instep and 32 heel stitches. Join into a round, being careful not to twist stitches. (For instructions, see Joining: Trading Places and Getting Ready to Work, page 16.)
NOTE: Rounds for the sock leg start and end on the right-hand side of the sock as worn. After turning the heel, rounds for the sole and toe of the sock start and end on the bottom of the sock.
Round 1: Knit to end of round.
Round 2: Purl to end of round.
Round 3: Knit to end of round.
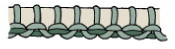
WORKING THE SCALLOPED LACE EDGING
You begin to work the Scalloped Lace Pattern in the next round. This pattern is a multiple of 8 stitches and 2 rows. You work 4 pattern repeats on both the heel and instep stitches.
HINT: You may wish to use stitch markers or coilless safety pins to separate pattern repeats.
Round 1: *P1, slip 1 wyb knitwise, K1, psso, K1, YO, K1, YO, K1, K2tog; repeat from * to end of round.
Round 2: *P1, K7; repeat from * to end of round.
Rounds 3 – 6: Repeat Rounds 1 and 2. If you'd prefer a longer edging, you can work additional rounds.
Round 7: Purl to end of round. Change to larger needles if needed to maintain gauge in the stranded knitting sections.
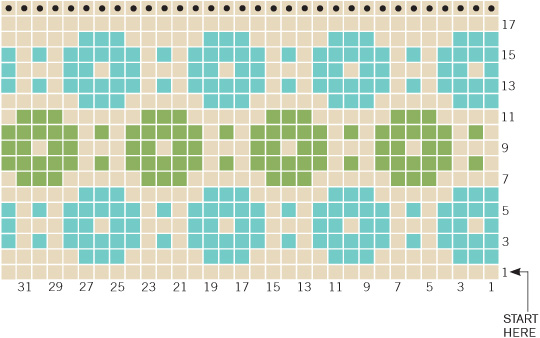
WORKING THE WINTER GARDEN CHART
Using cc1 and, if needed for gauge, the larger needles, follow the Winter Garden Cuff Chart (top of page 63), working from right to left and starting on Line 1 at the bottom. Add mc and cc2 as called for in the chart and in the written directions below. (The round numbers correspond with chart line numbers.)
Round 1: Using cc1, knit all sts.
Round 2: Using cc2 and cc1, *K3 cc2, K5 cc1; repeat from * to end of round.
Round 3: Using cc2 and cc1, *K4 cc2, K1 cc1, K1 cc2, K1 cc1, K1 cc2; repeat from * to end of round.
Round 4: Using cc2 and cc1, *K1 cc2, K1 cc1, K2 cc2, K3 cc1, K1 cc2; repeat from * to end of round.
Round 5: Using cc2 and cc1, *K4 cc2, K1 cc1, K1 cc2, K1 cc1, K1 cc2; repeat from * to end of round.
Round 6: Using cc2 and cc1, *K3 cc2, K5 cc1; repeat from * to end of round.
Round 7: Using cc1 and mc, *K4 cc1, K3 mc, K1 cc1; repeat from * to end of round.
Round 8: Using cc1 and mc, *K1 cc1, K1 mc, K1 cc1, K5 mc; repeat from * to end of round.
Round 9: Using cc1 and mc, *K3 cc1, K2 mc, K1 cc1, K2 mc; repeat from * to end of round.
Round 10: Using cc1 and mc, *K1 cc1, K1 mc, K1 cc1, K5 mc; repeat from * to end of round.
Round 11: Using cc1 and mc, *K4 cc1, K3 mc, K1 cc1; repeat from * to end of round. Break off mc, leaving a 6” (15cm) tail to weave in.
Rounds 12–16: Repeat Rounds 2– 6. At the end of Round 16, break off cc2, leaving a 6” (15cm) tail to weave in.
Round 17: Using cc1, knit to end of round. If using larger needle for stranded knitting on cuff, switch back to smaller needles now.
Round 18: Using cc1 and smaller needles, purl to end of round. Break off cc1, leaving a 6” (15cm) tail to weave in.
KNITTING THE STRIPED LEG
NOTE: The stockinette-stitch leg features alternating stripes of mc and cc2. For a little surprise and visual interest, the stripe size changes from 4 to 5 rows of each color midway down the sock foot. For an easy technique for smoothing out the “jog” where colors change in stripes, see Striping without Jogs, page 58.
Rounds 1–4: Using mc, knit to end of each round.
Rounds 5–8: Using cc2, knit to end of each round.
Striping without Jogs
When knitting in the round, rather than producing completed circles, you are actually knitting an ever-moving spiral. This results in a “jog,” or little step up, when the first stitch of the new color's second row is knit. Meg Swansen popularized a simple “jogless join” technique to avoid this problem and to smooth out the transition from one color to another. Here's how to do it:
1. When you are ready to add a new yarn, drop the old yarn and knit the first stitch in the round with the new yarn.
2. Knit a complete round with the new yarn.
3. Just before you knit the first stitch of the second round of the new yarn, use the tip of your right-hand needle to reach down below the first new yarn stitch into the old yarn stitch under it, and lift the right leg of the old stitch onto the left-hand needle.
4. Knit the old and new stitches together, then continue working with the new yarn.
You do this “jogless join” only one time when you are changing colors and are ready to begin the second round of the new color. When you later weave in the tails, pull them to tighten as usual and then weave them into the wrong side. Weave in a direction that helps pull the old yarn up and the new yarn down a bit to further smooth out the join. For more advice on starting new yarns, see Splicing Ends Together, page 123.
Rounds 9–32: Repeat Rounds 1– 8. You will have a total of 4 stripes of each color, and the leg will measure about 6½” (16cm) from the top of the scallop. End the row on the right-hand side of the leg. Break off mc and cc2, leaving 6” (15cm) tails for weaving in.
MAKING THE PATTERNED HEEL FLAP
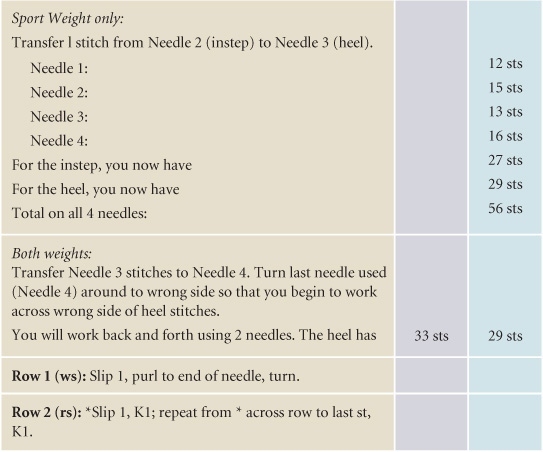
NOTE: In this section you will be working back and forth on the 31 heel flap stitches, using 2 needles/needle tips, while the 33 instep stitches wait until needed again. The heel flap features a garter stitch edging, formed by knitting 3 stitches at the beginning and end of every row. Although you may want to change to the larger needle for the heel, staying on smaller needle will make heel flap tighter and give it extra durability.
CHART NOTES: For the heel flap, follow the Winter Garden Heel Chart (page 63), beginning at the bottom right on Row 1. Knit all stitches on the right side (odd-numbered rows) and, except for the garter stitch edging, purl the stitches on the wrong side (even-numbered rows). The text on the next page corresponds to the chart.
Row 1 (rs): With cc1, knit across the next 31 stitches, knitting them onto 1 needle, and place the last (thirty-second) stitch on the instep needle. You now have 31 stitches on one needle, and those will be worked in the charted pattern for the heel flap. Turn to wrong side.
Row 2 (ws): K3, P25, K3, turn.
Row 3: K6 cc1, *K3 cc2, K5 cc1; repeat from * one more time; K3 cc2, K6 cc1.
Row 4: K3 cc1, P2 cc1, *P5 cc2, P1 cc1, P1 cc2, P1 cc1; repeat from * 1 more time; P5 cc2, P2 cc1, K3 cc1.
Row 5: K5 cc1, *K2 cc2, K1 cc1, K2 cc2, K3 cc1; repeat from * to last 2 stitches, K2 cc1.
Row 6: K3 cc1, P2 cc1, *P5 cc2, P1 cc1, P1 cc2, P1 cc1; repeat from * 1 more time; P5 cc2, P2 cc1, K3 cc1.
Row 7: K6 cc1, *K3 cc2, K5 cc1; repeat from * 1 more time; K3 cc2, K6 cc1.
Row 8: Using mc and cc1, K3 cc1, P7 cc1, *P3 mc, P5 cc1; repeat from * 1 more time; P2 cc1, K3 cc1.
Row 9: K7 cc1, *K1 mc, K1 cc1, K5 mc, K1 cc1; repeat from * 1 more time; K1 mc, K7 cc1.
Row 10: K3 cc1, P6 cc1, *P2 mc, P1 cc1, P2 mc, P3 cc1; repeat from * 1 more time; P3 cc1, K3 cc1.
Row 11: K7 cc1, *K1 mc, K1 cc1, K5 mc, K1 cc1; repeat from * 1 more time; K1 mc, K7 cc1.
Row 12: K3 cc1, P7 cc1, P3 mc, P5 cc1, P3 mc, P7 cc1, K3 cc1. Break off mc, leaving a 6” (15cm) tail for weaving in.
Rows 13 –17: Using cc1 and cc2, repeat Rows 3–7. Break off cc2, leaving a 6” (15cm) tail for weaving in.
Rows 18 and 20 (ws): Using cc1, K3, P25, K3.
Rows 19 and 21 (rs): Knit to end of each row.
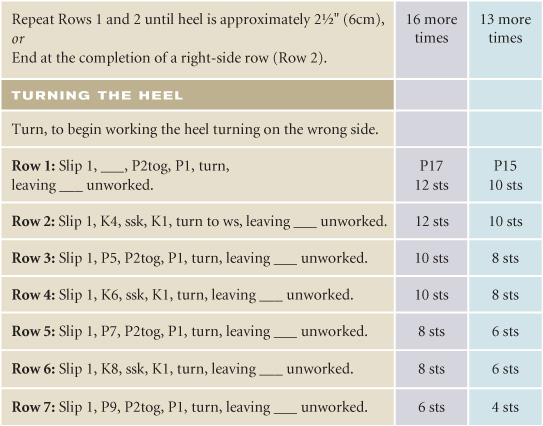
Next Rows: Repeat Rows 18 and 19 until heel flap measures 2½” (6cm), or desired length. End by working a right-side row in preparation for turning the heel. If using a larger needle, switch back to smaller needles now.
TURNING THE HEEL
NOTE: Begin the heel turning on the wrong side. Slip all stitches purlwise with yarn in front on wrong-side rows and with yarn in back on right-side rows.
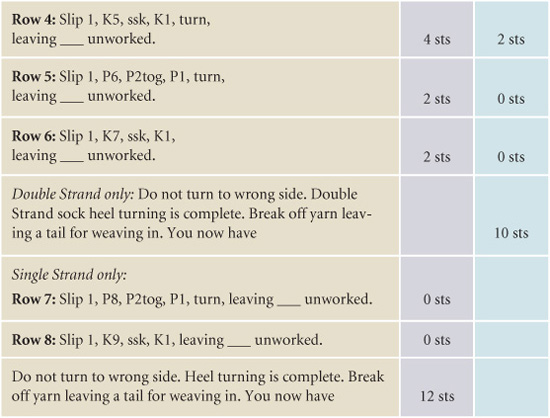
Row 1: Using cc1 and the smaller needles, slip 1, P17, P2tog, P1, turn, leaving 10 sts unworked.
Row 2: Slip 1, K6, ssk, K1, turn, leaving 10 sts.
Row 3: Slip 1, P7, P2tog, P1, turn, leaving 8 sts.
Row 4: Slip 1, K8, ssk, K1, turn, leaving 8 sts.
Row 5: Slip 1, P9, P2tog, P1, turn, leaving 6 sts.
Row 6: Slip 1, K10, ssk, K1, turn, leaving 6 sts.
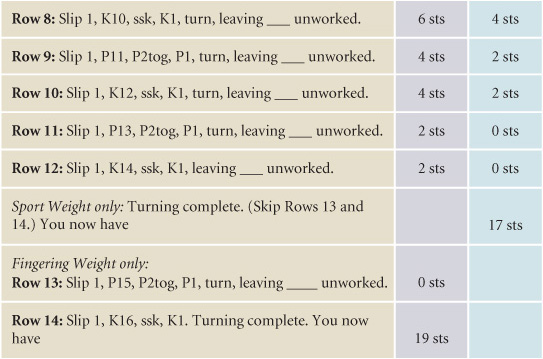
Row 7: Slip 1, P11, P2tog, P1, turn, leaving 4 sts.
Row 8: Slip 1, K12, ssk, K1, turn, leaving 4 sts.
Row 9: Slip 1, P13, P2tog, P1, turn, leaving 2 sts.
Row 10: Slip 1, K14, ssk, K1, turn, leaving 2 sts.
Row 11: Slip 1, P15, P2tog, P1, turn, leaving 0 sts.
Row 12: Slip 1, K16, ssk, K1, turn, leaving 0 sts. Heel turning complete. You have 19 stitches. Cut cc1, leaving a 6” (15cm) tail for weaving in. Weave in ends on flap.
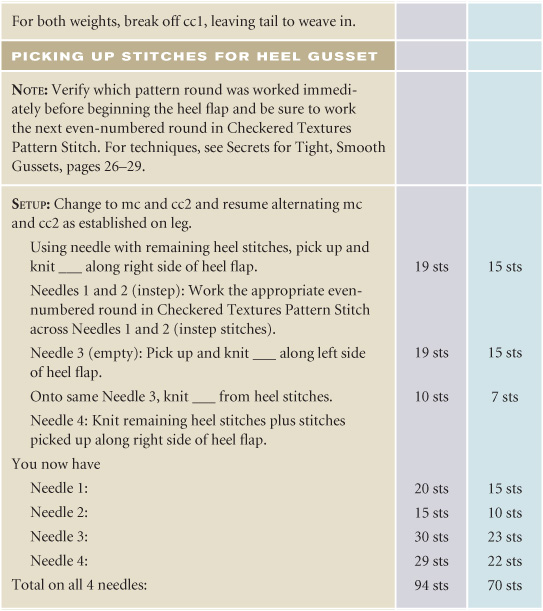
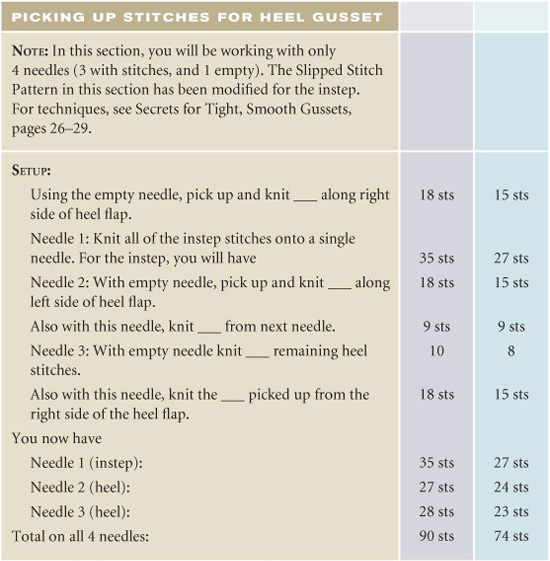
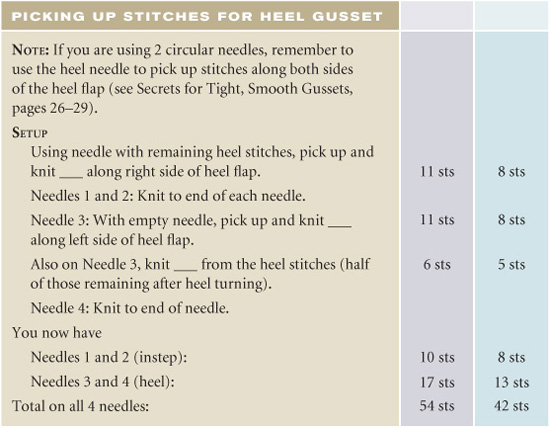
PICKING UP STITCHES FOR HEEL GUSSET
NOTE: For techniques, see Secrets for Tight, Smooth Gusssets, pages 26–29.
SETUP
Using mc and same needle/needle tip (needle with remaining heel stitches), pick up and knit 15 stitches along right side of heel. If you are using double points, this will be Needle 1 (heel).
Knit all instep stitches (Needles 2 and 3).
Pick up and knit 15 stitches along left side of heel (this becomes Needle 4). On same needle, knit 9 remaining heel stitches from Needle 1.
You now have
Needle 1 (heel): 25 stitches
Needle 2 (instep): 17 stitches
Needle 3 (instep): 16 stitches
Needle 4 (heel): 24 stitches
Total on all 4 needles: 82 stitches
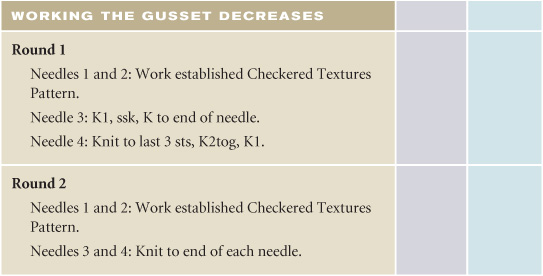
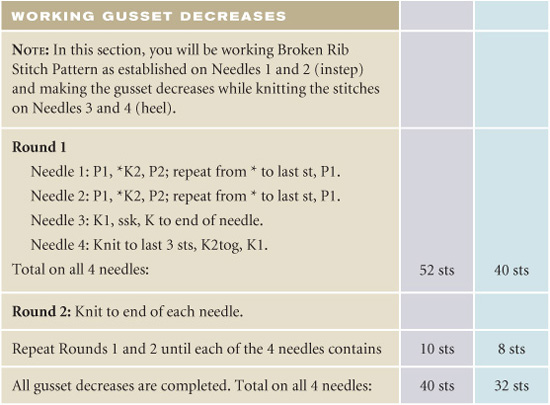
NOTE: Rounds begin and end in center back and sole. As you work the gusset decreases, you will also be working alternating 4-round stripes of mc and cc2.
Round 1
Needle 1: Knit to last 3 sts, K2tog, K1.
Needles 2 and 3: Knit to end of each needle.
Needle 4: K1, ssk, K to end of needle.
Round 2: Knit to end of each needle.
Repeat Rounds 1 and 2 until 64 stitches remain. Gusset is complete; make no further decreases.
You now have
Needle 1: 16 stitches
Needle 2: 17 stitches
Needle 3: 16 stitches
Needle 4: 15 stitches
Total on all 4 needles: 64 stitches
Socks of Another Stripe
Varying the number of stripes on the leg and the foot is a way to change the sock length and size. If desired, you can end the sock toe without having just a few rows of a new color. To do this, continue working your last color a few more rounds to complete the sock, including running a tail through the final stitches to close the toe. For example, the sock pictured on page 55 has a final color segment of 8 rounds, a few more than the 5-round striping sequence used in the foot.
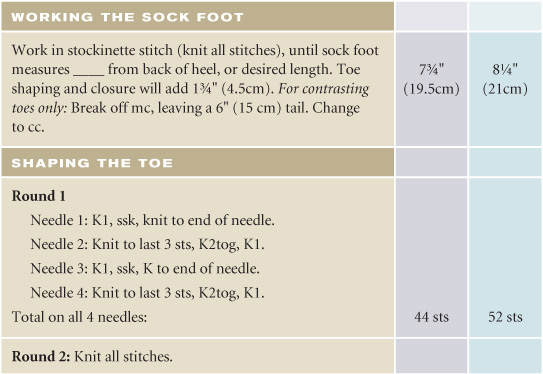
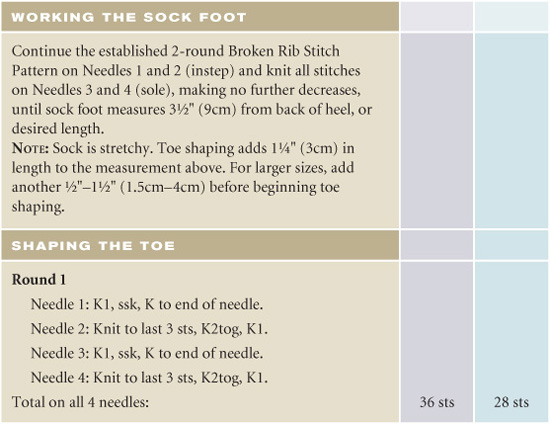
WORKING THE SOCK FOOT
Rounds 1–24: Knit to the end of each round, continuing the 4-round striping pattern as established. You will have 3 pairs of mc and cc2 stripes.
Next Rounds: Begin working 5-round stripes, maintaining the same alternating color pattern, until sock measures 8¼” (21cm) from back of heel, or desired length to beginning of toe shaping.
SHAPING THE ROUND TOE
SETUP: If using double-point needles, slip 1 stitch from Needle 2 (instep) to Needle 3 (instep) and 1 stitch from Needle 3 (instep) to Needle 4 (heel). You now have all instep stitches together on a needle/needle tip and all heel stitches together on another needle/needle tip. Continue the striping pattern as established.
Round 1: *K6, K2tog; repeat from * to end of round. You now have 56 stitches.
Rounds 2–3: Knit to end of each round.
Round 4: *K5, K2tog; repeat from * to end of round. You now have 48 stitches.
Rounds 5–6: Knit to end of each round.
Round 7: *K4, K2tog; repeat from * to end of round. You now have 40 stitches.
Rounds 8–9: Knit to end of each round.
Round 10: *K3, K2tog; repeat from * to end of round. You now have 32 stitches.
Rounds 11–12: Knit to end of each round.
Round 13: *K2, K2tog; repeat from * to end of round. You now have 24 stitches.
Rounds 14–15: Knit to end of each round.
Round 16: *K1, K2tog; repeat from * to end of round. You now have 16 stitches.
Round 17: K2tog to end of round. You now have 8 stitches.
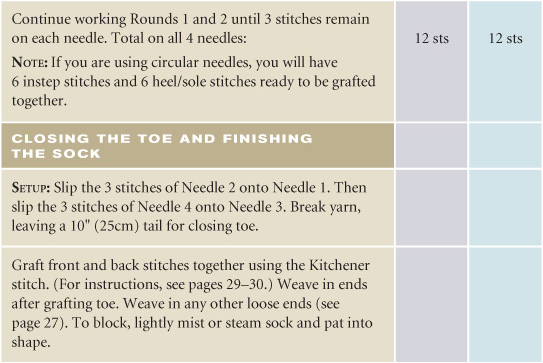
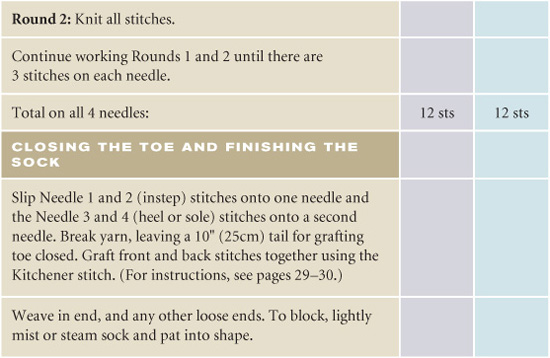
CLOSING THE TOE AND FINISHING THE SOCK
Break off yarn leaving a 8” (20cm) tail, thread tail through yarn needle, and run yarn through remaining 8 stitches. Draw stitches together, tighten, take yarn through to wrong side, and weave in.
To block, lightly mist or steam sock and pat into shape. Blocking will help smooth out your stranded Fair Isle patterning.
Winter Garden Cuff Chart (work in the round)
Winter Garden Heel Chart (work from side to side)
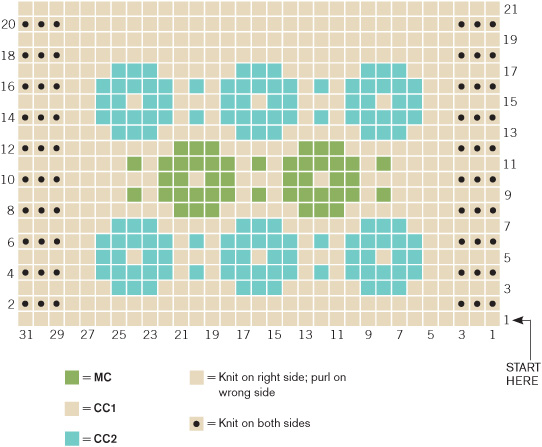
Little Guys
Knitting these cute toddler-sized socks is like eating popcorn — once you start it's hard to stop! Use your imagination to create your own signature gifts. Combine leftover yarns to make socks with several colors.


Low-Roll Sporty
A reverse stockinette stitch and roll tops make these stylish sport socks attractive enough to be seen anywhere. For a double roll look (not shown), create the second roll and shorten the sock leg length by pushing down the first roll approximately a half inch, allowing a second roll to magically appear. These socks knit up fast using two strands of fingering-weight yarn or a single strand of worsted, so you'll be able to knit up a pair to tuck in all your athletic bags.


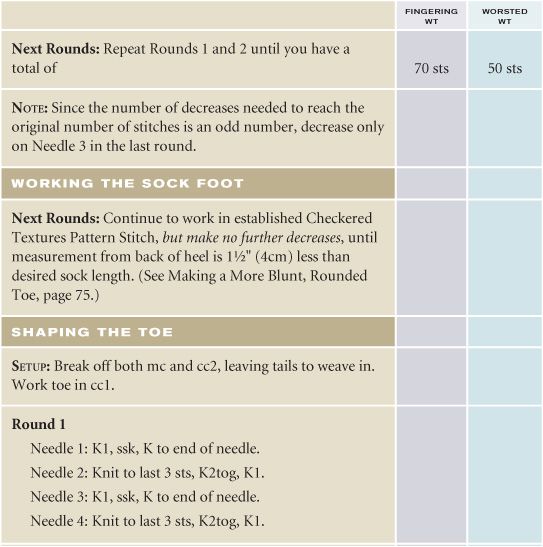
Making a More Blunt, Rounded Toe
For more blunt and rounded toe shaping, when the sock's foot length is 1½” (4cm) less than desired, work toe decreases until half the number of decreases have been made. Then work Round 2 (decrease round) every round instead of every other round until a total of 16 stitches remain. For example, a 72-stitch sock will be decreased by 56 stitches down to 16 stitches before grafting the toe together. To blunt the toe, work half of the decreases (half of 56 = 28), which will leave 22 stitches for the instep and 22 for the heel (72–28 = 44). Then continue to decrease every round from that point until 16 total stitches remain.
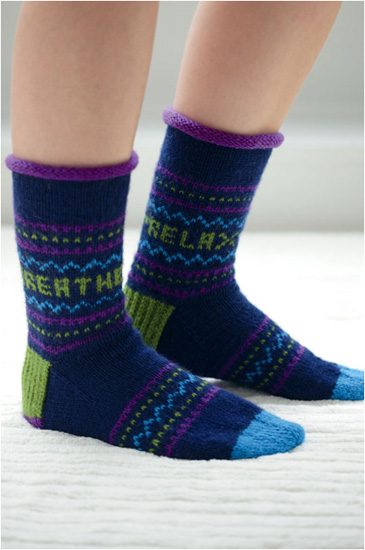
Yoga Moves
Combine your favorite colors and a special message to create socks that reflect your personality and make you smile. This new twist on a traditional style is a great way to learn or practice two-color stranded Fair Isle techniques. Like yoga, these socks will help you remember to “relax” and “breathe.”

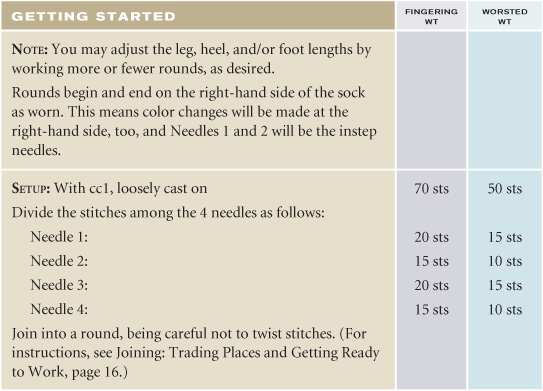
GETTING STARTED
SETUP: Using cc1, loosely cast on 56 stitches.
Divide stitches evenly among 4 needles, 14 stitches on each needle. This sock begins and ends in the center back of the leg and heel, and center bottom of the sole.
Join into a round being careful not to twist stitches. (For instructions, see Joining: Trading Places and Getting Ready to Work, page 16.)
WORKING THE SOCK TOP
NOTE: You have a choice of variations for the sock top: double rolled or traditional ribbing. The rolled top can be worn “up” with reverse stockinette edge or rolled down to create two contrasting rolls.
Rolled Top only:
Round 1: Using cc1, purl every round for 1” (2.5cm).
Round 2: Change to mc and knit every round for 1” (2.5cm).
Ribbed Top only: Using cc1, K1, P1 to end of each round for 1½” (4cm), or desired length.
WORKING THE SOCK LEG
Using mc, knit to end of each round until sock measures 2” (5cm) from introduction of mc.
NOTE: Begin here to work Chart A (page 84), Rounds 1–37, changing colors as indicated. Work chart from right to left, beginning on Line 1 at bottom of chart; repeat 4-stitch pattern to end of each round. Note that the lettering is worked on Rounds 17–21, using the Alphabet Chart provided. Below, I walk you through the chart, round by round. For advice on starting new yarns, see Splicing Ends Together, page 123.
Round 1: Using cc1, knit to end of round.
Round 2: Using cc1 and mc, *K1 cc1, K1 mc; repeat from * to end of round.
Rounds 3–4: Using mc, knit to end of each round.
Round 5: Using cc2 and mc, *K1 cc2, K1 mc; repeat from * to end of round.
Rounds 6–7: Using mc, knit to end of each round.
Round 8: Using cc1 and mc, *K1 cc1, K1 mc; repeat from * to end of round.
Round 9: Using cc1, knit to end of round.
Rounds 10–11: Using mc, knit to end of each round.
Round 12: Using mc and cc3, K1 mc, *K1 cc3, K3 mc; repeat from * to last 3 sts, K1 cc3, K2 mc.
Round 13: Using cc3 and mc, *K1 cc3, K1 mc; repeat from * to end of round.
Round 14: Using mc and cc3, *K3 mc, K1 cc3; repeat from * to end of round.
Rounds 15–16: Using mc, knit to end of each round.
Rounds 17–21: Work the lettering on these rounds. Using the alphabet provided (page 84) and graph paper, center words of your choice and use mc as the background color to separate letters and words, and cc2 for the lettering. The graph will look upside down when you work it on a top-down sock, as shown in the Alphabet Chart (page 84) for use.
Rounds 22–23: Using mc, knit to end of each round.
Round 24: Using mc and cc3, *K3 mc, K1 cc3; repeat from * to end of round.
Round 25: Using cc3 and mc, *K1 cc3, K1 mc; repeat from * to end of round.
Round 26: Using mc and cc3, K1 mc, *K1 cc3, K3 mc; repeat from * to last 3 sts, K1 cc3, K2 mc.
Rounds 27–28: Using mc, knit to end of each round.
Round 29: Using cc1, knit to end of round.
Round 30: Using cc1 and mc, *K1 cc1, K1 mc; repeat from * to end of round.
Rounds 31–32: Using mc, knit to end of each round.
Round 33: Using cc2 and mc, *K1 cc2, K1 mc; repeat from * to end of round.
Rounds 34 –35: Using mc, knit to end of each round.
Round 36: Using cc1 and mc, *K1 cc1, K1 mc; repeat from * to end of round.
Round 37: Using cc1, knit to end of round. (Chart A completed.)
Rounds 38 –39: Using mc, knit to end of each round.
Sock length will be approximately 6¾” (16cm) from introduction of mc.
MAKING THE HEEL FLAP
SETUP
Row 1 (rs): Using mc, K14 stitches from Needle 1 onto Needle 4 for the heel flap. You will work the 28 heel flap stitches back and forth using 2 needles. Break off mc, leaving a 6” (15cm) tail to weave in.
Row 2 (ws): Using cc2 and reinforcing yarn, if desired, turn to wrong side and purl to end of needle. Turn back to right side.
NOTE: In working the heel flap and turning the heel, slip stitches purlwise with yarn in front on wrong-side rows and yarn in back on right-side rows.
Row 1 (rs): *Slip 1, K1; repeat from * to end of needle. Turn.
Row 2 (ws): Slip 1, P to end of needle. Turn.
Rows 3–26: Repeat Rows 1 and 2, or work until the heel flap is approximately 2½” (6cm), or desired length.
Row 27: Repeat Row 1. Turn over to wrong side in preparation for turning the heel. Break off cc2, leaving a tail. Heel flap is complete.
TURNING THE HEEL
SETUP: Attach cc1 and begin turning the heel.
Row 1: Slip 1, P14, P2tog, P1, turn, leaving 10 sts unworked.
Row 2: Slip 1, K3, ssk, K1, turn, leaving 10 sts unworked.
Row 3: Slip 1, P4, P2tog, P1, leaving 8 sts unworked.
Row 4: Slip 1, K5, ssk, K1, leaving 8 sts unworked.
Row 5: Slip 1, P6, P2tog, P1, leaving 6 sts unworked.
Row 6: Slip 1, K7, ssk, K1, leaving 6 sts unworked.
Row 7: Slip 1, P8, P2tog, P1, leaving 4 sts unworked.
Row 8: Slip 1, K9, ssk, K1, leaving 4 sts unworked.
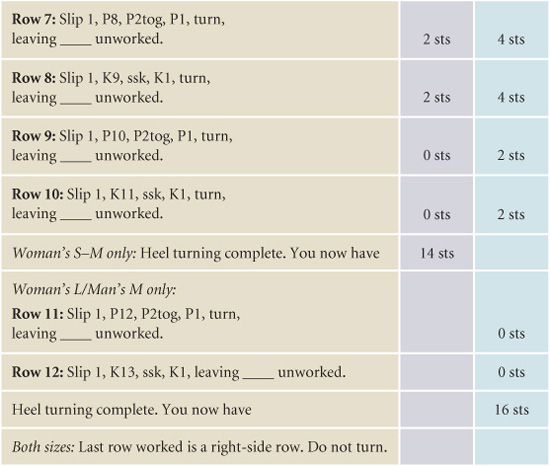
Row 9: Slip 1, P10, P2tog, P1, leaving 2 sts unworked.
Row 10: Slip 1, K11, ssk, K1, leaving 2 sts unworked.
Row 11: Slip 1, P12, P2tog, P1, leaving 0 sts unworked.
Row 12: Slip 1, K13, ssk, K1, leaving 0 sts unworked.
You now have 16 heel stitches. Break off cc1, leaving a tail for weaving in.
PICKING UP STITCHES FOR HEEL GUSSET
NOTE: For techniques, see Secrets for Tight, Smooth Gussets, pages 26–29.
SETUP
Attach mc. With the heel stitch needle, pick up and knit 14 stitches along the right side of the heel flap. This is Needle 1.
Needle 2: Knit 14 stitches.
Needle 3: Knit 14 stitches.
Using an empty needle, pick up and knit 14 stitches along the left side of the heel flap. Then knit 8 of the remaining heel stitches onto same needle. This is Needle 4. This is the center back, beginning and end of rounds.
You now have
Needle 1: 22 stitches
Needle 2: 14 stitches
Needle 3: 14 stitches
Needle 4: 22 stitches
Total on all 4 needles: 72 stitches
WORKING THE GUSSET DECREASES
Round 1
Needle 1: Knit to last 3 sts, K2tog, K1.
Needles 2 and 3: Knit to end of each needle.
Needle 4: K1, ssk, K to end of needle.
Round 2: Knit all stitches.
Rounds 3–16: Repeat Rounds 1 and 2. You now have a total of 56 stitches (14 stitches on each needle.) Make no further decreases.
Rounds 17–24: Continuing to use mc, knit to end of each round, or work until measurement from the completion of the gusset decreases is about 1” (2.5cm).
NOTE: For a shorter foot, you may want to stop in preparation for the foot color-work after knitting only¾” (2cm) after the gusset.
WORKING THE PATTERNED SOCK FOOT
NOTE: Work Chart B (page 84), Lines 1–17, changing colors as indicated. Work the chart from right to left, beginning on Line 1 at the bottom, and repeat the 4-stitch pattern to the end of each round. The text below corresponds to the chart on page 84.
Round 1: Using cc1, knit to end of round.
Round 2: Using cc1 and mc,* K1 cc1, K1 mc; repeat from * to end of round.
Rounds 3– 4: Using mc, knit to end of each round.
Round 5: Using cc2 and mc, *K1 cc2, K1 mc; repeat from * to end of round.
Rounds 6–7: Using mc, knit to end of each round.
Round 8: Using mc and cc3, K1 mc, *K1 cc3, K3 mc; repeat from * to last 2 sts, K2 mc.
Round 9: Using cc3 and mc, *K1 cc3, K1 mc; repeat from * to end of round.
Round 10: Using mc and cc3, *K3 mc, K1 cc3; repeat from * to end of round.
Rounds 11–12: Using mc, knit to end of each round.
Round 13: Using cc2 and mc, *K1 cc2, K1 mc; repeat from * to end of round.
Rounds 14 –15: Using mc, knit to end of each round.
Round 16: Using cc1 and mc, *K1 cc1, K1 mc; repeat from * to end of round.
Round 17: Using cc1, knit to end of round. (Chart B is complete.)
Next Rounds: Using mc, knit to end of each round for 1½” (4cm), or until measurement from back of heel is about 8” (20cm), or desired length. Break off mc, leaving 6” (15cm) tail to weave in.
You now have 56 stitches.
SHAPING THE ROUND TOE
Round 1: Using cc3, *K5, K2tog; repeat from * to end of round. You now have 12 stitches on each needle, and a total of 48 stitches.
Rounds 2– 4: Knit to end of each round.
Round 5: *K4, K2tog; repeat from * to end of round. You now have 10 stitches on each needle, and a total of 40 stitches.
Rounds 6–8: Knit to end of each round.
Round 9: *K3, K2tog; repeat from * to end of round. You now have 8 stitches on each needle, and a total of 32 stitches.
Rounds 10–11: Knit to end of each round.
Round 12: *K2, K2tog; repeat from * to end of round. You now have 6 stitches on each needle, and a total of 24 stitches.
Rounds 13–14: Knit to end of each round.
Round 15: *K1, K2tog; repeat from * to end of round. You now have 4 stitches on each needle, and a total of 16 stitches.
Rounds 16–17: Knit to end of each round.
CLOSING THE TOE AND FINISHING THE SOCK
Round 18: K2tog to end of round. You now have 2 stitches on each needle, and a total of 8 stitches.
Break off yarn, leaving a 6” (15cm) tail. Pull tail through remaining stitches with a yarn needle. Cinch stitches up firmly to close toe. Take yarn through to wrong side and weave in end. Weave in any other loose ends.
Lightly block with spray mist or steam to smooth out color pattern work and the rest of the sock. Pat gently into shape.
No More “Ladders”
When knitting in the round, strive for an even-textured fabric. Try to avoid making a “ladder” — that line of loose stitches that makes the place where you changed from one needle to the next apparent, rather than invisible, as it should be. Here are some tips that may help:
• Knit the first few stitches on each new needle tighter than usual and give each of those stitches a little tug before moving on to the next one.
• Knit with five, rather than four, if using double-point needles.
• Lay the needle tip forming the new stitch up against the last stitch and knit it with adequate tension to prevent any slack.
Alphabet Chart
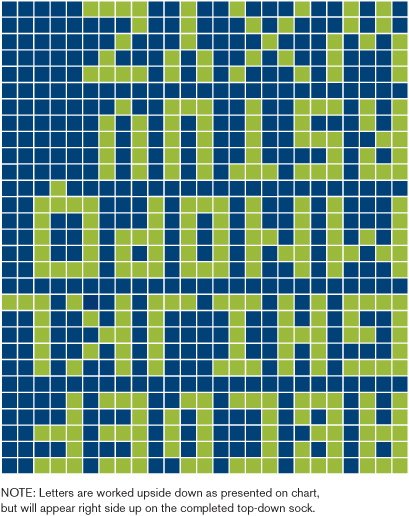
Chart A
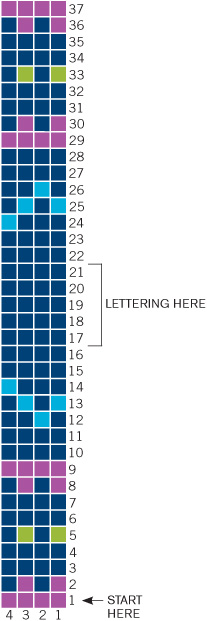
Chart B
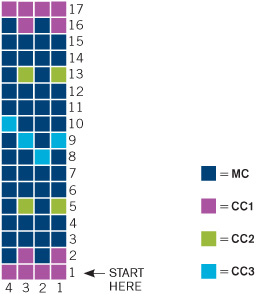
Sizing the Sock for Good Fit
Three dimensions need to be considered in deciding what size to make your socks:
1. Width of foot or leg (relates to size shown in patterns)
2. Length of foot
3. Length of heel flap
Using the chart below, sock length can be estimated from the wearer's shoe size. To calculate stitches for a specific foot width, multiply gauge (the number of stitches per inch) by the number of inches needed to go around the widest part of the foot. Reduce those stitches by 10–15 percent for “stretch” and round up or down to the nearest number divisible by 4 or your pattern multiple.
To determine heel flap length, measure from ankle bone to foot sole. Making the flap too long produces a baggy foot; making it too short makes the instep and foot feel too tight. The length of the average heel flap for a woman is 2½” (6.4cm) and 2¾” (7cm) for the average man.
Socks stretch, enabling a sock to fit different foot sizes quite comfortably. Ribbed socks have more stretch and are a good choice to make for people not available to be measured. To gauge sock fit, insert your hand (or very carefully your foot) into the sock after working several inches. The way your hand fits into the sock is usually a good indicator of how it will fit on you or someone else with your foot width.
Adult Sock Length Guidelines
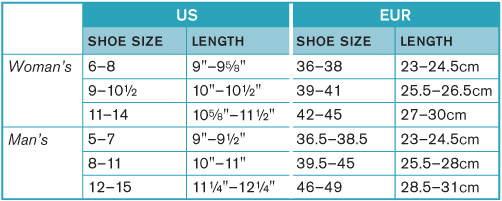
Best Foot Forward
These classic unisex socks highlight the beauty of both luxury and traditional yarns. The flattering lines of vertical rib ensure a snug fit, for socks that feel as good as they look. You can knit them in fingering- or worsted-weight yarns. Either version will let you put your best foot forward!
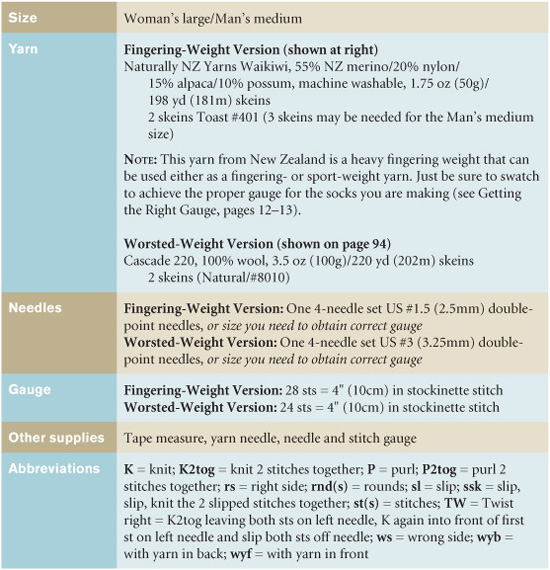


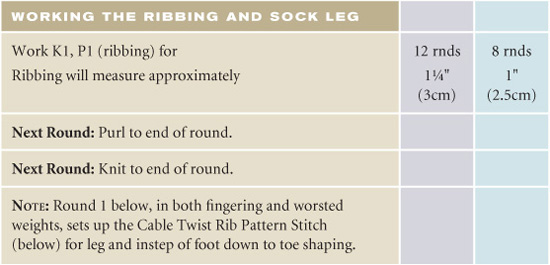
Cable Twist Rib Pattern Stitch (multiple of 7)
Round 1: *K1, P2, TW, P2; repeat from * to end of round.
Rounds 2–4: *K1, P2, K2, P2; repeat from * to end of round.
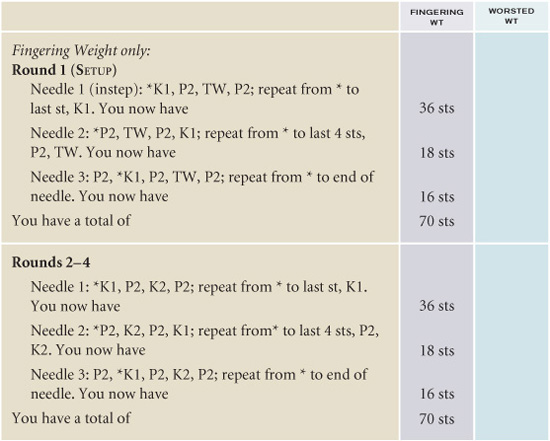
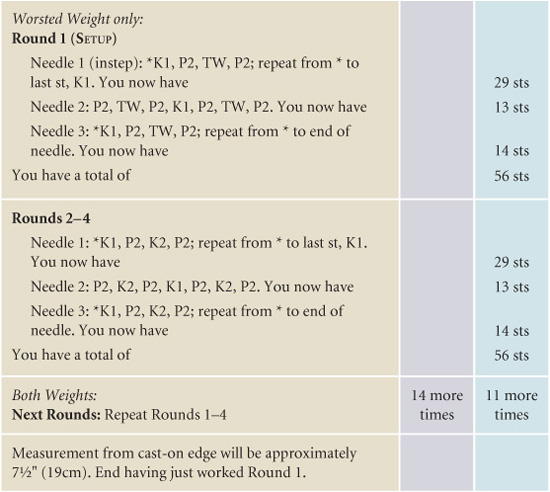
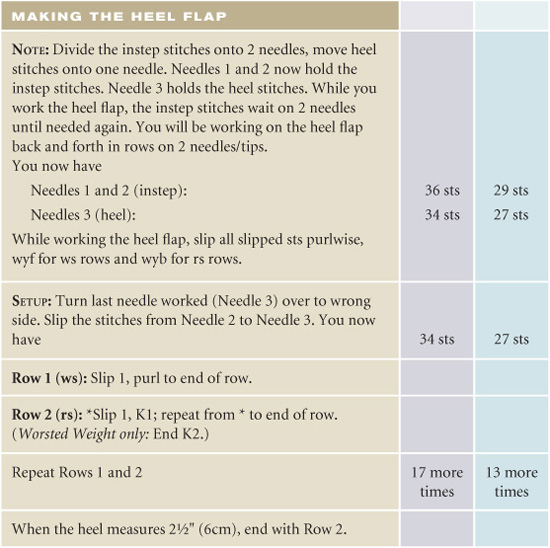
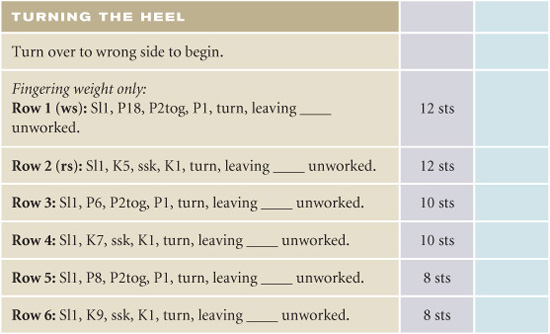
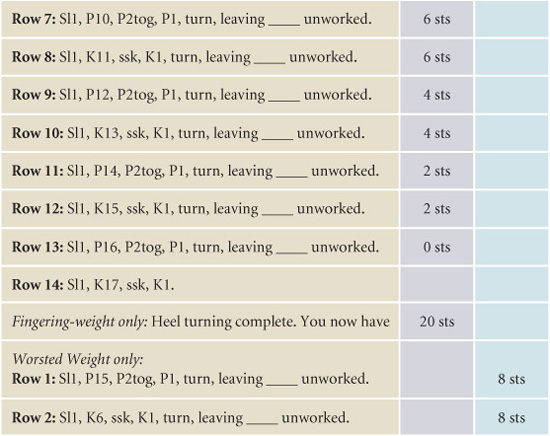
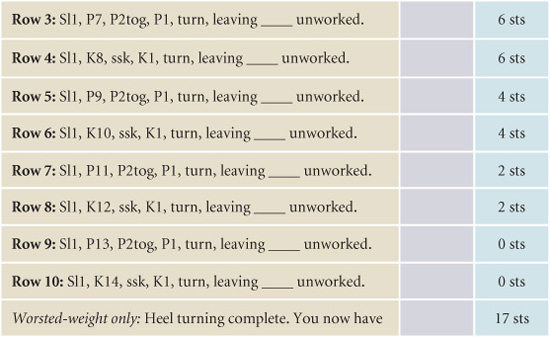
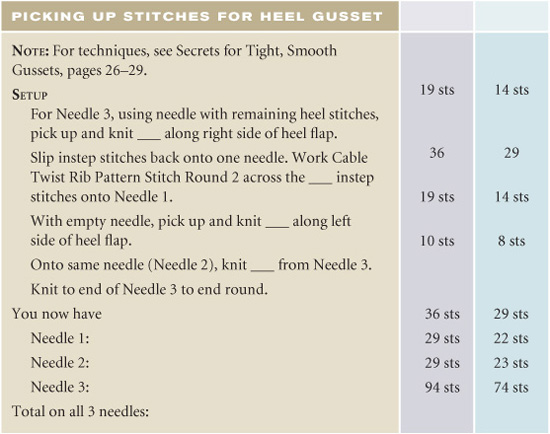

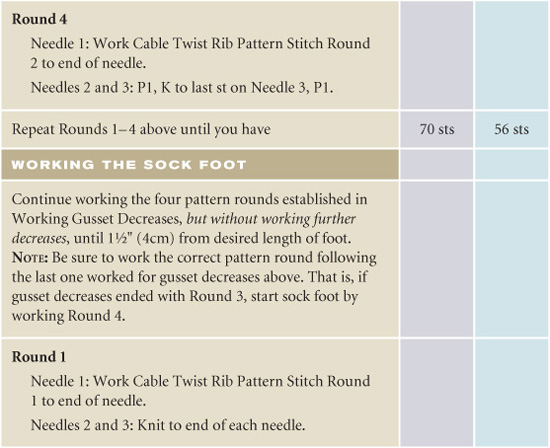
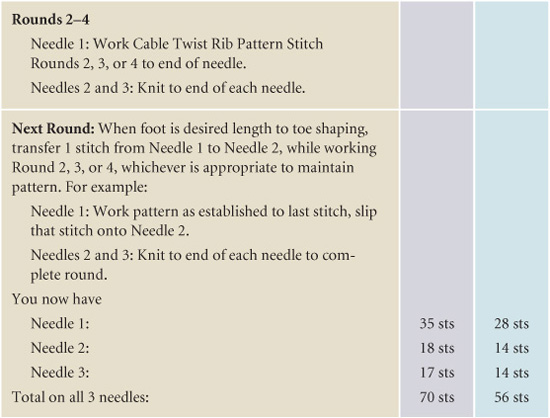
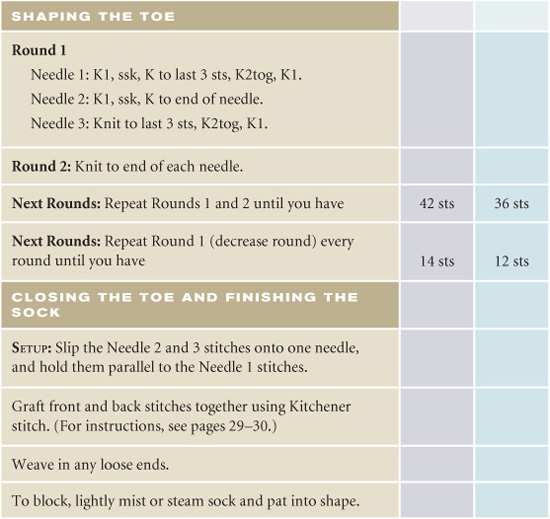
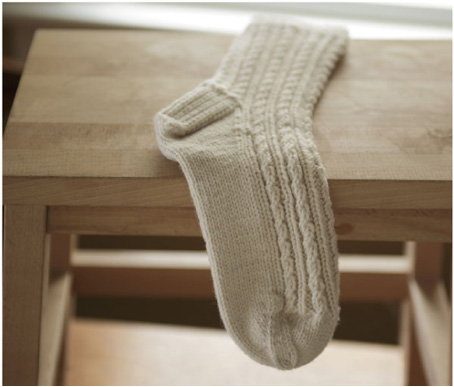
Be Your Own Designer
Here's one way to proceed in personalizing or modifying a pattern after getting comfortable with sock knitting:
• Select a pattern that appeals to you. See Barbara G. Walker's four-volume, Treasury of Knitting Patterns and other stitch dictionaries, as well as patterns in magazines, books, and catalogs. Open yourself to possibilities!
• Make a gauge swatch (in the round) with yarn you like and think might work.
• Check the fabric density of your swatch, changing needle size until you get the right “feel.”
• Measure gauge and calculate stitches required to produce the desired sock size. Note that slip stitch, cable, and twisted stitch patterns pull in, making it necessary to add more stitches than for stockinette stitch. Lace patterns, in contrast, tend to be more open and to stretch out more than stockinette stitch, resulting in a need for fewer stitches. Yarn overs produce more stretch or “give,” an important consideration when planning lace. It is a good idea to block your swatch using any new stitch to see what it will be like in a sock after blocking and washing. Treat it like a finished sock, blocking and drying it before measuring the gauge.
• Consider breaking “rules,” such as variegated yarns not being suitable for cables or certain patterns. Play with patterns, making various swatches until you hit on something pleasing to you. Try something different, like combining a number of different ribs, one after the other, in a “traditional” ribbed-style sock. Think about putting words in surprising places, in surprising colors! Make a cuff with a color or texture pattern you want to try out and follow that with interesting ribs down the leg. Play and have fun creating your own special socks!
You've Got Rhythm
This trio of patterns has variety and something for everyone. Rhythm is worked in brightly colored hand-painted yarn using a rhythmic, slip-stitch pattern. A two-color version — Double Time — provides double the fun, while a shimmering rib dances down the third sock in Shimmy Rib. All three socks use the same easy lace cuff. Or, work a traditional knit-and-purl ribbing, for a stretchy, unisex pattern you're sure to return to again and again.


GETTING STARTED
NOTE: In all 3 patterns, the first half of the stitches cast on and worked become the instep stitches and the remaining (last half) are the heel stitches.
SETUP: Loosely cast on 72 stitches. Divide stitches evenly among the needles. Join into a round, being careful not to twist. (For instructions, see Joining: Trading Places and Getting Ready to Work, page 16.)
WORKING THE CUFF
Round 1: Purl to end of each needle.
Round 2: Knit to end of each needle.
Round 3: *P1, ssk, K1, YO, K1, YO, K1, K2tog, P1; repeat from * to end of round.
Round 4: P1, K7, *P2, K7; repeat from * to last stitch, P1.
Rounds 5–8: Repeat Rounds 3 and 4 two more times.
Rounds 9–10: Purl to end of each needle.
Rounds 11–13: Knit to end of each needle.
Round 14: Purl to end of each needle.
Round 15: *P1, K2tog, K1, YO, K1, YO, K1, ssk, P1; repeat from * to end of round.
Round 16: Purl to end of each needle.
Rounds 17–19: Knit to end of each needle.
Rounds 20–21: Purl to end of each needle.
Working with Color
• When changing yarn colors, bring the new color up from under the old to prevent holes.
• One of the Double Time sock models shows the cc and mc are reversed in both leg and foot sections. You may want to make your own changes.
Pattern Stitches (see charts, page 102)
Rhythm (multiple of 6 stitches)
Rounds 1 and 2: Knit to end of each needle.
Round 3: K1, *slip 1, K2; repeat from * ending with slip 1, K1.
Round 4: P1, *slip 1, P2; repeat from * ending with slip 1, P1.
Double Time (multiple of 6 stitches)
Rounds 1 and 2: Using mc, knit to end of each needle.
Round 3: Using cc, K1, *slip 1, K2; repeat from * to last stitch, K1.
Round 4: Using cc, P1, *slip 1, P2; repeat from * to last stitch, P1.
Shimmy Rib (multiple of 6 stitches)
Rounds 1–4: *P1, K4, P1; repeat from * to end of round
Rounds 5–8: *K2, P2, K2; repeat from * to end of round
WORKING THE SOCK LEG
Work your chosen stitch pattern until the leg measures approximately 7” (or desired length) from cast on, slipping all stitches as if to purl, holding yarn in back.
Rhythm and Double Time only: End with Round 2 of the pattern. Turn work.
Shimmy Rib only: End with either Round 4 or Round 8. Turn work.
MAKING THE HEEL FLAP
NOTE: Beginning on the wrong side, work the heel flap back and forth on 36 heel stitches while the instep stitches wait on their needle(s) until you use them again for Picking Up Stitches for the Heel Gusset (page 101). Slip all heel stitches purlwise, with yarn in front on the wrong side and with yarn in back on right-side rows.
Double Time only: Begin working heel using mc.
Row 1 (ws): Slip 1, P to end of heel stitches, turn.
Row 2 (rs): *Slip 1, K1; repeat from * to end of heel stitches.
Repeat Rows 1 and 2 until heel flap is approx. 2½” (6cm) long or desired length, ending with a right-side row. (Nineteen repeats of Rows 1 and 2 = 2½” (6cm) in pattern models.)
TURNING THE HEEL
Row 1 (ws): Slip 1, P20, P2tog, P1, turn, leaving 12 stitches unworked.
Row 2 (rs): Slip 1, K7, ssk, K1, turn, leaving 12 stitches unworked.
Row 3: Slip 1, P8, P2tog, P1, turn, leaving 10 stitches unworked.
Row 4: Slip 1, K9, ssk, K1, turn, leaving 10 stitches unworked.
Row 5: Slip 1, P10, P2tog, P1, turn, leaving 8 stitches unworked.
Row 6: Slip 1, K11, ssk, K1, turn, leaving 8 stitches unworked.
Row 7: Slip 1, P12, P2tog, P1, turn, leaving 6 stitches unworked.
Row 8: Slip 1, K13, ssk, K1, turn, leaving 6 stitches unworked.
Row 9: Slip 1, P14, P2tog, P1, turn, leaving 4 stitches unworked.
Row 10: Slip 1, K15, ssk, K1, turn, leaving 4 stitches unworked.
Row 11: Slip 1, P16, P2tog, P1, turn, leaving 2 stitches unworked.
Row 12: Slip 1, K17, ssk, K1, turn, leaving 2 stitches unworked.
Row 13: Slip 1, P18, P2tog, P1, turn, leaving 0 stitches unworked.
Row 14: Slip 1, K19, ssk, K1. Heel turning is complete. You now have 22 stitches. End having just worked a right-side row.
Optional Narrower Heel
You may want to try this approach for turning the heel instead.
Row 1: Slip 1, P18, P2tog, P1, turn, leaving 14 unworked.
Row 2: Slip 1, K3, ssk, K1, turn, leaving 14 unworked.
Row 3: Slip 1, P4, P2tog, P1, turn, leaving 12 unworked.
Row 4: Slip 1, K5, ssk, K1, turn, leaving 12 unworked.
Row 5: Slip 1, P6, P2tog, P1, turn, leaving 10 unworked.
Row 6: Slip 1, K7, ssk, K1, turn, leaving 10 unworked.
Continue from Row 3 instructions above, except you will be leaving 2 stitches less each time (for example, you will be leaving 8 stitches instead of 10 stitches.)
After heel turning, 20 stitches will remain. End with a right-side row.
PICKING UP STITCHES FOR HEEL GUSSET
NOTE: For techniques, see Secrets for Tight, Smooth Gussets, pages 26–29. Pick up enough stitches to avoid holes or looseness along the edge of heel flap, even if this means that you pick up slightly more or less than 19.
SETUP: Using the appropriate needle, pick up and knit 19 stitches up the right side of heel flap. Then work across all instep stitches, beginning with the next row of the pattern you have chosen.
Rhythm and Double Time only: Work Round 3.
Shimmy Rib only: Work either Round 5 or 1, depending on whether you ended with Round 4 or Round 8.
Pick up and knit 19 stitches along the left side of the heel flap.
Continue to knit across the remaining heel stitches (the 22 stitches remaining after heel turning plus the 19 picked up along the right side of the flap or the 20 stitches remaining for the narrow heel turning option).
WORKING GUSSET DECREASES
Rhythm and Double Time only: Begin instep by working pattern Row 4.
Shimmy Rib only: Begin the instep by working either pattern Row 6 or 2, depending on whether the last pattern row worked before the heel was Row 5 or Row 1.
Round 1
Instep stitches: Work in pattern as established.
Heel stitches: K1, ssk, K to last 3 heel stitches, K2tog, K1. (You have decreased 2 stitches.)
Round 2
Instep stitches: Work in pattern as established.
Heel stitches: Knit to end of each needle.
Next Rounds: Repeat Rounds 1 and 2 until you have a total of 72 stitches (36 for instep and 36 for heel).
Rhythm and Double Time only: End by working pattern Row 2 or 4.
WORKING THE SOCK FOOT
NOTE: To fit various lengths, make the sock longer or shorter by working more or fewer rounds for the foot.
Double Time only: Continue slip-stitch pattern in mc for one pattern repeat (4 rounds) beyond the last gusset decrease. Then reverse mc and cc, working Rows 1 and 2 in cc and 3 and 4 in mc until 2” (5cm) from the desired length of the sock foot or 1½” (4cm) if using a rounder toe (see Making a More Blunt, Rounded Toe, page 75).
Continue working without making further decreases, patterning instep stitches and knitting sole stitches as established. Measuring from the back of the heel, work until the foot is 2” from the desired length of the sock foot.
Rhythm and Double Time only: End with pattern Row 2 or 4.
SHAPING THE TOE
NOTE: The toes of each pattern stitch are shaped in the same manner using stockinette stitch (knitting every round).
Round 1: Knit to end of each needle.
Round 2
Instep stitches: K1, ssk, K to last 3 instep stitches, K2tog, K1.
Sole stitches: K1, ssk, K to last 3 heel stitches, K2tog, K1.
Round 3: Knit to end of each needle.
Next Rounds: Repeat Rounds 2 and 3 until 16 stitches remain (8 instep and 8 sole stitches).
CLOSING THE TOE AND FINISHING THE SOCK
Break yarn, leaving a 10” (25cm) tail. Hold the remaining stitches parallel on two needles or needle tips. Using the tail threaded on a yarn needle, graft the front and back stitches together using Kitchener stitch (see pages 29–30). Weave in the end after grafting the toe. Weave in any other loose ends.
To block, lightly mist or steam the sock and pat it gently into shape.
Rhythm
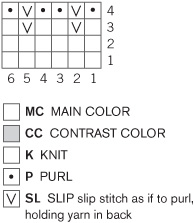
Double Time

Shimmy Rib
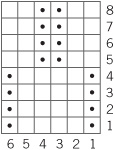
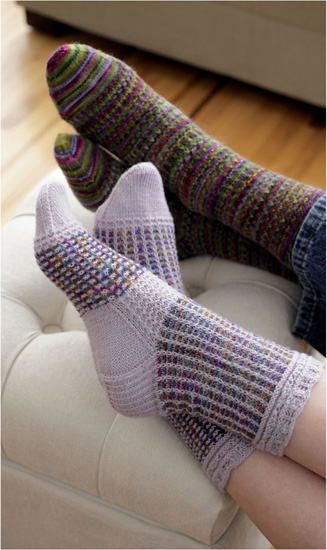
Off the Cuff
Sensible socks can be attractive! These classic, cuffed anklets with contrasting trim and toes are ready for anything. Use a soft cotton-blend yarn to make them an instant and comfy favorite. Instructions include two sizes and can be adjusted for more. Begin with a small band of stockinette stitch that curls under to create an interesting cuff edging. Add more stripes where you want to personalize your socks.
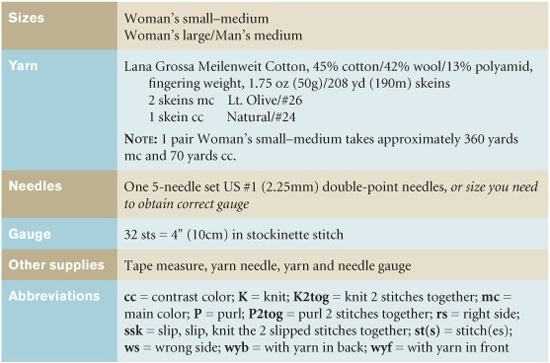
Substitutions
This is the perfect pattern to adapt for a plain stockinette-stitch sock in fingering-weight yarn using either 64 stitches or 72 stitches. Substitute K1, P1 ribbing for the 1”–1½” (2.5–3.75cm) cuff instructions on page 106. Then knit all rounds to heel flap (7“/17.5cm) from cast on or desired length.
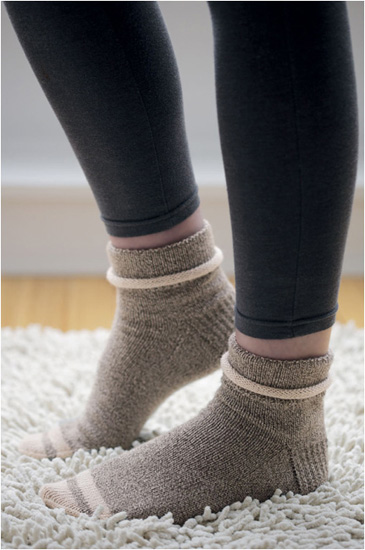
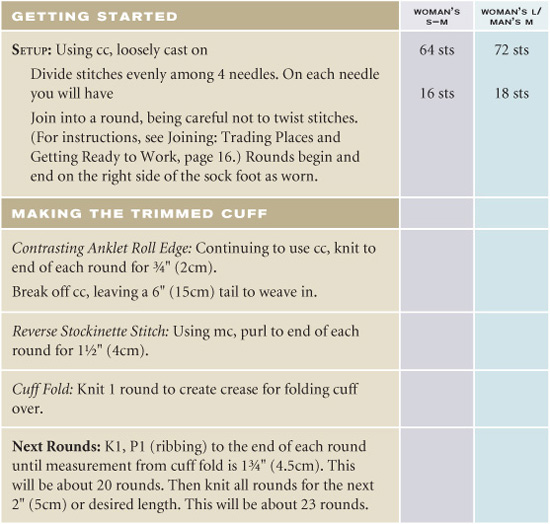
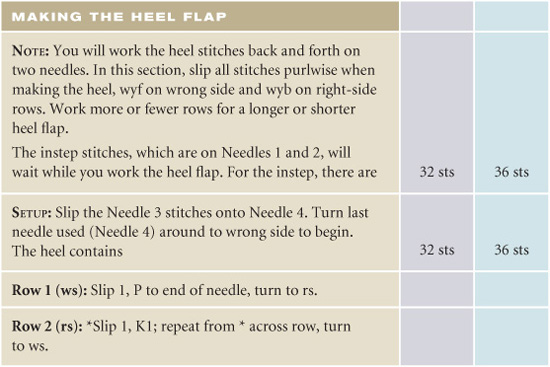
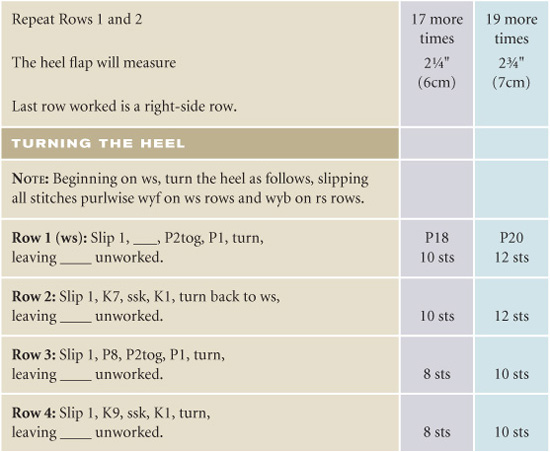
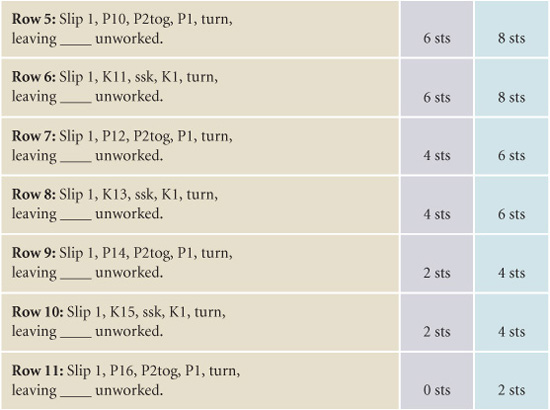
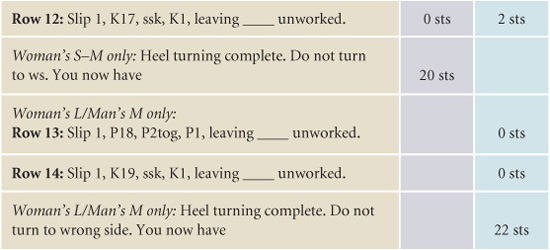
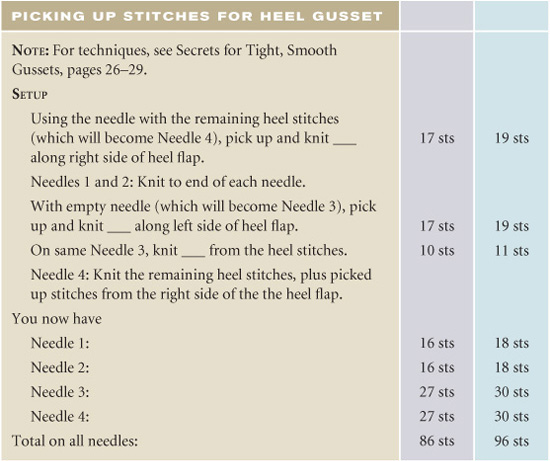
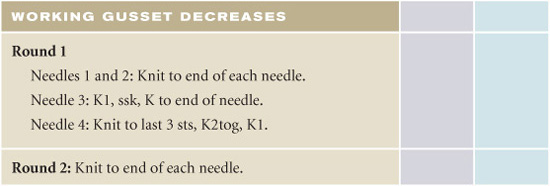
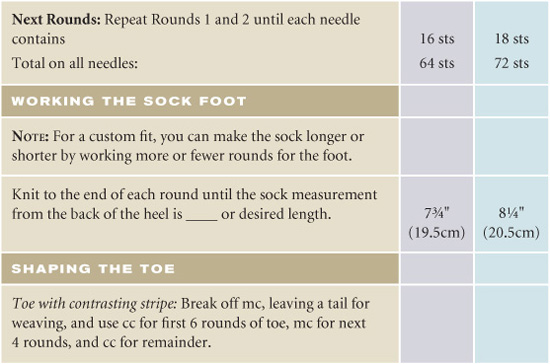

Lacy Days
Three traditional Japanese, easy-to-learn lace patterns adorn these elegantly simple socks. Their stretchiness makes them fit well. The cuffs vary: traditional 1×1 ribbing, seed stitch, and a modified knit-purl ribbing.
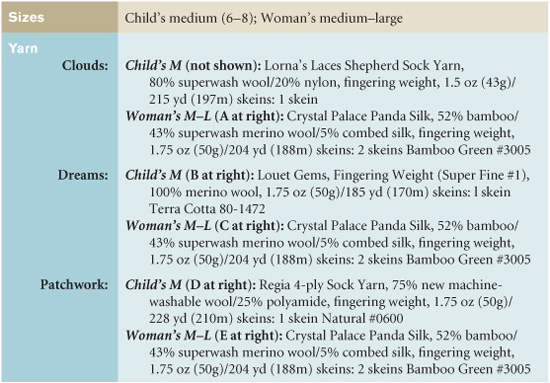

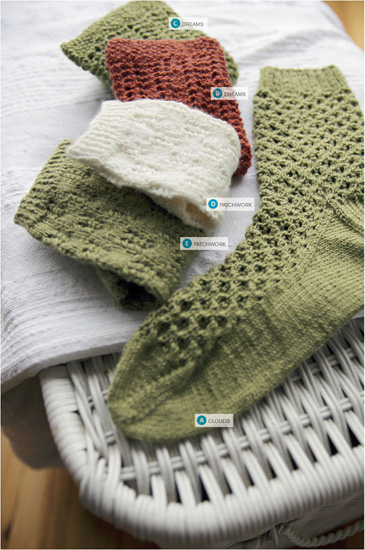
Pattern Stitches (see charts, page 122)
Clouds (multiple of 6 stitches)
Round 1: *P1, ssk, YO, K1, YO, K2tog; repeat from * to end.
Rounds 2, 3, and 4: *P1, K5; repeat from * to end.
Round 5: *K1, YO, K2tog, P1, ssk, YO; repeat from * to end. Rounds 6, 7, and 8: *K3, P1, K2; repeat from * to end.
Dreams (multiple of 6 stitches)
Rounds 1, 2: Knit.
Round 3: Purl.
Round 4: *K2, YO, s2kp, YO, K1; repeat from *to end.
Patchwork (multiple of 10 stitches)
Rounds 1, 3, 5 and 7: *K2tog, YO, K1, YO, ssk, K5; repeat from * to end.
Rounds 2, 4, 6 and 8: Knit.
Rounds 9, 11, 13, and 15: *K 5, K2tog, YO, K1, YO, ssk; repeat from * to end.
Rounds 10, 12, 14, and 16: Knit.
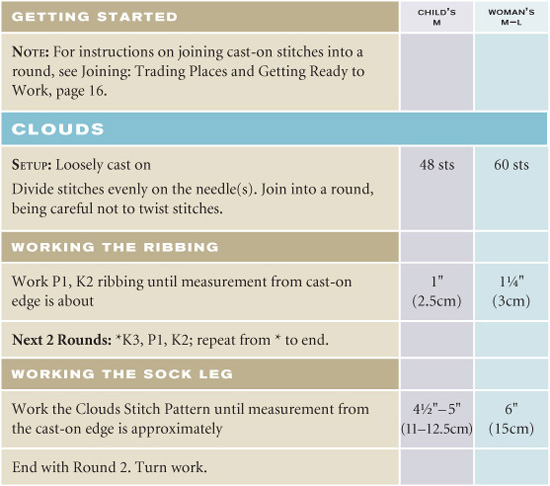
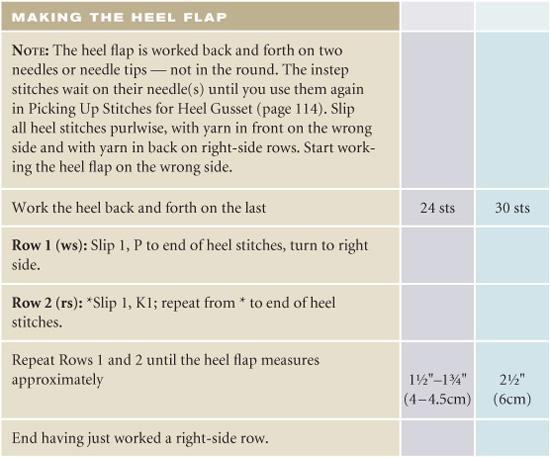
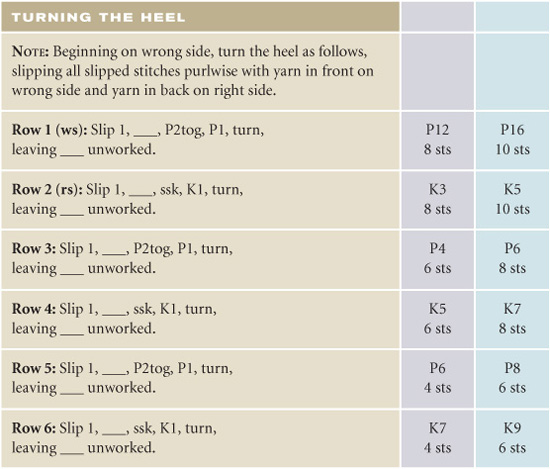

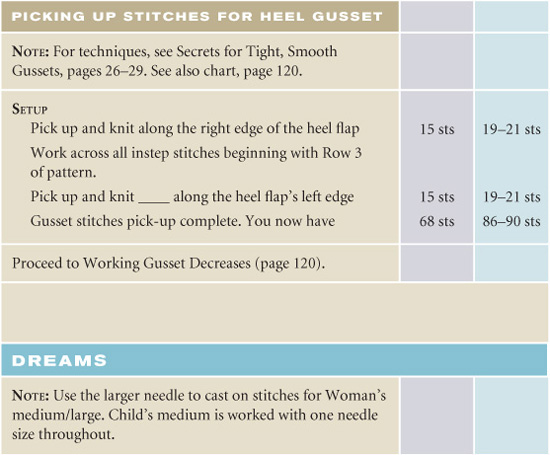
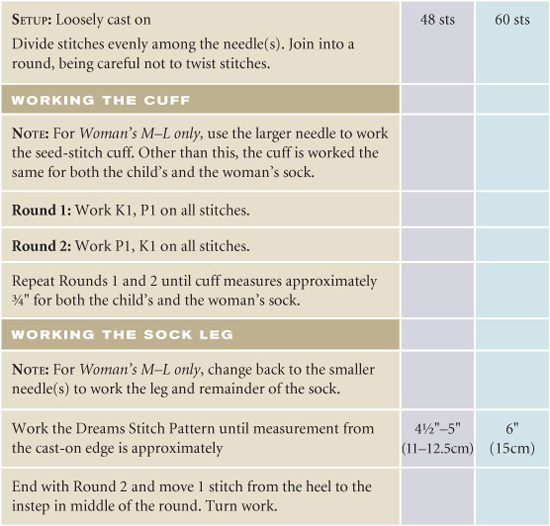
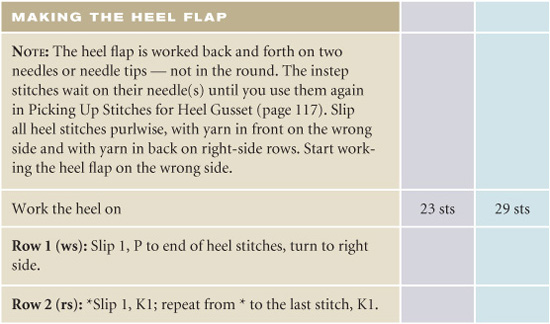
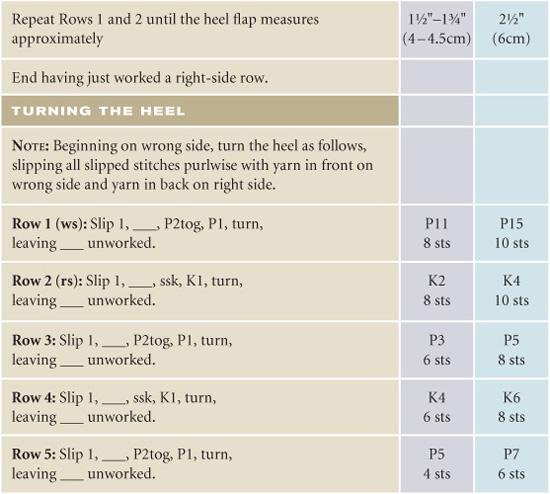
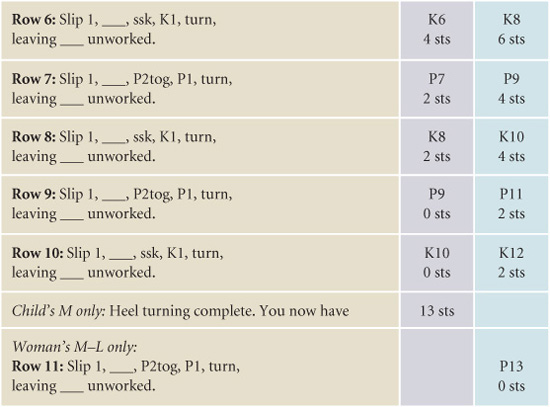

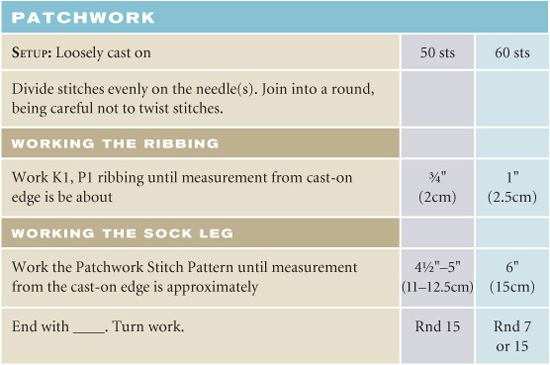
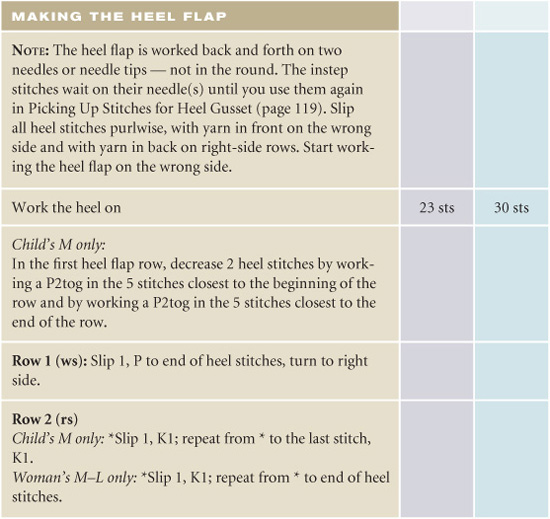

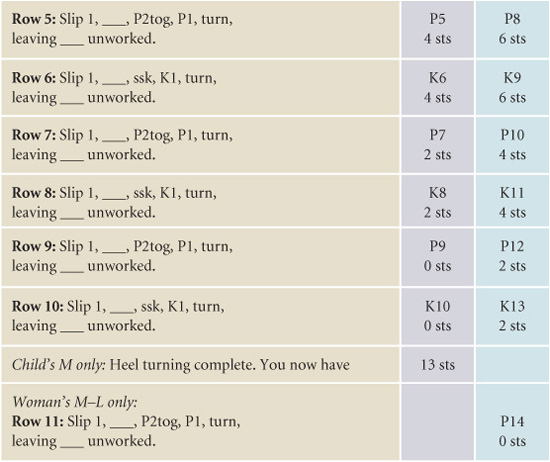
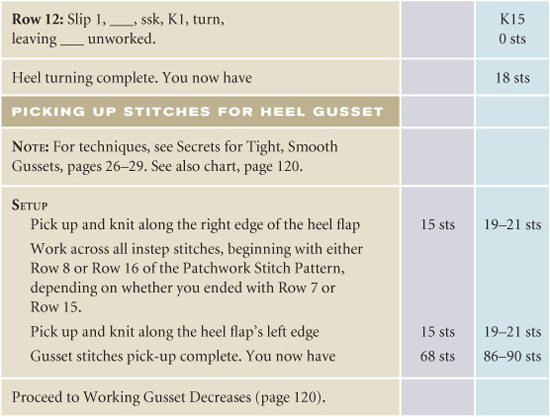
Picking Up Stitches for Heel Gusset
As explained in Secrets for Tight, Smooth Gussets (pages 26–29), you may want to pick up more stitches, if needed, to avoid gaps and looseness along the heel flap edges. I pick up 1 stitch in every slipped stitch and occasionally add another 1 or so at the top to eliminate the pesky holes. The extras can be eliminated by knitting 2 stitches together where the last gusset stitches and the stitches that remained after turning come together or at the top of the gusset before working the first decrease round. Or you can just keep repeating gusset decrease rounds 1 and 2 until the original 48 or 60 total stitches are on the needle.
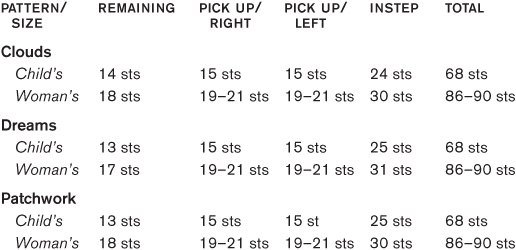

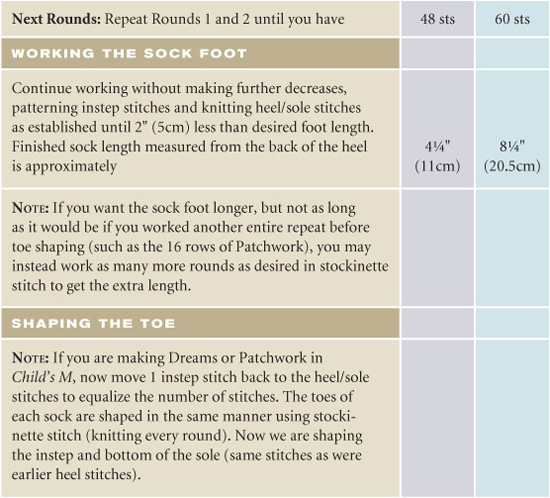
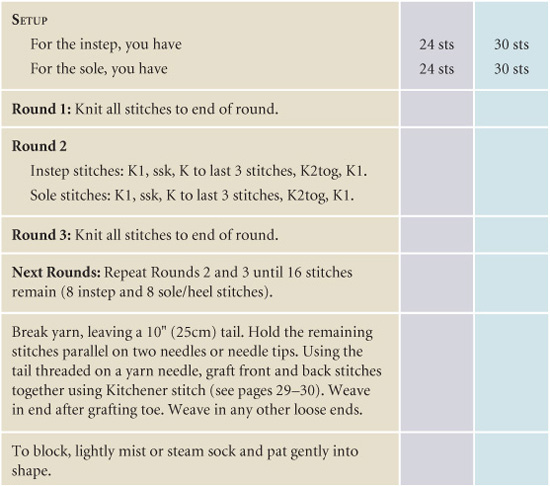
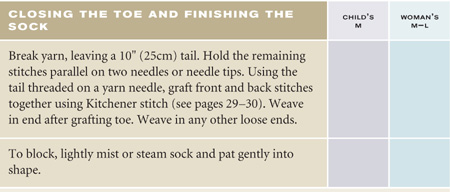
Clouds
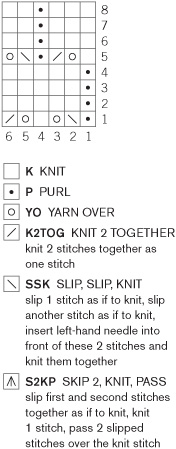
Dreams
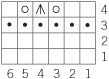
Patchwork
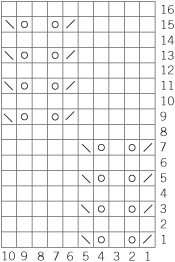
Splicing Ends Together
A quick and easy way to join old and new yarns is to spit-splice them together to avoid weaving in the ends. This is a timesaver for socks that have a number of different yarns and regular color changes. In addition, the join made is very smooth and strong. Here's how to do it:
Separate the plies in each of the yarn ends to be spliced. Really pick them apart for about 1”–1½” (2.5–4cm) as shown in the illustration. Bring the two ends together, so that the plies overlap and plies from the two ends are intermingled. Then moisten the area of the join with saliva until it is pretty wet (you don't really have to spit on it!). Next, put the join between the palms of your hands and rub them together vigorously. The overlapped area will get thinner and thinner until it is about the size of a single yarn end. The heat and friction from your palm rubbing the yarn ends has created a good strong spit-splice join, actually felting the ends together.
Note: The spit-splice method works only with wool and other natural fibers that will felt. Synthetics or wool yarn that has been treated so that it can be machine washed (for example, “superwash” yarn) cannot be spliced together in this way. Also, be sure to make the splice before you are actually out of yarn. You'll need at least a 6” (15cm) tail left and 6–8 stitches to go before starting the new color.

Fireside Stripes
Use your imagination to experiment with color, as you create these warm and wonderful socks knit with two strands of yarn. For a work of art you'll be proud to wear, pick your favorite hand–dyed or variegated yarn to use throughout and add three coordinating solids sequentially to make subtle stripes. You can also combine a solid color with three changing complementary colors. This fun technique offers an easy way to play with colors and a new world of sock possibilities. The Eye-of-Peacock stitch on the heel is especially nice.
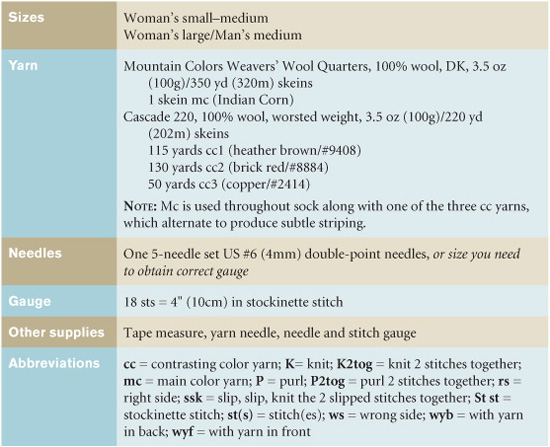
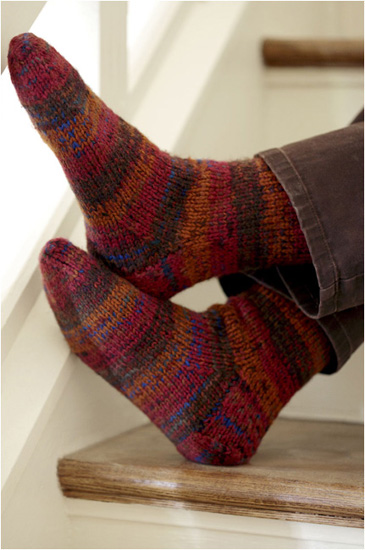
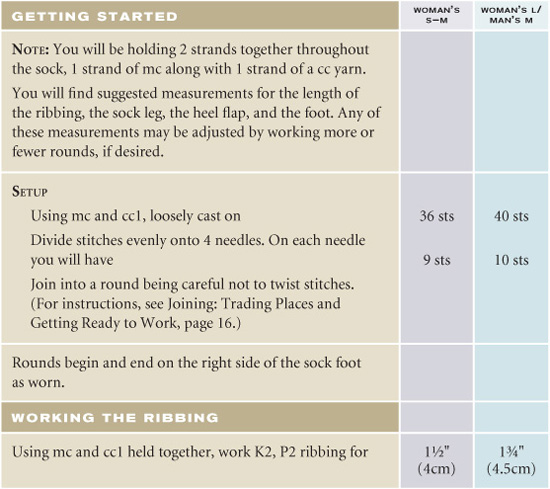
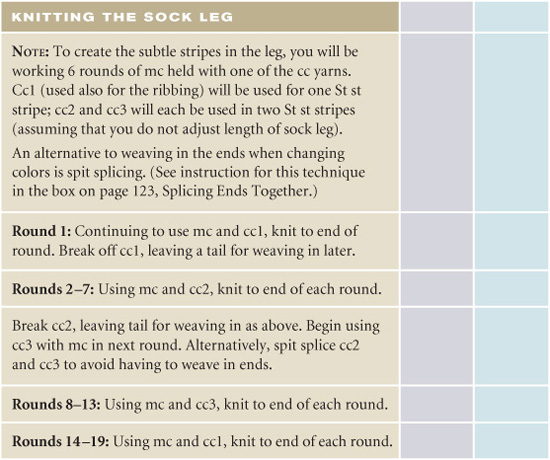
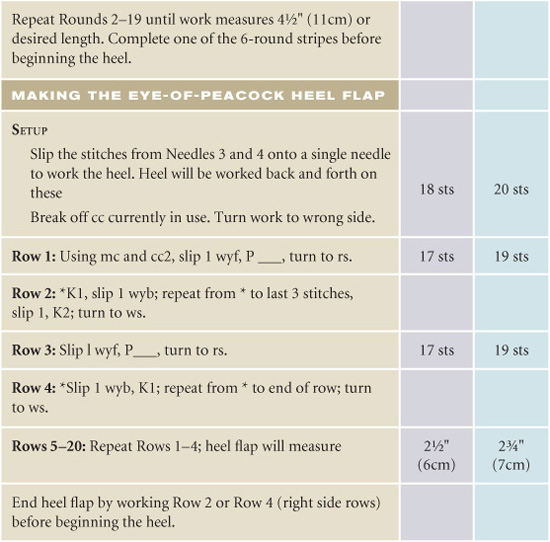
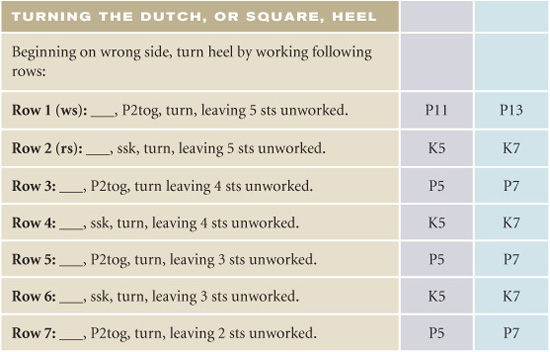
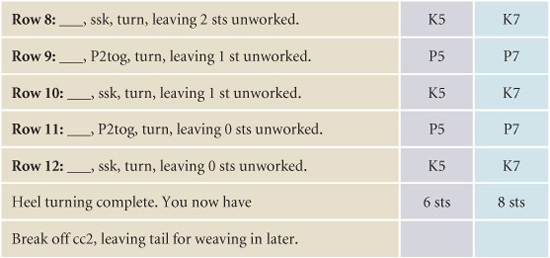

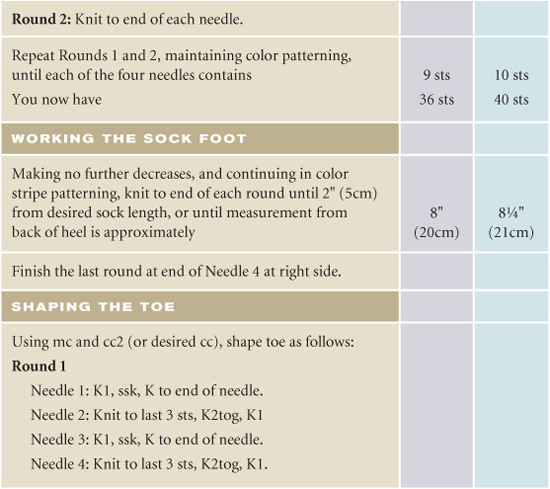

Diamonds & Cables
Classic cables adorn these stretchy unisex socks. The larger size is worked in DK-weight yarn and features a sculptural center-front diamond cable. The smaller-sized version, a perfect introduction to knitting cables, is the basic garter rib and four-stitch cable combo, worked in fingering-weight yarn without the center diamond cable.
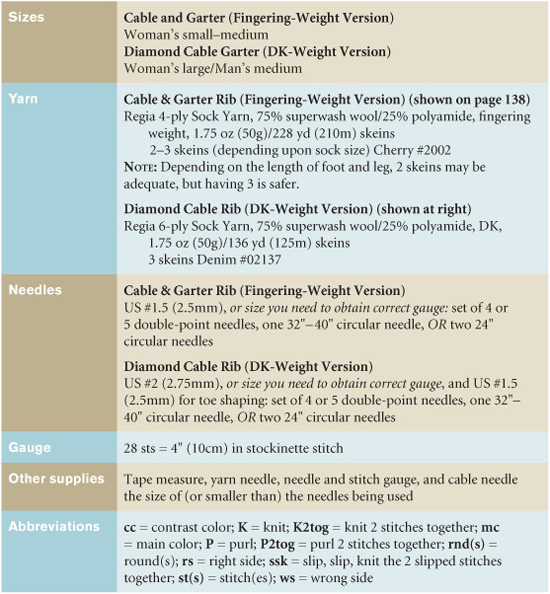
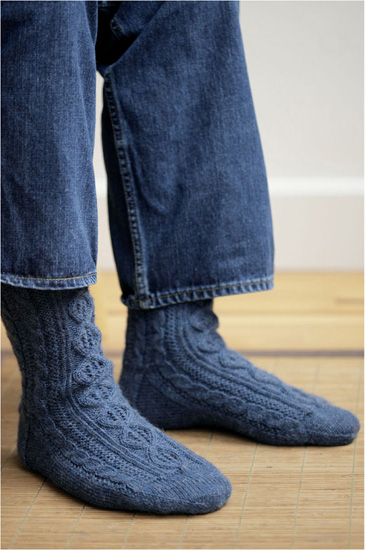
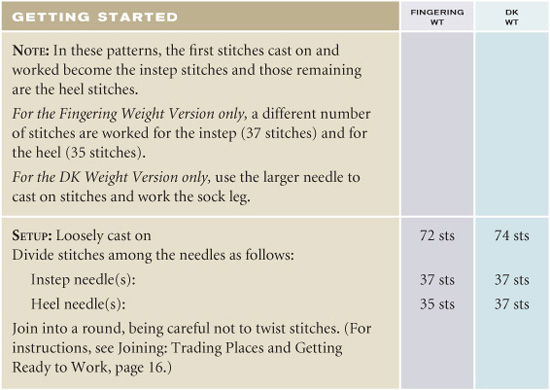
Pattern Stitches
Fingering-Weight Version
Cable & Garter Ribbing
Instep (37 stitches): P1, (K1, P2, K2, P2, K1, P1) four times.
Heel (35 stitches): (K1, P2, K2, P2, K1, P1) three times, ending K1, P2, K2, P2, K1.
Cable & Garter
See Cable & Garter Chart on page 139.
DK-Weight Version
Diamond Cable Ribbing
Instep (37 stitches): K1, (P2, K2) 2 times; P1, (K2, P1) 6 times; (K2, P2) 2 times, K1.
Heel (37 stitches): P1, (K1, P2, K2, P2, K1, P1) 4 times.
Diamond Cable
See Diamond Cable Garter Chart on page 139.
Sizing Options
Go up or down in needle size to increase or decrease the circumference of these socks. To shorten the socks or use less yarn, work fewer pattern repeats for the leg and/or foot. The Diamond Cable DK-weight model has four leg and four foot pattern repeats; leg length from cast on to heel is approximately 8” (20cm) and foot length is approximately 11” (28cm). The Cable & Garter fingering-weight model has five leg and four foot pattern repeats; leg length from cast on to heel is approximately 7½” (19cm) and foot length is approximately 9¾” (25cm).
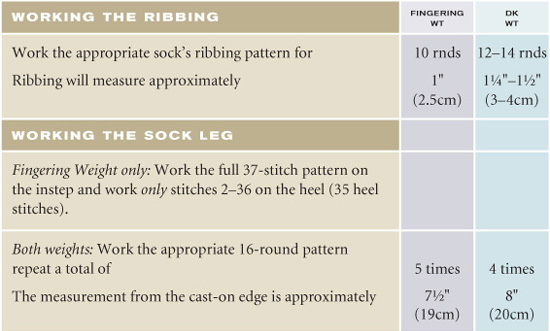
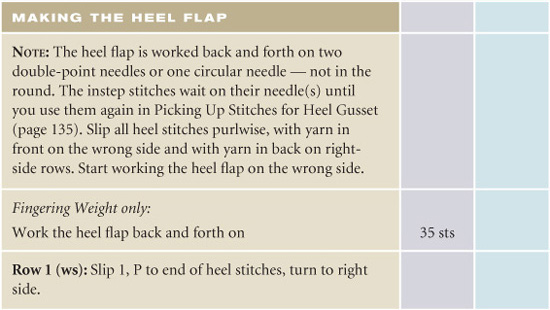
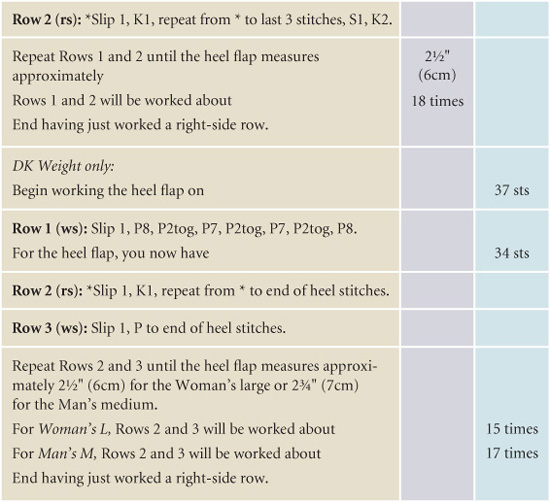
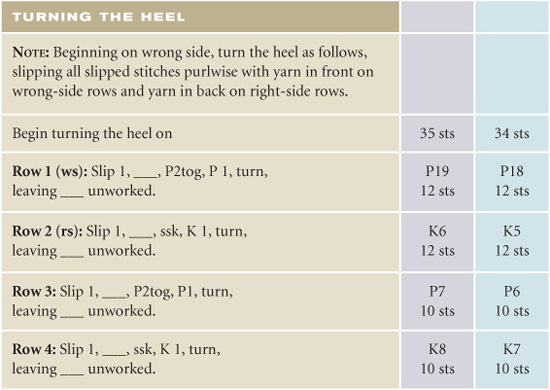
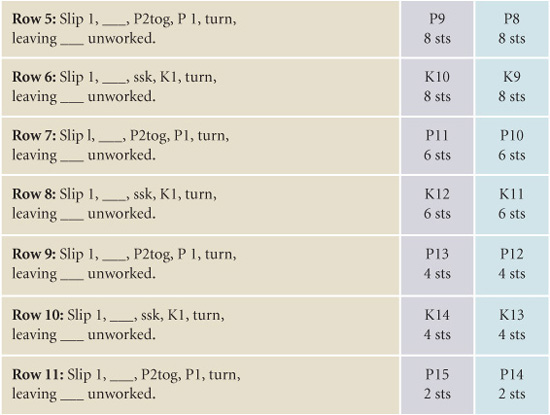


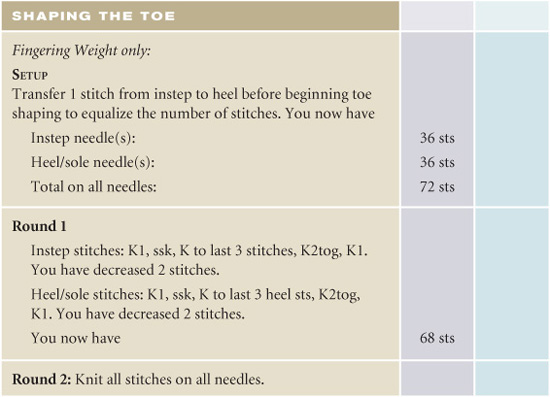
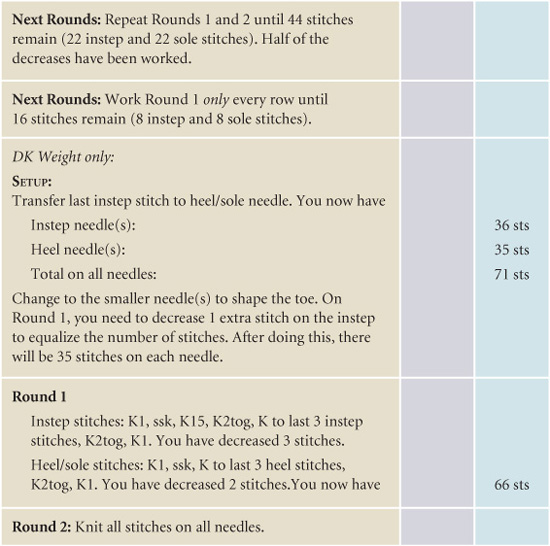
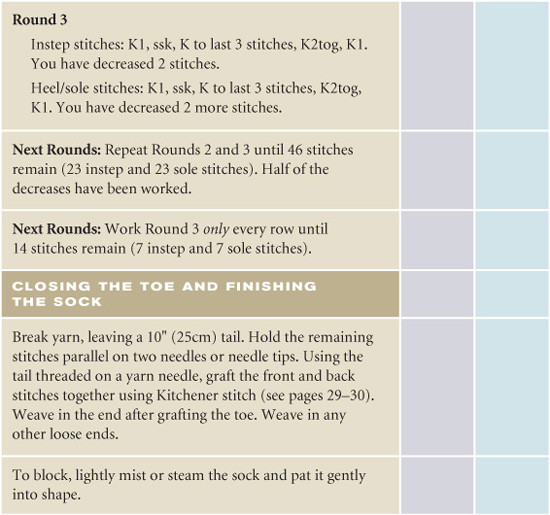
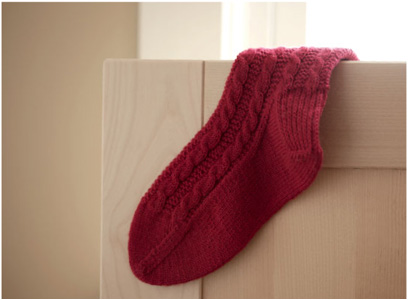
Cable & Garter Chart
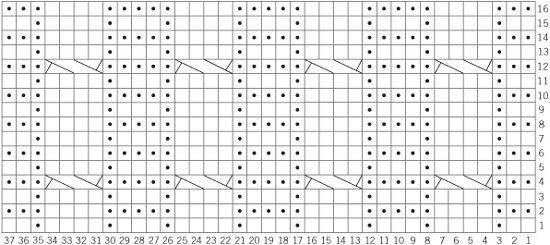
Diamonds & Cables
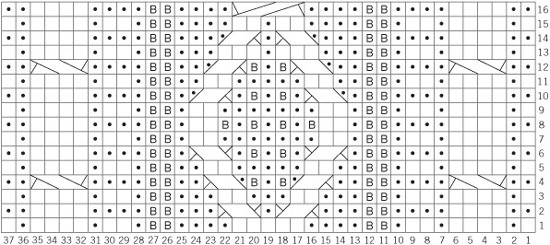
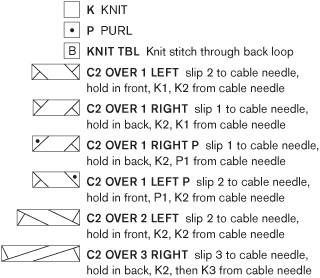
Straight-Laced
Reveal a different side of your personality with lace socks that are simple to knit and fun to wear. This easy pattern knits up quickly and makes a stretchy sock that fits a variety of foot lengths — perfect for gift giving! Knit them in worsted- or fingering-weight yarns.

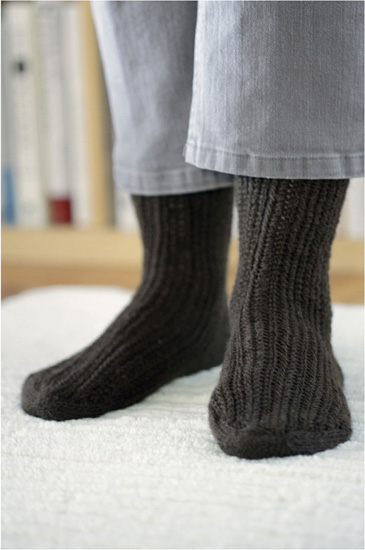
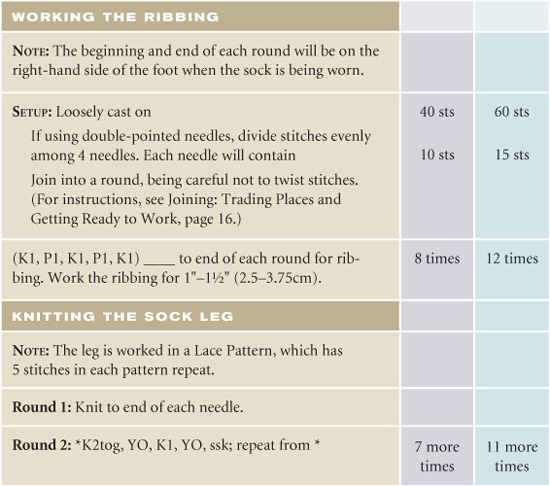


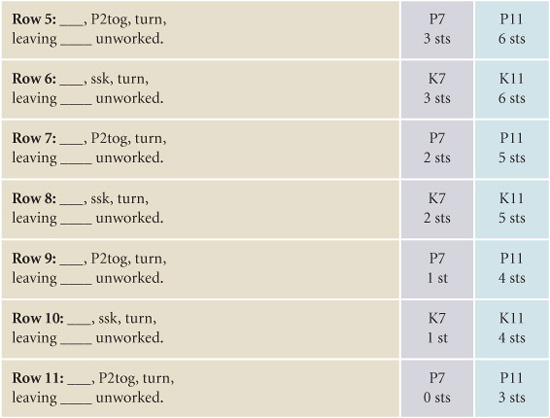

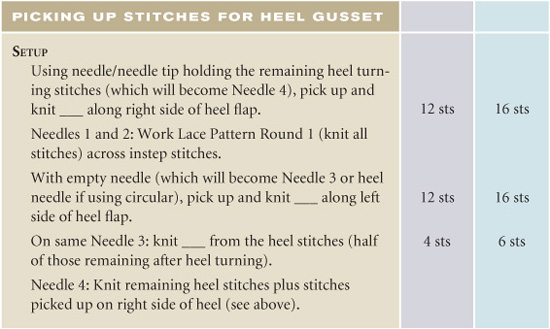
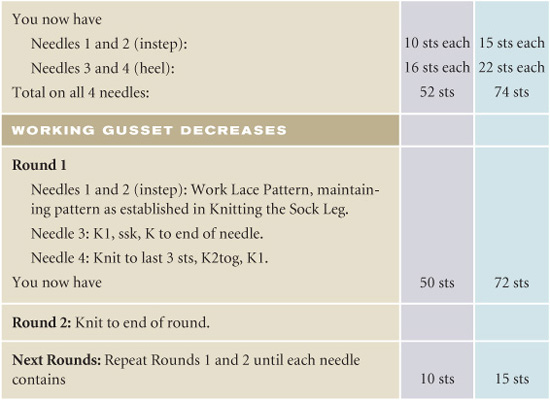
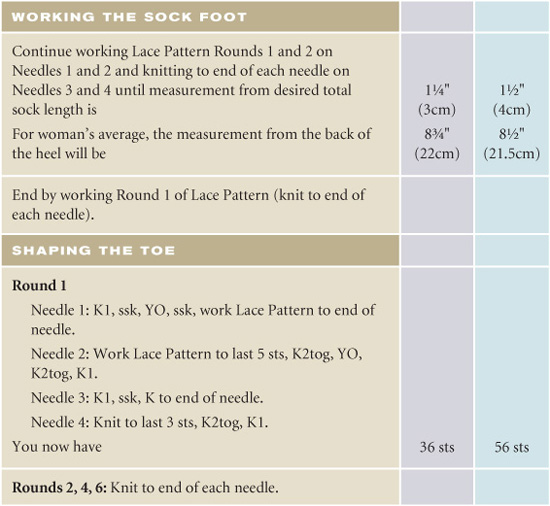
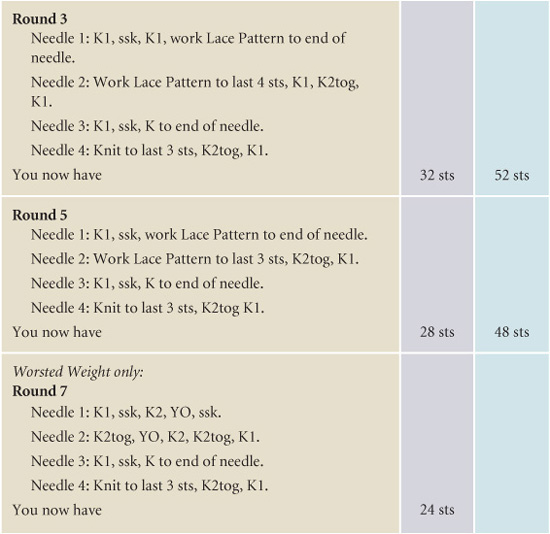
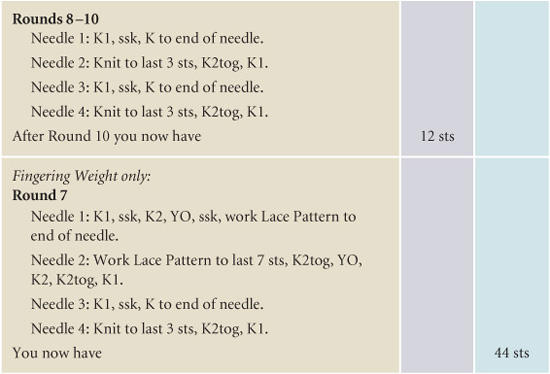
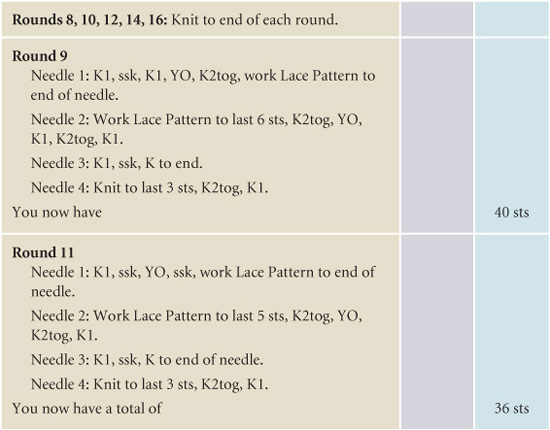
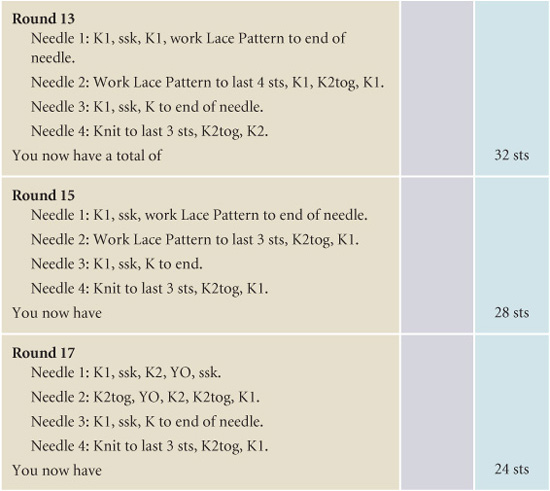

Reinforcing Socks
You can make your socks more durable by knitting in a strand of reinforcing yarn or thread. You hold the reinforcement together with the regular sock yarn as the parts are being knit. Some sock parts often reinforced are the heel flap, heel cap or turning, and the toe. You may also wish to reinforce other parts that receive hard wear, such as the ball of the foot and the extension onto the sole of the stitches that remained after turning the heel. Doing this is an optional procedure, as even 100% wool socks knit to a dense gauge live on for years without this reinforcement.
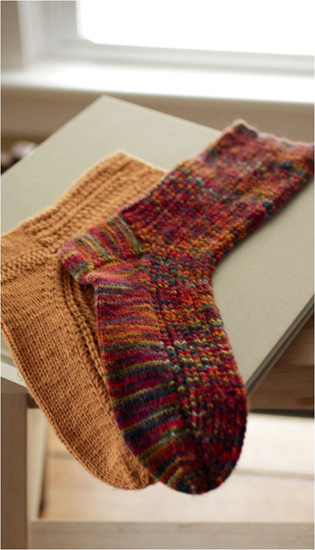
Peaks ’n’ Valleys
Combine a simple chevron lace stitch with self-striping or variegated yarns for a new slant on lace. The two-row repeat lace pattern is easy to learn and creates an attractive, stretchy sock that fits well. Another good beginning lace project! As an alternative, use two or more solid-colored yarns to create your own striping pattern.

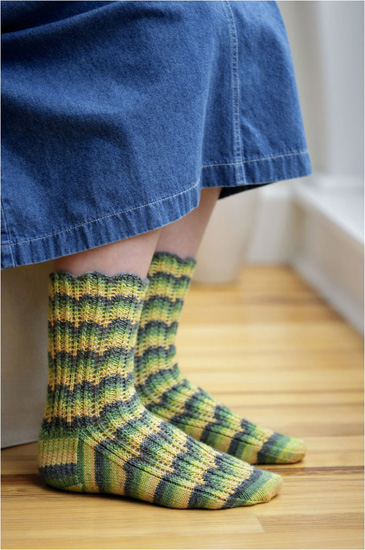
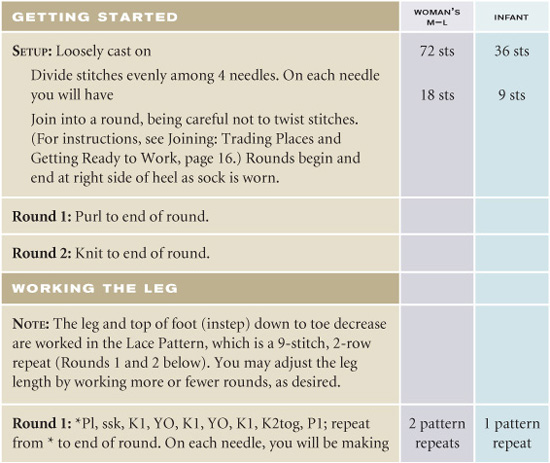
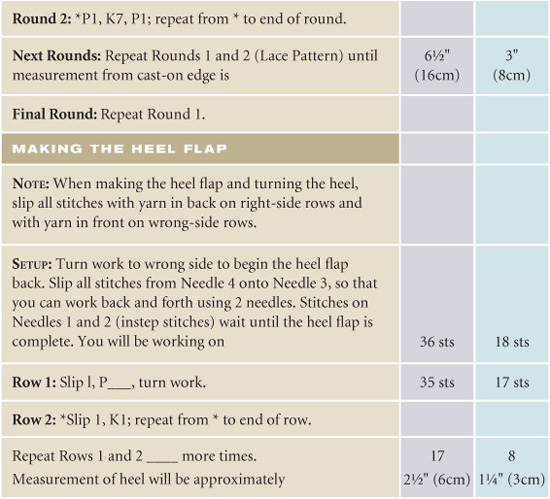

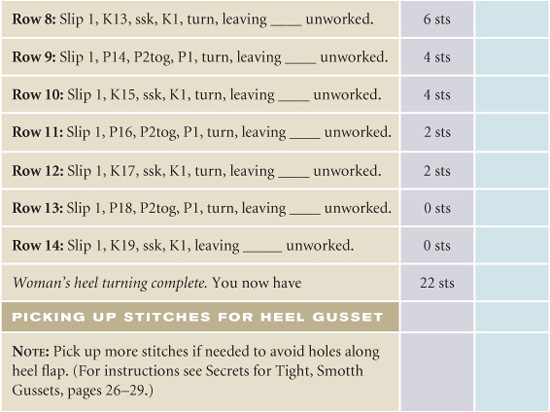
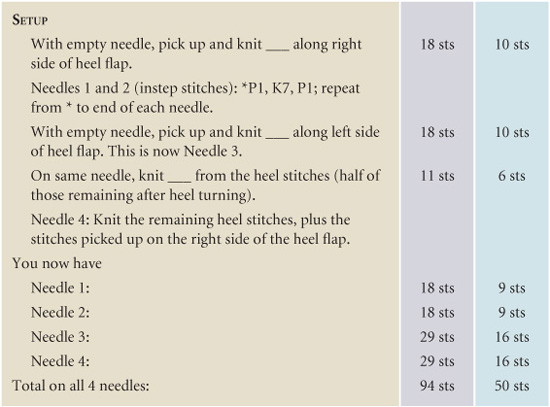
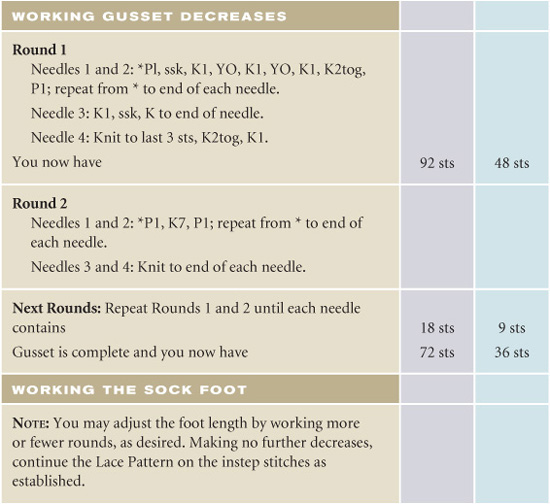
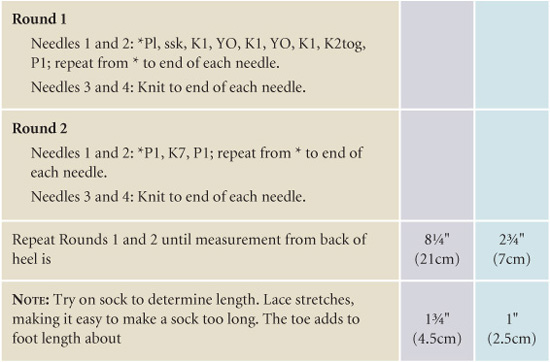

Simple Ribs
These great-fitting unisex socks can be made in both worsted- and DK-weight yarns. The ribbing creates a comfortable, stretchy sock that fits a variety of foot widths — a can't-miss pattern when making a surprise gift for someone you don't want to (or can't) measure.

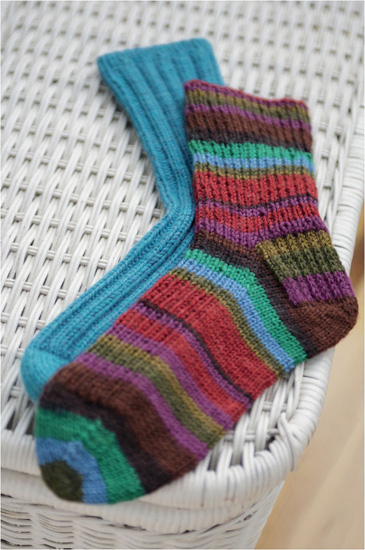
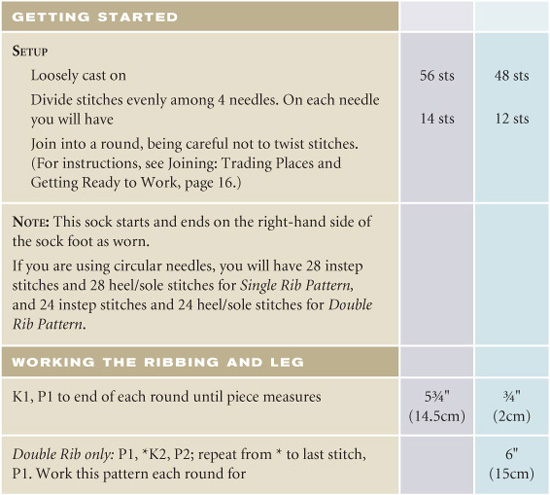
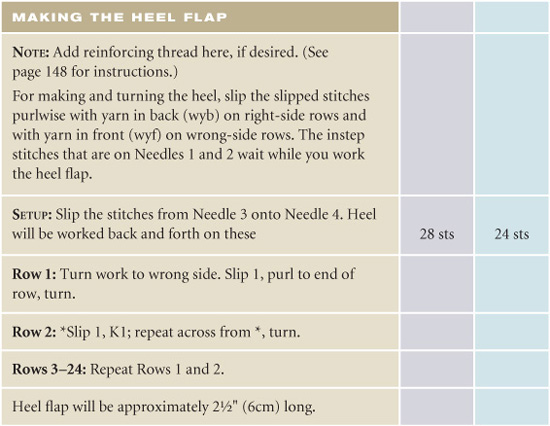
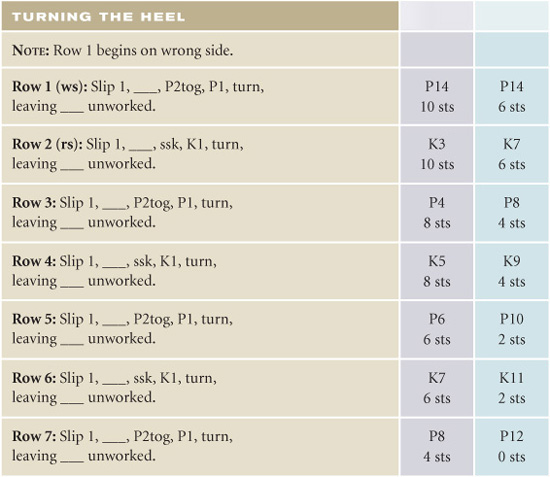
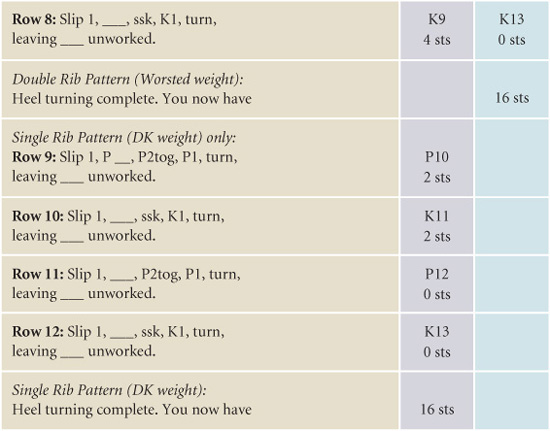
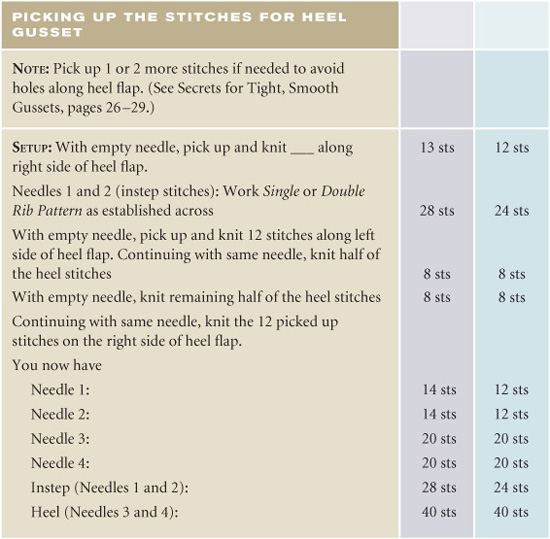
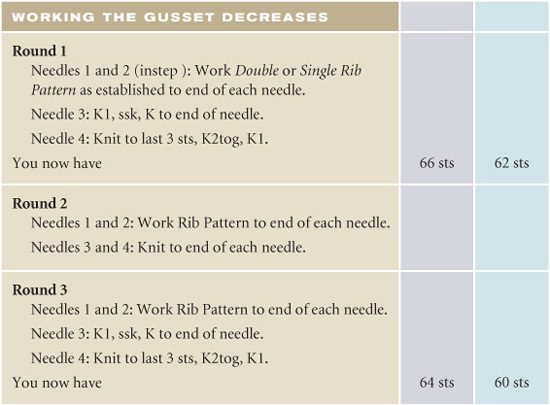
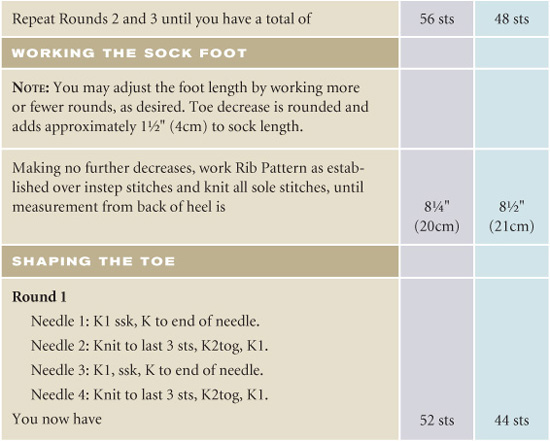
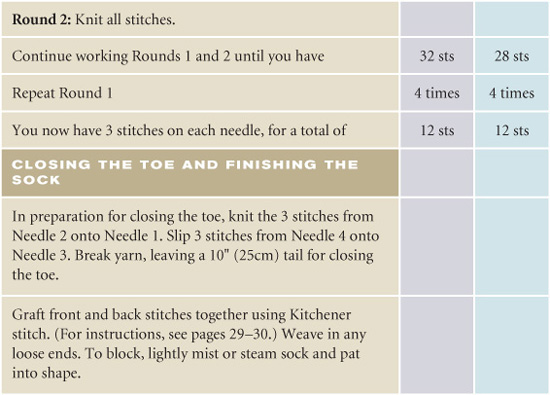
Shadow Box
A subtly textured stitch pattern is showcased between rolled top and rounded toe on these intriguing socks. A square shadow heel adds to the interest. This four-row repeat pattern is easy to learn, and the sock can be knit in either worsted or bulky weight. For a soft, luxurious sock, combine two yarns in the bulky version.

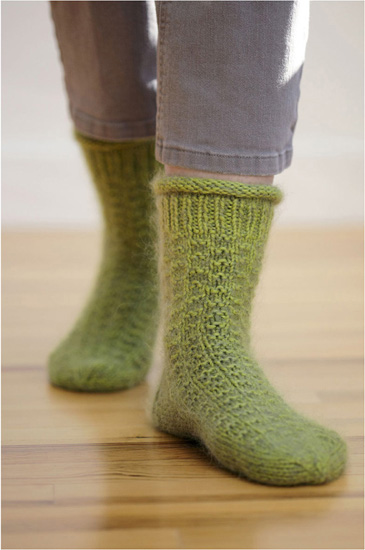

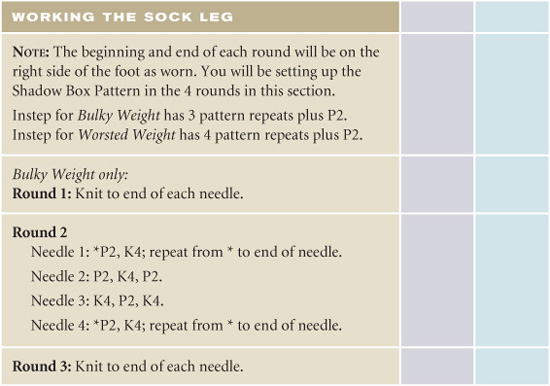

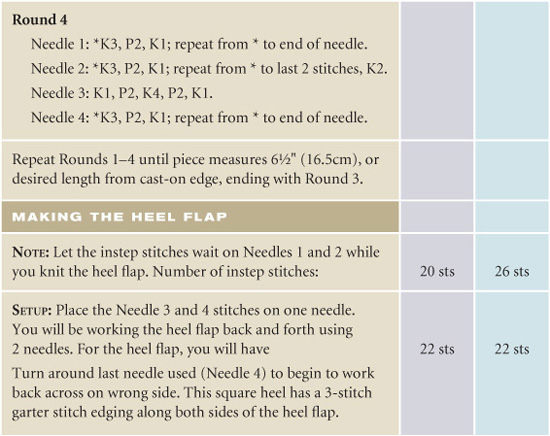

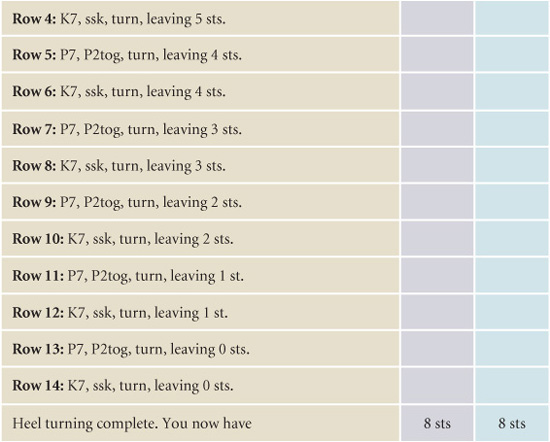
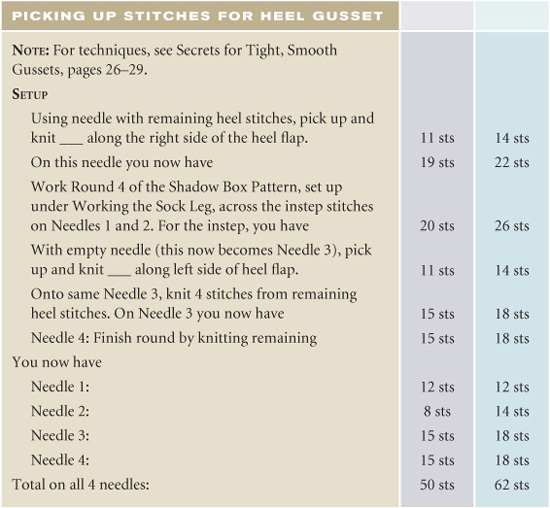
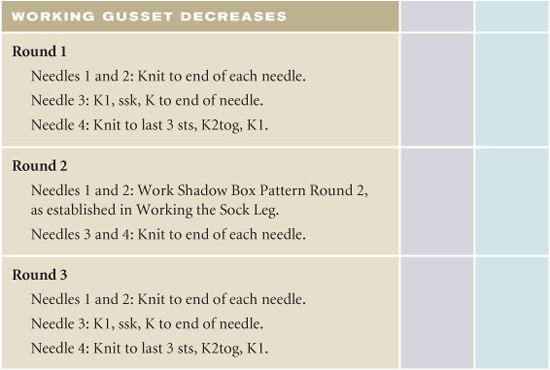
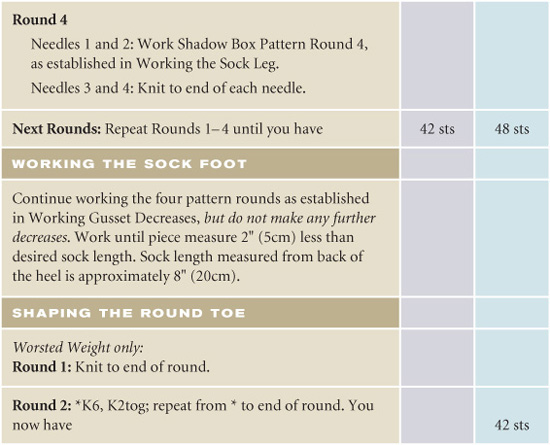
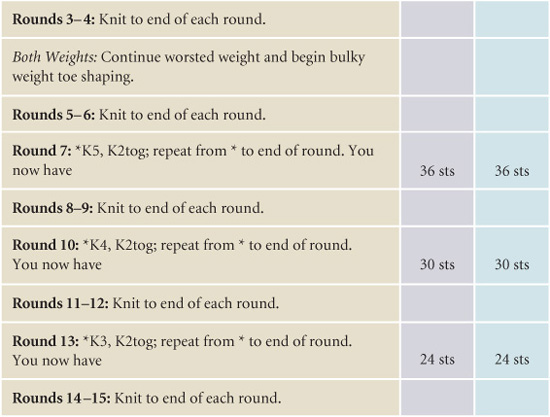
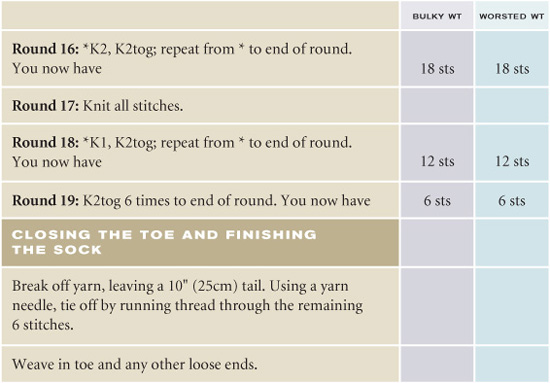
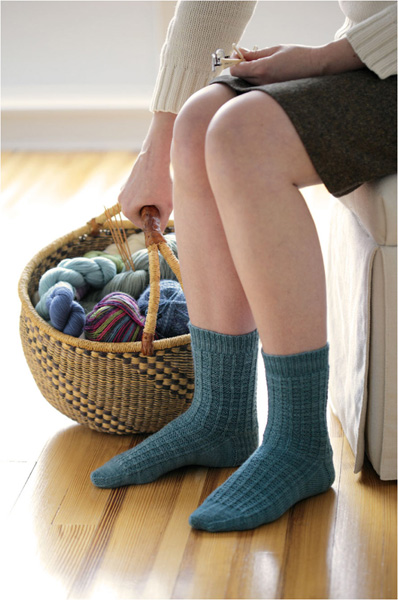
Resources
Blue Sky Alpacas
888-460-8862
www.blueskyalpacas.com
www.spudandchloe.com
Spud & Chloë Fine
Brown Sheep Company
800-826-9136
www.brownsheep.com
Wildfoote Luxury Sock
Cascade Yarns
www.cascadeyarns.com
Cascade 220, Cascade 220 Quatro,
Lana D'Oro
Crystal Palace Yarns
www.straw.com
Crystal Palace Panda Silk
Dalegarn/Dale of Norway
www.dale.no/dalegarn
Dale Baby Ull, Falk
Fiber Trends for Naturally NZ Yarns
509-884-8631
www.fibertrends.com
Waikiwi Luxury Blend Sock Yarn
Lana Grossa
www.lanagrossa.com
Lana Grossa Meilenweit Cotton Fun,
Meilenweit Cotton
Lorna's Hand-Dyed Yarns
773-935-3803
www.lornaslaces.net
Shepherd Sock Yarn
Louet North America
800-897-6444
www.louet.com
Gems Fingering Weight (Super Fine #1)
Misti Alpaca Yarns
888-776-9276
www.mistialpaca.com
Misti Alpaca Hand Paint Sock Yarn
Mountain Colors
406-961-1900
www.mountaincolors.com
Bearfoot
Westminster Fibers, Inc.
Yarn Division
800-445-9276
www.westminsterfibers.com
Regia 4-ply Sock Yarn, Regia Ringel Color, Regia 6-ply Design Line by Kaffe Fassett
Acknowledgments
More people than I can name contributed to this book. Thanks go first to my students, who raised wonderful questions and requested patterns to help them progress from basic to more challenging socks, and ultimately to patterns of their own.
Special thanks to: Evelyn Clark of Seattle, Washington, for encouraging me to write the book and supporting me through the whole process; Grace Jarvis of Corvallis, Oregon, for introducing me to sock knitting nearly 45 years ago; Sandy Blue of Seattle, Washington, for mentoring and encouraging me to design patterns and teach; Bev Galeskas of East Wenatchee, Washington, for sage pattern-writing advice; Nancy Bush and Lucy Neatby, and now many others, too, for wonderful sock books, inspirations, and new techniques. Other friends who provided help when it was needed: Mary Berghammer, Renee Coale, Sarah Hauschka, Jason Hanson, Judie Stanton and Annelie Wallbom. Again, special thanks and appreciation to Gwen Steege, creative and sensitive Storey Publishing acquisitions editor, who encouraged this book and contributed greatly to its development, and to technical editors Andrea Dodge and Kathy Brock.
Finally, heartfelt thanks go to my husband, Terry, for love, understanding, and support of all sorts through both editions of the book, to my children, Matthew (and Renee) Coale and Rebecca Skloot, for their love and long-time encouragement and to grandsons Nick (who can knit) and now Justin (who will).
For testing the patterns included in this book, thanks to: Rebecca Bienn, Kathleen Case, Mary Johnson, Ruth Ann Myers, and Carla Sawyer. Special thanks to Judie Stanton for knitting the socks “Best Foot Forward” and “Winter Garden” (shown on the cover) for this revised edition.
For providing yarn, thanks to:
Spud & Chloë Yarns (Blue Sky Alpacas), Cedar, Minnesota
Brown Sheep Company, Mitchell, Nebraska
Cascade Yarn Company, Tukwila, Washington
Crystal Palace Yarns, Richmond, California
Dale of Norway, Shelburne, Vermont
Fiber Trends (Naturally New Zealand Yarns), East Wenatchee, Washington
Lorna's Laces, Chicago, Illinois
Louet North America, Ogdensburg, New York
Misti Alpaca Yarns, Glen Ellyn, Illinois
Mountain Colors, Corvallis, Montana
Index
Page numbers in italics indicate photographs or illustrations. Page numbers in bold indicate charts.
A
abbreviations, 175
Alphabet Chart, 84
B
yarns, 9–10, 110
bar increase, 23, 23
Best Foot Forward, 86–94, 87, 94
Brown Sheep yarn, 38
C
Cable & Garter Rib, 130–38, 138, 139
Cable Twist Rib Stitch, 88
Cascade yarn, 32, 38, 86, 124, 140, 156, 162
casting on and dividing, 15–17
long-tail cast-on, 16, 16
loose cast-on tips, 17
children's socks
Lacy Days, 110–22, 111
Little Guys, 64–69, 65
Peaks ‘n’ Valleys, 150–55
circular knitting
gauge swatches for, 12–13, 13
preventing ladders, 83
with double-point needles, 16–18, 18
gussets on one long circular, 21, 28–29, 29
gussets on two circulars, 27–28, 28
knitting socks on one long circular, 20–22, 21
knitting socks on two circulars, 19–20
Slipped Stitch Pattern, 48
Clouds, 110, 111, 112–14, 120–22, 122
Crystal Palace Panda Silk yarn, 96, 110
D
Diamonds & Cables, 130–39, 131, 138
chart for both variations, 139
pattern stitches for all versions, 132
double-point needles, 6, 10–11
joining cast-on stitches, 17–18, 18
tight, smooth gussets, 26–27
Dreams, 110, 111, 114–17, 120–22, 122
F
Fair Isle techniques, 76–85, 77, 84
G
gauge needle and stitch, 8
swatch knitting in the round, 12–13, 13
GGH Soft Kid yarn, 162
avoiding holes and looseness, 27
secrets for tight, smooth, 26–29
on one long circular, 28–29, 29
on two circulars, 27–28, 28
H
flap, 14, 14–15, 25–26
optional narrower heel, 100
turning the heel, 25, 25–26
I
J
joining cast-on stitches, 16–22
double-point needles, 17–18, 18
one long circular needle, 20–22, 21
trading places, 17–18, 18
two circular needles, 19–20
joins
jogless join, 58
methods overview, 24, 24
split-splicing, 123, 123
weaving in loose ends, 27, 27
K
Kitchener stitch, 29–30, 29–30
knit 2 together (K2tog), 22, 22
knitting bag supplies, 8–9
L
lace stitch socks
Lacy Days, 110–22, 111
Peaks ‘n’ Valleys, 150–55, 151
Winter Garden, 54–63, 55, 63
charts for all three variations, 122
pattern stitches, 112
picking up stitches for gusset, 120
ladders, how to prevent, 25, 83
Lana Grossa Meilenweit yarn, 70, 104, 150
Broken Rib Stitch pattern, 66
Lorna's Laces yarn, 46, 96, 110
M
Magic Loop or Mickey Mouse Ears, 20–22, 21
N
Naturally NZ yarn, 86
O
P
Patchwork, 110, 111, 117–22, 122
patterns, modifying, 31, 31, 95
Peaks ‘n’ Valleys, 150–55, 151
R
Regia, 150
4-ply sock yarn, 110, 130
6-ply sock yarn, 130, 156
reinforcing socks, 148
reverse stockinette stitch, 106
rolled-top socks
Low-Roll Sporty, 70–75, 71
Off the Cuff, 104–9, 105
Shadow Box, 162–69, 163
Yoga Moves, 76–85, 77, 84
S
“selective suturing,” 27
self-striping socks
Peaks ‘n’ Valleys, 150–55, 151
Simple Ribs, 156–61, 157
short rows, 26
sizing the sock for a good fit, 85, 85
slip, slip, knit (ssk), 22, 22
splicing ends together, 123, 123
Spud & Chlöe yarn, 140
Starter Stockinette, 32–37, 33
stockinette stitch socks
Fireside Stripes, 124–29, 125
Off the Cuff, 104–9, 105
Starter Stockinette, 32–37, 33
Straight-Laced, 140–49, 141, 149
Lace Pattern stitches, 142
striped socks
Low-Roll Sporty, 70–75, 71
Peaks ‘n’ Valleys, 150–55, 151
Winter Garden, 54–63, 55, 63
stripes
striping without jogs, 58
varying the number of stripes, 61
superwash yarn, 9
projects made with, 46, 96, 110, 130
T
toe finishing
blunt, rounded toe, 75
Kitchener stitch, 29–30, 29–30
two-strand knitting
Checkered Textures, 38–45, 39
Fireside Stripes, 124–29, 125
Low-Roll Sporty, 70–75, 71
Yoga Moves, 76–85, 77, 84
U
unisex socks
Best Foot Forward, 86–94, 87, 94
Classy Slip-Up, 46–53, 47, 53
Diamond Cable Rib, 130–39, 131, 138, 139
Fireside Stripes, 124–29, 125
Simple Ribs, 156–61, 157
Starter Stockinette, 32–37, 33
V
variegated yarn projects
Checkered Textures, 38–45, 39
Classy Slip-Up, 46–53, 53
Fireside Stripes, 124–29, 125
Low-Roll Sporty, 70–75, 71
Peaks ‘n’ Valleys, 150–55, 151
Rhythm, 96–103, 103
Simple Ribs, 156–61, 157
W
charts for cuff and heel, 63
Scalloped Lace Pattern, 56
wooden needles, 12
Y
yarn
adding new yarn, 24, 24
blends, 9–10
splicing ends together, 123, 123
types of, 9–10
You've Got Rhythm, 96–103, 97, 103
charts, 102
pattern stitches, 99
Abbreviations
| cc | contrasting color |
| K | knit |
| K2tog | knit 2 stitches together |
| mc | main color |
| P | purl |
| P2tog | purl 2 stitches together |
| psso | pass slipped stitch over |
| rs | right side |
| rnd(s) | round(s) |
| s2kp | slip 2 sts knitwise, K1, pass 2 slipped sts over knit stitch |
| ssk | slip, slip, knit the 2 slipped stitches together |
| st(s) | stitch(es) |
| St st | stockinette stitch |
| TW | twist right (K2tog leaving both sts on left needle, K again into front of first st on left needle and slip both sts off needle) |
| ws | wrong side |
| wyb | with yarn in back |
| wyf | with yarn in front |
| YO | yarn over |
Other Storey Titles You Will Enjoy
2-at-a-Time Socks, by Melissa Morgan-Oakes.
An easy-to-learn new technique to banish Second Sock Syndrome forever!
144 pages. Hardcover with concealed wire-o. ISBN 978-1-58017-691-0.
101 Designer One-Skein Wonders,
edited by Judith Durant.
Patterns for every lonely skein in your stash, by knitwear designers from across the country.
256 pages. Paper. ISBN 978-1-58017-688-0.
The Knitting Answer Book, by Margaret Radcliffe.
Answers for every knitting quandry — an indispensable addition to every knitter’s project bag.
400 pages. Flexibind with cloth spine. ISBN 978-1-58017-599-9.
Luxury Yarn One-Skein Wonders,
edited by Judith Durant.
The one-skein concept meets luxury fibers, including alpaca, silk, cashmere,
and bamboo — fun, fast, and decadent!
272 pages. Paper. ISBN 978-1-60342-079-2.
Toe-Up 2-at-a-Time Socks, by Melissa Morgan-Oakes.
The practicality of toe-up knitting combined with the convenience of
the 2-at-a-time technique!
176 pages. Hardcover with concealed wire-o. ISBN 978-1-60342-533-9.
These and other books from Storey Publishing are available
wherever quality books are sold or by calling 1-800-441-5700.
Visit us at www.storey.com.
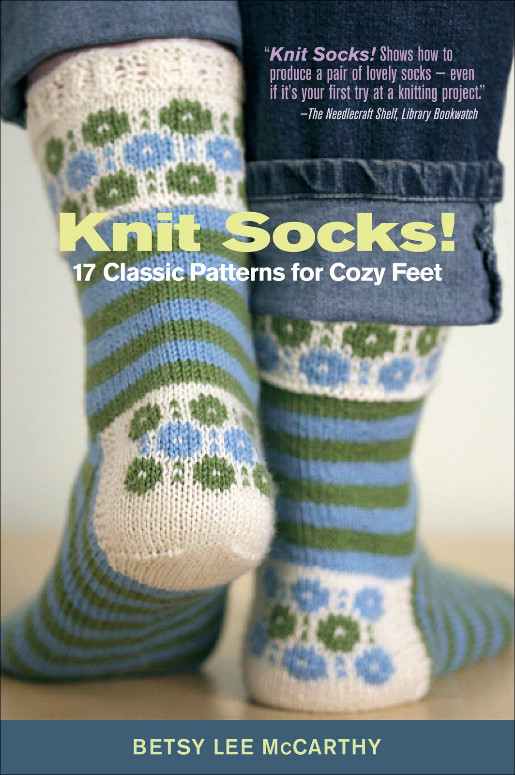
Table of Contents


Product Description
Knitters love to make socks. Socks are practical and pretty, cozy and colorful. Sock projects are easily carried in a knitting bag, and the patterns are complex enough to be interesting but small enough to be quickly finished. Plus, socks are always fun to wear and great to give as gifts.
Now Knit Socks!, the little die-cut hardcover that sold more than 65,000 copies, is available in a paperback edition that includes two all-new sock patterns. But that’s not all. Sock knitters will find much more in this revision to feed their sock addictions, such as helpful new advice on choosing sock yarns what feels the best, what holds its shape, what really lasts.
And what is a knitter to do if a pattern looks interesting, but she wants to substitute a lighter yarn for the chunky, warm wool specified? A new chart provides alternative yarn weights and the corresponding number of stitches needed for each of the patterns and sizes. Knitters might also want to experiment with two circular needles. Or four double points. There’s advice here for adapting any pattern to any type of needle.
With all the variations and possibilities, Knit Socks! goes far beyond its 17 patterns. Creative knitters will find an endless array of exciting options for keeping feet comfortable, warm, and beautiful.
From the Back Cover
Practical and Pretty, Cozy and Colorful
With the friendly instruction of knitting teacher Betsy Lee McCarthy, you can produce a pair of beautiful socks on your first try. Covering everything from choosing yarns to adapting patterns to any type of needle, Knit Socks! gives stitchers the confidence to get started and the skills to tackle more challenging projects. Wear them yourself or give them as gifts; handmade socks never go out of style.
“Knit Socks! shows how to produce a pair of lovely socks – even if it’s your first try at a knitting project.” — The Needlecraft Shelf, Library Bookwatch